The post Mushroom Bolognese appeared first on Your Allergy Chefs.
]]>
free of gluten and the top 9 allergens
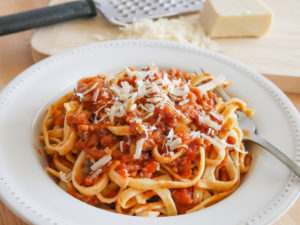
This rich-tasting Bolognese sauce is loaded with veggies. Onions, celery, carrots, and mushrooms are simmered with garlic, tomato sauce, red wine, chickpeas, and a few seasonings before being transformed into an intensely flavorful and healthy sauce.
It’s perfect for serving over your favorite pasta, polenta, or even zucchini noodles.
So delicious and hearty, we know you won’t miss the beef…
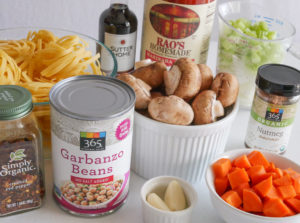
mise en place
Cook up whatever kind of pasta you have onhand.
While in Italy just before the Covid-19 pandemic, we picked up some amazing allergy-friendly tagliatelle. It shouldn’t be a surprise that Italy makes some of the best gluten-free pasta. It was perfect with this sauce. Spaghetti, rigatoni, or any other pasta will be just as delicious. We also like Andean Dream Organic Quinoa Pastas.
Step 1
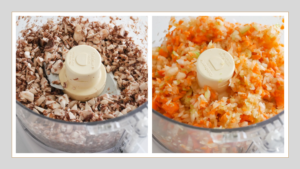
In a food processor, pulse mushrooms in two batches, 7 – 10 pulses each, scraping down the sides of the bowl as needed. See processed mushrooms in the photo below on the left. Set the work bowl aside…no need to clean it yet.
Heat oil in a medium saucepan over medium heat. Add mushrooms and cook, stirring occasionally, about 6 -8 minutes.
Step 2
While mushrooms cook, combine chopped onions, chopped celery, and chopped carrots. Place in work bowl of food processor and pulse in two batches, 7-10 pulses each batch, scraping down the sides of the bowl as needed. See the photo below on the right of the processed veggies. Transfer to the pan with mushrooms and cook for 5 minutes.
Step 3
Pulse chickpeas in food processor until chopped into 1/4-inch pieces, about 7-10 pulses. You do want a chunky texture. Set chickpeas aside.
Step 4
Add garlic and red pepper flakes to vegetable mixture and cook for 30 seconds. Pour red wine into saucepan and cook until wine is evaporated by about half. Add chickpeas, purchased marinara or homemade tomato sauce, and a little sugar. Bring to a boil. Cover and reduce heat to medium-low. Simmer for 10-15 minutes, stirring occasionally. Stir in a little nutmeg.
The sauce should be rather thick. However, if you feel it is too thick, add 1/4 cup of veggie broth or water.
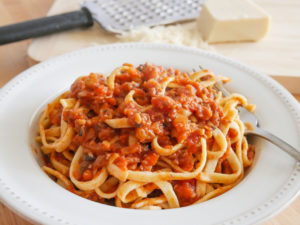
Spoon mushroom Bolognese over your favorite cooked pasta. If desired, garnish with grated allergy-friendly parmesan cheese, such as Violife Just Like Parmesan.
Enjoy!
Mushroom Bolognese
Yield 6 Servings
Free of: gluten and top 9 allergens.
You won’t miss the beef!
Ingredients
12 ounces cremini mushrooms, cleaned, trimmed, and quartered
1 tbsp vegetable oil
1-1/4 cups coarsely chopped onion
3/4 cup coarsely chopped celery
3/4 cup coarsely chopped carrots
1 (15-ounce) can chickpeas, drained and rinsed
1 tbsp minced garlic
1/4 – 1/2 tsp red pepper flakes
1/2 cup dry red wine
1 (32-ounce) jar marinara, such as Rao’s -or- our 4 cups of homemade Tomato Sauce
1 tsp sugar
1/4 tsp ground nutmeg
1 pound allergy-friendly spaghetti, tagliatelle, or pasta of choice, cooked according to package directions
1/2 cup grated allergy-friendly parmesan cheese, such as Violife Just Like Parmesan
Instructions
- Pulse mushrooms in two batches in a food processor, 7 to 10 pulses each, scraping down sides of bowl as needed. It is not necessary to clean workbowl.
- Heat oil in Dutch oven or medium saucepan over medium heat. Add mushrooms and cook, stirring occasionally, about 6-8 minutes.
- While mushrooms cook, combine onion, celery, and carrots. Pulse in two batches, 7 to 10 pulses each batch, scraping down sides of bowl as needed. Transfer to the pan with mushrooms and cook for 5 minutes. Pulse chickpeas in food processor until chopped into ¼-inch pieces, 7 to 10 pulses. Set aside.
- Add garlic and red pepper flakes to vegetable mixture; cook for 30 seconds. We like to use ½ tsp of red pepper flakes. However, if you don’t like it too spicy, use ¼ tsp.
- Pour in red wine and cook until wine is evaporated by about half.
- Add chickpeas, marinara, and sugar. Bring to a boil. Cover and reduce heat to medium-low. Simmer for 10-15 minutes, stirring occasionally. Add nutmeg.
- The sauce should be rather thick. However, if you feel it is too thick, add ¼ cup of veggie broth or water. This recipe yields 6-1/2 cups of sauce.
- To serve with pasta, spoon sauce over your pasta and garnish with parmesan cheese, if desired. Enjoy!
Courses Mains
The post Mushroom Bolognese appeared first on Your Allergy Chefs.
]]>The post Raspberry Thumbprints appeared first on Your Allergy Chefs.
]]>
free of gluten and top 8 allergens
‘Tis the season for cookies!
This past week we received an email from Amber asking for a raspberry thumbprint recipe for a gluten-free cookie swap party she’s attending this coming week.
Here you are Amber! These raspberry thumbprints are a holiday favorite, easy to make, and easy to customize with a variety of fillings.
They are indeed melt-in-your-mouth, sugary bites of bliss!
Called by many different names including Polish Tea Cakes and Hallongrotta (which means “Raspberry Cave” in Swedish), the origin of the cookie is still heavily disputed. Was it Poland, Sweden, or East Europe?
But one thing’s for sure…the name comes from the way this cookie is made. They’re rolled into a ball and an indentation is made in the center with one’s thumb for the jam filling.
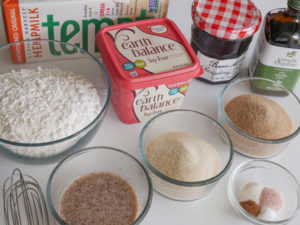
mise en place
Making the Dough
- Whisk together your favorite gluten-free flour blend, xanthan gum (omit if your blend contains xanthan gum), salt, baking soda, and ground cinnamon. Set aside.
- Make a flax egg by whisking together flaxseed meal and water. Allow to sit for 5 minutes.
- With the paddle attachment of a stand mixer, beat vegan buttery spread (such as Earth Balance Natural Buttery Spread, Soy Free) on medium until creamy for 20-30 seconds. Add granulated and brown sugars and beat until incorporated, about 30 seconds, scraping down the sides of the bowl as needed.
- Return to the flax egg and vigorously whisk. Gradually add flax egg and vanilla extract to creamed mixture and mix just until combined.
- Add half of the flour mixture and mix on low for 5-10 seconds. Add the remaining flour mixture and mix just until combined and a dough forms, about 30 seconds. Depending on the flour blend you are using, you may need to add a little alternative milk. Not all flours hydrate at the same rate. If your dough is crumbly, add alternative milk a teaspoon at a time, mixing by hand.
Let’s Get Thumbprinting
- Portion the cookie dough with a scoop, also known in the industry as a disher. We use a #40 scoop, which is usually identified by a purple handle or some portion of the handle being purple. The portion is equivalent to a heaping tablespoon.
- Roll each scoop into a smooth ball.
- Roll the ball into cinnamon-sugar. We find the easiest and neatest way is to put the cinnamon-sugar in a ziploc bag and add the dough balls one by one, tossing to coat in the mixture.
- Place the cookie ball on a baking sheet lined with parchment paper or a silpat. Do not flatten.
- Use your thumb to form an indentation in the middle of the cookie, gently pressing about 1/2 way in.

- Once the tray is filled with cookies, fill the wells with jam. We like to use a pastry piping bag. However, if you don’t have piping bags, a ziploc bag will work just fine. Place jam in the ziploc. Cut one of the bottom corners to make a small hole and pipe the jam into the wells, securing the open end so the jam does not spill out.

- Bake in a preheated oven at 375°F for approximately 14-16 minutes. The bottom of the cookie should be lightly golden.

Thumbprint cookies are a treat that can be made with so many fillings, from raspberry to apricot jam and from caramel to chocolate.
Chef Mary’s Tip
Be sure not to overmix the buttery spread. Overmixing will warm the spread, causing the finished dough to be too soft.
We made 4 batches experimenting with mix times and amounts of sugar. We’re giving you our best batch.
Creaming butter and sugar is a method of mechanical leavening for many cookies and cakes. During the creaming process, small air cells are whipped into the butter/sugar mixture and expand when baked, causing the product to rise. The properties in the buttery spread are not the same as butter, so we’re not able to mix in the same fashion.
Nonetheless, these cookies rival the best of the thumbprint cookies that are made with butter, eggs, and wheat flour!
For another fabulous holiday cookie, try our Pumpkin Chocolate Chip Drops!
Your Allergy Chefs are participants in the Amazon Associates Program, an affiliate advertising program designed to provide a means for sites to earn advertising fees by advertising and linking to Amazon.
Raspberry Thumbprints
Yield 18-20 Cookies
Free of: gluten and top 8 allergens.
Melt-in-your-mouth, sugary bites of bliss!
Ingredients
Cinnamon-Sugar
1/2 cup granulated sugar
2 tsp ground cinnamon
Dough
1 tbsp ground flaxseed meal
3 tbsp lukewarm water
2 cups gluten-free all-purpose flour blend
1/2 tsp xanthan gum (omit if your flour blend contains xanthan gum)
1/2 tsp sea salt
1/4 tsp baking soda
1/4 tsp ground cinnamon
1/3 cup vegan buttery spread, such as Earth Balance Natural Buttery Spread, Soy Free
1/2 cup granulated sugar
1/4 cup light brown sugar, lightly packed
1 tsp pure vanilla extract
2 tbsp alternative milk, such as unsweetened hemp milk, if needed
Filling
1/3 cup raspberry jam
Instructions
- Preheat oven to 375-degrees F.
- To make the cinnamon-sugar, in a small bowl or ziploc bag, combine 1/2 cup granulated sugar and 2 teaspoons ground cinnamon. Mix well and set cinnamon-sugar aside.
- Make the flax egg by whisking together flaxseed meal and water in a small bowl. Set aside for 5 minutes.
- In a medium bowl whisk together flour blend, xanthan gum, salt, baking soda, and ground cinnamon. Set aside.
- In the bowl of a stand mixer, using the paddle attachment, beat vegan buttery spread on medium until creamy for 20-30 seconds. Add granulated sugar and brown sugar and beat until incorporated, about 30 seconds, scraping down the sides of the bowl as needed. Be sure not to overmix the buttery spread. Overmixing will warm the spread, causing the finished dough to be too soft.
- Return to flax egg and whisk vigorously. Gradually add flax egg and vanilla to creamed mixture and mix just until combined.
- Add half of the flour mixture and mix on low for 5-10 seconds. Add the remaining flour mixture and mix just until combined and a dough forms, about 30 seconds. Depending on the flour blend you are using, you may need to add a little alternative milk. Not all flours hydrate at the same rate. If your dough is dry and crumbly, add alternative milk a teaspoon at a time, mixing by hand.
- Portion the cookie dough with a scoop, also known in the industry as a disher. We use a #40 scoop, which is usually identified by a purple handle or some portion of the handle being purple. The portion is equivalent to a heaping tablespoon.
- Roll each scoop into a smooth ball. Roll the balls in cinnamon-sugar. We find the easiest and neatest way is to put the cinnamon-sugar in a ziploc bag and add the dough balls one by one, tossing to coat.
- Place the cookie balls on a baking sheet lined with parchment paper or a silpat, spacing them 2-inches apart. Do not flatten.
- Use your thumb to form an indentation in the middle of the cookie, gently pressing about 1/2 way in.
- Once the tray is filled with cookies, fill each well with 1/2 teaspoon of jam. A small spoon will do the job. However, we find that piping the jam is super quick. If you don’t have a decorating or pastry bag, place jam in a ziploc bag. Cut one of the bottom corners to make a small hole and pipe the jam into the wells, securing the open end so the jam does not spill out. Do not use jelly, as jellies tend to melt.
- Bake for approximately 14-16 minutes. The bottom of the cookies should be lightly golden.
Notes
- There’s nothing wrong with a few cracks along the edges of a thumbprint. After all, that’s part of the charm. However, the dough cracks less if you make the indentation after rolling the balls in batches of 6, instead of rolling them all first.
- Adding too much milk or beating the buttery spread too long will cause the dough to be too soft to handle. If your dough is too soft, chill for an hour in the fridge. The cookies may still spread more than normal.
- The cookies can be kept at room temperature for about 3 days before they start to lose their luster.
Courses Sweets
The post Raspberry Thumbprints appeared first on Your Allergy Chefs.
]]>The post Roasted Peach Shortcakes appeared first on Your Allergy Chefs.
]]>
plant-based, free of gluten and top 8 allergens
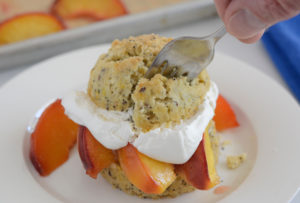
Few desserts say summer like these roasted peach shortcakes. Our version gets an upgrade with three-seed biscuits.
These hearty, golden biscuits provide a delicious platform for peak-season fruit and fluffy dollops of allergy-friendly whipped topping.
Check out this unforgettable summer dessert!
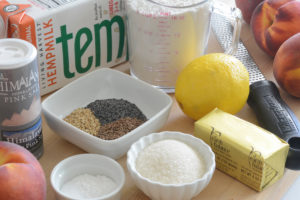
mise en place
Three-Seed Biscuits
In a large bowl, sift together gluten-free all-purpose flour, baking powder, xanthan gum, and baking soda. Add organic cane sugar (granulated), poppy seeds, sesame seeds, flax seeds, lemon zest, and salt. Whisk to combine.
Cut in the margarine.
Trick for Cutting Butter or Margarine into Flour
The usual way to cut butter or margarine into flour is to cut the cold butter into small pieces. These pieces are tossed with the flour mixture until coated. The butter is then worked into the dry ingredients with a pastry cutter or by pinching and rubbing small pieces between your fingers until they are pea sized.
These small, uneven pieces of unincorporated butter create steam pockets as the biscuits bake, resulting in a tender, flaky product.
This is a great way to cut the butter into the flour. However, we have another way that is super quick and easy.
Take a stick of allergy-friendly margarine (we like Earth Balance Soy Free Buttery Sticks) and place in the freezer for an hour or two.
Remove the margarine from the freezer, grate half of it into the flour and toss together. Then grate the remaining margarine into the flour and toss well, breaking up any large clumps with your fingers. Work fast so the margarine doesn’t warm up.
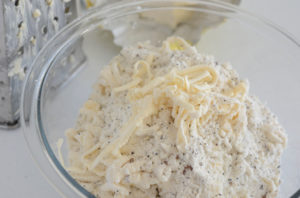
Once the margarine shreds are worked with fingers into the flour to the size of peas, gently stir in chilled unsweetened hemp milk, just until combined.
Line a baking sheet with a silpat and portion the dough into rings (3-inches in diameter by 1 3/4-inches tall) using a green (#12) portion scoop (also know as a disher).
If you don’t have rings, don’t worry. Use a portion scoop or a 1/3-cup measuring cup to mound balls of dough onto prepared baking sheet.
Bake the biscuits for about 18-20 minutes in an oven preheated to 400-degrees F.
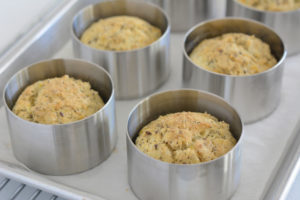
We made 2 batches, one with xanthan gum and one without xanthan gum. The batch without the xanthan gum had a texture that was too crumbly, so we suggest not leaving out the xanthan gum. We also used King Arthur Flour’s Gluten Free All-Purpose Flour.
Just like most baked goods, even those containing gluten, these biscuits are best the same day they are made.
At Walt Disney World, baked goods were baked fresh daily. We even baked some items fresh every couple of hours.
Peachy Keen
Take 4 large peaches, pit and cut into 1/2-inch slices. Toss with pure maple syrup and a little olive oil.
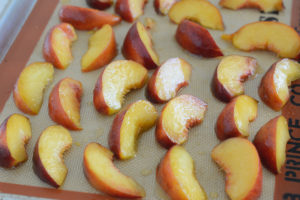
Place in the oven and roast at 425-degrees F for about 12-15 minutes, until peaches are soft but not mushy.
Allow the peaches to cool…or not! Wouldn’t the shortcakes be great with warm peaches and vanilla or caramel ice cream alternative? We think so!
Roasting?
Roasting peaches takes the tart edge off and intensifies their flavor. This is especially helpful if peaches are not at the peak of perfection.
However, if you have perfectly ripe peaches, you don’t have to roast them. Just pit and slice ’em up, tossing with a tablespoon of sugar and a squeeze (about a tablespoon) of fresh lemon juice. Refrigerate for 30 minutes or up to an hour before assembling.
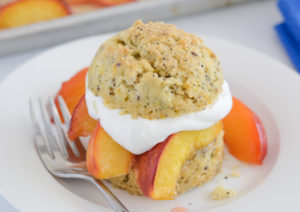
Now for the fun! Split biscuits. Place bottom halves on serving plates and top with peaches and allergy-friendly whipped topping. Replace shortcake tops and enjoy these roasted peach shortcakes!
Roasted Peach Shortcakes
Yield 8 Servings
Free of: gluten and top 8 allergens.
An unforgettable summer dessert!
Ingredients
Biscuits
2 cups all-purpose gluten-free flour blend
2 tsp baking powder
1/2 tsp xanthan gum (omit if using a flour blend with xanthan)
1/2 tsp baking soda
3 tbsp granulated organic cane sugar
1 tbsp poppy seeds
1 tbsp toasted sesame seeds
1 tbsp flax seeds
1 tbsp lemon zest (zest from one lemon)
1 tsp fine sea salt
8 tbsp allergy-friendly margarine (placed in freezer for 1-2 hours), such as Earth Balance Soy Free Buttery Sticks
1 cup unsweetened hemp milk, chilled
Peaches
4 large peaches
2 tbsp pure maple syrup
2 tbsp olive oil
Instructions
- For the biscuits, preheat the oven to 400-degrees F.
- In a large bowl, sift together the flour, baking powder, xanthan gum, and baking soda. Add sugar, poppy seeds, sesame seeds, flax seeds, lemon zest, and salt. Whisk to combine.
- Remove margarine from the freezer. Grate half of the margarine into the flour. Toss together. Grate remaining margarine into the flour and toss well, breaking up any large clumps.
- If you don’t have a box grater, cut the cold margarine into small pieces and work into the flour mixture with your fingers or a pastry cutter to the size of peas.
- Working fast, so the margarine doesn’t warm up, stir in the milk until incorporated. Line a baking sheet with a silpat or parchment paper and portion the dough into rings (3-inches in diameter by 1 3/4-inches tall) using a green (#12) portion scoop.
- If you don’t have rings, don’t worry. Use a portion scoop or a 1/3-cup measuring cup to mound balls of dough onto prepared baking sheet. If desired, sprinkle lightly with demerara sugar.
- Bake about 18-20 minutes or until done. Cooking time will depend on thickness of the biscuit.
- Remove from oven and set aside to cool.
- For the peaches, preheat oven to 425-degrees F. Pit and cut peaches into 1/2-inch slices. In a medium bowl, gently toss peaches with maple syrup and olive oil.
- Arrange peach slices in a single layer on a baking sheet lined with parchment paper or a silpat. Bake for 12-15 minutes, until peaches are soft but not mushy. Remove from oven and let cool.
- To assemble dessert, split biscuits. Place bottom halves on serving plates; top with peaches and allergy-friendly whipped topping. Replace shortcake tops.
Notes
Roasting peaches takes the tart edge off and intensifies their flavor. This is especially helpful if peaches are not at the peak of perfection.
However, if you have the perfectly ripe peaches, you don’t have to roast them. Just pit and slice ’em up, tossing with a tablespoon of sugar and a squeeze (about a tablespoon) of fresh lemon juice. Refrigerate for 30 minutes or up to an hour before assembling.
Courses Sweets
The post Roasted Peach Shortcakes appeared first on Your Allergy Chefs.
]]>The post Southwest Sorghum Cobb Salad appeared first on Your Allergy Chefs.
]]>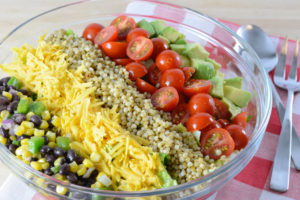
Our twist on the Cobb showcases sorghum and Southwestern flavors with a black bean corn relish, cheddar shreds, tomatoes, avocados, and a simple cilantro vinaigrette.
We first developed this salad for Bob’s Red Mill blog and are excited to share it with you.
Cobb…the salad to rule all salads!
Many stories exist recounting how the Cobb salad was invented. One says it came about in the 1930s when Robert Cobb, manager of the original Brown Derby in Hollywood, created it. The salad became a staple at the Brown Derby, and eventually an American classic.
See how we’ve changed up this classic…
Once you have your mise en place (everything ready), place chopped romaine in a large bowl or divide between four large salad bowls.
Place cooked sorghum on top of the lettuce forming a row down the middle. In strips on either side of the sorghum place black bean relish, cheese, cherry tomatoes, and avocados over the greens.
Drizzle cilantro vinaigrette, or your favorite dressing, over the salad. Toss to combine. Garnish with corn chips (optional) and enjoy.

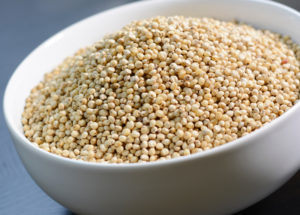
Sorghum Thrives
One of the growing commercial uses in the U.S. for sorghum is in gluten free flour blends. Sorghum best imitates wheat in texture and taste. Flour blends that contain sorghum flour are outperforming the blends from the early days of gluten-free baking.
Sorghum has a lot more going on than just being gluten free. This easy to grow, drought tolerant crop is environmentally friendly.
Sorghum retains the majority of its nutrients since it doesn’t have an inedible hull like many other grains.
Chef Joel’s Tip
Different manufacturers give varying ratios of sorghum to water when cooking. We like to use a ratio of one cup whole grain sorghum to four cups of water, because of the long cooking time. Besides, any excess liquid is drained at the end of the cooking process.
- Start by rinsing the sorghum and placing in a pot with the water. Avoid using a large pot if cooking small amounts, as water will evaporate quickly. Bring to a boil, reduce heat to a simmer and cook until grains are tender and still chewy. This takes a good hour. Taste at the end of the cooking process to make sure it’s done. And finally, drain excess liquid. One cup of dry whole grain sorghum yields approximately 2-1/2 cups cooked.
We love cooking with sorghum and are excited to share one of our favorite grains, which packs a healthy punch.
For other delicious sorghum dishes, try our Greek Sorghum Salad and one of my very favorites, Thai Sorghum Bowl.
Spice up your meals with sorghum, a crop with a great future in food!
Southwest Sorghum Cobb Salad
Yield 4 Servings
Free of: gluten and top 8 allergens.
A twist on the Cobb that features sorghum and Southwestern flavors!
Ingredients
Cilantro Vinaigrette
1/4 cup fresh lime juice
1/4 cup firmly packed cilantro leaves
2 tbsp jalapeno pepper, seeded and coarsely chopped
2 tsp balsamic vinegar
1 tsp minced garlic
3/4 tsp minced fresh ginger
1/2 tsp kosher or sea salt
1/3 cup honey
1/2 cup extra-virgin olive oil
Black Bean and Corn Relish
1 1/2 cups fresh or frozen corn kernels, thawed
1 (15-ounce) can black beans, drained and rinsed
3/4 cup diced green bell pepper
1/2 cup diced red onion, soaked in ice water for 15 minutes and drained (see recipe notes)
2 tbsp fresh lime juice
2 tbsp olive oil
2 tsp jalapeno or poblano pepper, seeded and minced
1 tsp ground cumin
1 tsp chopped fresh oregano
1 tsp kosher or sea salt
1/2 tsp minced garlic
1/2 tsp ground chili powder
Salad
1 package of 3 romaine hearts, trimmed, washed, and chopped
1 cup dry whole grain sorghum, rinsed, cooked, drained and cooled (see recipe notes)
2 cups black bean corn relish (recipe above)
2 cups cheddar style shreds, such as Daiya
1 pint cherry tomatoes, halved
2 avocados, diced
1 cup cilantro vinaigrette (recipe above)
2 cups corn chips (optional)
Instructions
- For the cilantro vinaigrette, place lime juice, cilantro, pepper, vinegar, garlic, ginger, salt, and honey into a food processor or blender. Pulse a couple of times to blend.
- Turn the food processor or blender on low speed and drizzle in olive oil until incorporated. Transfer to a sealed container and refrigerate. Makes 1 cup.
- For the black bean and corn relish, combine corn, beans, bell pepper, onion, lime juice, olive oil, jalapeño, cumin, oregano, salt, garlic, and chili powder in a medium bowl. Toss well. Store in refrigerator until ready to use. Heads up, you will only need about half of this for the salad.
- For the salad, divide the romaine between one large bowl or four large salad bowls.
- Place cooked sorghum on top of the romaine forming a row down the center. In strips on either side of the sorghum place the black bean relish, cheese, tomatoes, and avocados over the greens.
- Drizzle cilantro vinaigrette or your favorite dressing over the salad. Toss to combine.
- Garnish with corn chips, if desired. Enjoy!
Notes
- Soaking red onions in ice water mellows out their flavor. The sulfur compounds which cause the harsh flavor and powerful aftertaste dissipates into the cold water.
- One cup of uncooked sorghum yields approximately 2-1/2 cups cooked.
Courses Soups & Salads
The post Southwest Sorghum Cobb Salad appeared first on Your Allergy Chefs.
]]>The post Beef Stew appeared first on Your Allergy Chefs.
]]>
Beef, onion, carrots, potatoes and red wine come together in cozy harmony.
This beef stew will have you craving leftovers. It’s the easy dish that keeps on giving.
For meatless Monday and for our vegan friends we share a recipe for beefless stew, where mushrooms stand in for the beef…my favorite!

mise en place
Chef Joel’s Tips
Stew is the ideal time to take advantage of the less expensive, tougher cuts. The long slow cook time leaves lean meat, like sirloin, tough and chewy, while tougher cuts of meat break down and become really tender.
Chuck meat is a great choice for beef stew. For really tender meat, cook low and slow. Stews when cooking should only simmer, as boiling will cause the meat to be tough.
Searing the meat is an important step for making great beef stew. This is where the stew starts to build its rich flavors.
Add vegetables like carrots and potatoes during the last 20 or 30 minutes of cooking. Cutting the vegetables into uniform shapes and sizes ensures even cooking. Delicate vegetables, like peas should be added a couple minutes before taking the stew off the heat.
Jazz Up Leftovers
Place leftover stew in small casserole or baking dishes. Cover with pie crust or dumplings, and bake.
Plant Based, Low Sodium and Oil Free Beefless Stew

beefless stew
Beefless Stew
Ingredients
2 medium white or yellow onions, cut into 3/4-inch pieces ( 3 cups)
2 ribs celery, sliced into 3/4-inch pieces (1 cup)
8 ounces button mushrooms, trimmed, cleaned and cut into halves and quarters
8 ounces portobello mushrooms, trimmed, cleaned and cut into 3/4-inch pieces
1 tbsp finely chopped garlic
1 tbsp dried Italian herb seasoning
1 tbsp smoked paprika
1 tsp finely chopped fresh rosemary
1/2 cup red wine
1/3 cup tomato paste
5 cups low sodium vegetable broth
2 pounds red potatoes, cut into 1-inch chunks (about 6 cups)
2-3 medium carrots, cut into 3/4-inch pieces (2 cups)
1 1/2 cups frozen peas, thawed and drained
1/4 cup Italian parsley, chopped
Method
- Heat 1 tablespoon water in a large heavy pot over medium-high heat. When the water starts to sputter, add the onions and celery. Cook, stirring frequently, for about 5 minutes, adding a tablespoon of water as needed.
- Stir in mushrooms (about 5 cups) and garlic, continue to cook while stirring for 5 minutes, adding a tablespoon of water at the beginning, if needed.
- Add Italian herb seasoning, smoked paprika, and rosemary. Stir for 1 minute. Add wine and deglaze any brown spots in your pan, reducing wine by half.
- Add tomato paste. Add broth, potatoes and carrots. Bring to a boil over medium-high heat. Reduce heat to medium-low. Cover and cook for 25-30 minutes, or until the potatoes and carrots are tender, stirring occasionally.
- Place 2 cups of stew (broth and veggies) in a high speed blender and blend until smooth. Stir back into the pot to thicken the stew.
- Stir in peas and parsley and heat for 2 minutes. Remove from heat.

Whether you’re a carnivore or a plant pusher, enjoy stew your way!
Beef Stew
Yield 6-8 Servings
Free of: gluten and top 8 allergens.
Beef, onions, carrots, potatoes and red wine come together in cozy harmony.
Ingredients
1 pound beef chuck, boneless and trimmed of fat
2 tbsp vegetable oil
2 medium white or yellow onions, chopped into 3/4-inch pieces (about 3 cups)
2 tbsp garbanzo bean flour
1 tbsp minced garlic
1 tbsp dried Italian herb seasoning
1 tbsp smoked paprika
1 tsp finely chopped fresh rosemary
1/2 cup red wine
1/3 cup tomato paste
5 cups low sodium vegetable broth
2 large ribs celery, sliced into 3/4-inch pieces (about 1 cup)
1 pound red potatoes, peeled and cut into 1-inch cubes (about 4 cups)
3 medium carrots, sliced lengthwise and cut into 3/4-inch pieces (2 cups)
2 tbsp cornstarch
2 tbsp cold water
1 1/2 cups frozen peas, thawed and drained
1/4 cup Italian parsley, chopped
Instructions
- Cut meat into 1-inch cubes.
- Heat a large heavy pot over medium-high heat. When hot add the oil. Add the meat and brown well, stirring occasionally to brown on all sides. If necessary, brown the meat in two batches to avoid overcrowding the pan.
- To all the meat in the pan, add onions and continue to cook until lightly browned, about 5 minutes.
- Add the flour and stir to make a roux. Brown the roux lightly for several minutes.
- Add garlic, Italian herb seasoning, smoked paprika, and rosemary. Stir and cook for 1 minute. Add wine and deglaze, reducing wine by about half.
- Add tomato paste, broth and celery. Bring to a boil. Reduce heat to medium-low and cover. Gently simmer for 1 1/2 hours, stirring occasionally. Degrease by skimming off the fat.
- Add potatoes and carrots. Increase heat to medium-high and bring to a boil. Reduce heat to medium-low. Cover and cook for 25-30 minutes, or until the potatoes and carrots are tender, stirring occasionally.
- In a small bowl combine the cornstarch and water. Add cornstarch slurry to stew. Stir and cook for 2 minutes. Stir in peas and parsley and heat for 2 minutes. Remove from heat.
Courses Mains
The post Beef Stew appeared first on Your Allergy Chefs.
]]>The post Teriyaki Chicken Plate Lunch appeared first on Your Allergy Chefs.
]]>
free of gluten and top 8 allergens
With it’s roots in the Japanese bento, the plate lunch is a staple in Hawaii.
So what is a plate lunch? Similar to the South’s meat-and-three, there are a variety of proteins to choose from. However, what’s always on the plate is macaroni salad and two scoops rice.
Our teriyaki sauce is great with anything teriyaki, including our veggie option…
The origin of the plate lunch dates back to the 1800s, where it became a popular lunch for plantation workers on the booming pineapple and sugar plantations.
Many of these plantation workers were immigrants from other countries such as Japan, China, the Philippines, Korea, and Portugal. With them, they brought various dishes from their homeland.
Along with many Hawaiian dishes on the plate lunch menu, there are a diverse number of others, including chicken or pork katsu, char sui chicken, teriyaki salmon (chicken or beef), and pork adobo.
We’re recreating one of the most popular, chicken teriyaki.
Replacing Soy Sauce
Of course when we think of teriyaki sauce, we automatically relate it to shoyu or soy sauce.
Coconut aminos is the perfect replacement for soy sauce, containing just 2 ingredients, organic coconut tree sap and organic sea salt.
Although naturally sweet, coconut aminos is low on the glycemic index scale, so it won’t spike your blood sugar. It’s also contains 73% less sodium than soy sauce. If that’s not enough, it’s organic, gluten-free, non-GMO, contains no MSG, and it’s vegan!
Coconut Aminos makes this teriyaki sauce a no-brainer.
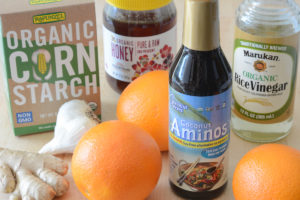
mise en place
Making the Teriyaki Sauce
In a small saucepan, combine coconut aminos, orange juice, rice vinegar, honey, minced ginger, and minced garlic. Reserve 1/2 cup for marinating chicken thighs.
Place chicken thighs and reserved sauce in a large zip lock bag. Seal and marinate in the fridge for 8 hours.
While the chicken is marinating, bring the ingredients in saucepan to a boil over high heat. Reduce heat to medium and simmer for 10 minutes.
Combine cornstarch and water, stirring to form a smooth paste. Whisk the cornstarch slurry into the simmering sauce, whisking constantly for 2 minutes.
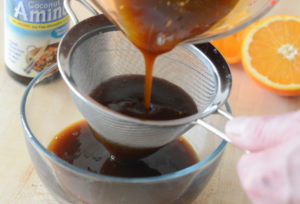
Strain the teriyaki sauce into a bowl. Allow to cool and refrigerate until needed. This will yield about 1-1/2 cups of sauce, with enough leftover to enjoy later in the week on your favorite burger or in a stir-fry.
The Chicken
Take marinated chicken out of the fridge 20 minutes before cooking, to let it warm up a bit. Drain well.
Preheat oven to 350-degrees F. Heat a large non-stick skillet over medium-high heat. Add chicken thighs, smooth side down and sear for about 1 minute, until golden brown. Flip over for another minute to brown the other side.
Transfer chicken to a parchment or foil lined baking sheet. Bake until internal temperature reaches 165-degrees F, about 10 minutes. To test for doneness, use an instant read meat thermometer inserted into the center of the thickest part of the thigh.
Remove chicken from oven. Cover loosely with foil and allow chicken to rest for 5-10 minutes.
Chef Joel’s Tip
Resting meat ensures it is moist, tender and juicy. When meat is cooked, the proteins push the meat’s juices to the center of the meat. Resting allows the juices to redistribute throughout the meat and be reabsorbed so when you eat the meat it will be juicier and tastier.
The Rice
Plate lunch or sushi = calrose rice.
Calrose rice is known for its short pearly white grains and sticky texture. If you must, you can certainly replace calrose with brown rice. However, any local would tell you da rice gotta be sticky, brah.

The Macaroni Salad
In Hawaii, macaroni salad is king. You won’t find a plate lunch without it.
We’ve chosen a mac salad variation with potatoes. Click here for our potato-mac salad recipe.
Let’s Eat!
On each plate, place two scoops rice, one scoop potato-mac salad, and chicken. Serve with warm teriyaki sauce on the side.

Make Mine Veggie
Make mine veggie with teriyaki portobello mushrooms! Following this recipe for teriyaki chicken, simply replace the chicken thighs with 4 portobello mushrooms and omit the marinating.
Cut the stems off the mushrooms and scrape out the gills. Pour 1/2 cup teriyaki sauce, or more as needed, into a small bowl. Slide a portobello into the sauce with the underside facing up. Spoon sauce over the mushroom, coating the entire mushroom. Place the mushroom on a parchment lined baking sheet, underside facing up. Repeat with remaining mushrooms.
Bake at 375-degrees F for about 15 minutes or until mushrooms reach desired tenderness. Slice and serve with rice and potato-mac salad.
Now it’s time fo grind!
Teriyaki Chicken Plate Lunch
Yield 4 Servings
Free of: gluten and top 8 allergens.
There’s no better way to indulge than with a teriyaki chicken plate lunch.
Ingredients
1 cup fresh orange juice or pineapple juice, or a combination of
3/4 cup coconut aminos
1/4 cup mirin or rice vinegar
1/4 cup honey or organic cane sugar
1 tbsp minced ginger
1 tbsp minced garlic
1-1/2 tbsp cornstarch
1/4 cup water
4 large boneless, skinless chicken thighs (about 1 pound)
8 scoops calrose rice, cooked according to package directions
4 scoops Potato-mac salad
Instructions
- In a small saucepan, combine orange juice, coconut aminos, mirin, honey, ginger, and garlic. Reserve 1/2 cup for marinating chicken thighs.
- Place chicken and reserved sauce in a large zip lock bag. Seal and marinate in the fridge for 8 hours.
- While the chicken is marinating, bring the ingredients in saucepan to a boil over high heat. Reduce heat to medium and simmer for 5 minutes, stirring occasionally.
- Combine cornstarch and water in a small bowl; stir until smooth paste forms. Whisk the cornstarch slurry into the simmering sauce, whisking constantly for 2 minutes.
- Strain the teriyaki sauce into a bowl. Allow to cool and refrigerate until needed. This will yield about one and a half cups of sauce. Warm up right before serving.
- Take marinated chicken out of the fridge 20 minutes before cooking, to let it warm up. Drain well.
- Preheat oven to 350-degrees F. Heat a large non-stick skillet over medium-high heat. Add chicken thighs, smooth side down and sear for about 1 minute, until golden brown. Flip over for another minute to brown the other side.
- Transfer chicken to a parchment or foil lined baking sheet. Bake until internal temperature reaches 165-degrees F, about 8-10 minutes. To test for doneness, use an instant read meat thermometer inserted into the center of the thickest part of the thigh.
- Remove chicken from oven. Cover loosely with foil and allow chicken to rest for 5-10 minutes.
- To serve: on each plate, place 2 scoops rice, one scoop potato-mac salad, and chicken. Serve with warm teriyaki sauce on the side.
Notes
Make Mine Veggie!
Make mine veggie with teriyaki portobello mushrooms! Following this recipe for teriyaki chicken, simply replace the chicken thighs with 4 portobello mushrooms and omit the marinating.
Cut the stems off the mushrooms and scrape out the gills. Pour 1/2 cup teriyaki sauce into a small bowl. Slide a portobello into the sauce with the underside facing up. Spoon sauce over the mushroom, coating the entire mushroom. Place the mushroom on a parchment lined baking sheet, underside facing up. Repeat with remaining mushrooms.
Bake at 375-degrees F for about 15 minutes or until mushrooms reach desired tenderness. Slice and serve with rice and potato-mac salad.
Courses Mains
The post Teriyaki Chicken Plate Lunch appeared first on Your Allergy Chefs.
]]>The post Salted Chocolate Popcorn appeared first on Your Allergy Chefs.
]]>
free from gluten and the top 8 food allergens
Kick up your Valentine’s Day with salted chocolate popcorn made with just 3 ingredients.
Compared to most snack foods, popcorn is low in calories. Besides, what’s not to love? Chocolate and popcorn. Bliss in a bowl.
We recently developed videos with recipes for the American Kidney Fund, the leading U.S. non-profit organization working on behalf of the 30 million Americans with kidney disease. One of the recipes for the snack video was sriracha popcorn. Read more for the recipe and links to Chef Joel’s videos.
Choose and Pop Your Popcorn Wisely
In general, microwave popcorn often contains a lot of salt with artificial flavorings. The Environmental Working Group, a nonprofit that advocates for human and environmental health, found other chemicals inside microwave popcorn bags that are potential carcinogens (AKA cancer-causing agents).
Cooking your popcorn on the stove in oil is better than using microwave bags, but still allows for some issues, because the burning oil can create chemical compounds that potentially can cause oxidative damage to cells.
The best option for popping popcorn is using an electric air popper, which requires no oil. You’ll get perfectly fluffy popcorn, minus the chemicals, preservatives, and excess salt. And the best part is you can find electric air poppers on Amazon for under $30.00.
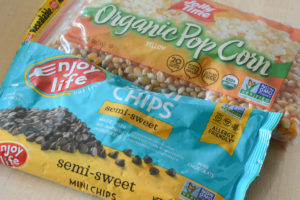
simple ingredients for salted chocolate popcorn
You’re gonna love this quick and easy gourmet salted chocolate popcorn!
Pop 1/2 cup of organic popcorn kernels. This will yield about 12 cups of popped popcorn. Place in a large bowl and set aside.
Did you know?
It’s estimated that 90 percent of corn grown in the United States is from genetically modified seed. Fortunately, there are plenty of non-GMO popcorn options available. Any certified organic popcorn will be non-GMO.
Melt 6 ounces of chocolate chips or finely chopped chocolate in a double boiler, stirring occasionally. We love Enjoy Life semi-sweet mini chips that are free from the top 8 allergens, but not free from flavor.
Remove the melted chocolate from the heat and immediately pour over the popcorn, stirring to coat as thoroughly as possible. We like to wear disposable food grade vinyl gloves, tossing with our hands.
Spread evenly onto a baking sheet lined with parchment paper. Sprinkle with a little sea salt. Let sit at room temperature until the chocolate has hardened and set, about an hour.

salted chocolate popcorn
This keeps for up to 3 days in an airtight container, if it lasts that long!
Videos
Check out Chef Joel’s videos with step-by-step recipes for healthy, kidney-friendly foods. The categories are international dishes with a flair, chicken entrees, and low phosphorus snacks.
Included in the low phosphorus snacks is sriracha popcorn.

sriracha popcorn
Salted Chocolate Popcorn
Yield 3 Quarts
Free of: gluten and top 8 allergens.
Kick up your movie night with salted chocolate popcorn!
Ingredients
1/2 cup organic popcorn kernels
6 ounces allergy-friendly chocolate chips, such as Enjoy Life Mini Chips (1 cup)
1/2 tsp sea salt
Instructions
- Pop popcorn kernels according to manufacturer’s instructions. The healthiest option is popping in an electric air popper. You should have about 12 cups of popped popcorn. Place in a large bowl and set aside.
-
Fill a saucepan with a couple inches of water and bring to a boil. Place chocolate in a bowl; the bowl of chocolate should not be in direct contact with the water. Once you place the bowl on the saucepan, lower the heat so the water is gently simmering. Melt the chocolate, stirring occasionally.
- Remove the melted chocolate from heat. Wipe the bottom of the bowl to dry any condensation. Immediately pour over the popcorn and stir to coat as thoroughly as possible. We like to wear disposable food grade vinyl gloves, tossing with our hands.
- Spread evenly onto a baking sheet lined with parchment paper. Sprinkle with a little sea salt. Let sit at room temperature until the chocolate has hardened and set, about an hour.
- This keeps for up to 3 days in an airtight container.
Courses Sweets
The post Salted Chocolate Popcorn appeared first on Your Allergy Chefs.
]]>The post Turkey Chili Mac appeared first on Your Allergy Chefs.
]]>
free of gluten and top 8 allergens
This turkey chili mac is one of those super delicious meals perfect in many ways. It’s made in one pot and is ready in 30 minutes.
Filled with hearty flavors of turkey, beans, and macaroni, this simple recipe makes a great meal that even picky kids will love!
In Make Mine Veggie, check out our vegan version…
Start by choosing your pasta. We like elbow macaroni or fusilli, but any pasta will work.
Cook pasta according to package directions. Because cooking rates may vary, start checking pasta for doneness about 4 minutes before specified time. When pasta is al dente, drain in a colander and rinse under cold water to stop the cooking process. Drain again and set aside.
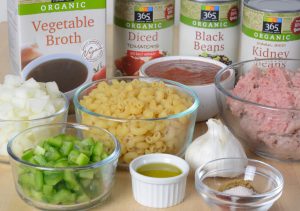
mise en place
Heat oil in a large heavy duty pot. Add onions and cook for 4 minutes. Add peppers and garlic and cook for another minute.
Add turkey and cook until browned, breaking up any big chunks with a spatula or spoon. Drain any excess fat by moving turkey to one side of the pan and tilting pan to allow the fat to collect, blotting it with paper towels.
Stir in chili powder, cumin, paprika, and a little salt and mix through until turkey is fully coated in the seasonings.
Mix in diced tomatoes, tomato sauce, beer or chicken broth, and beans. Simmer for about 10 minutes. Add the pasta and toss well to combine.
Serve with shredded cheese and add a little spice by garnishing with sliced jalapeños.
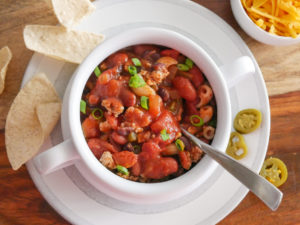
The Battle of the Beans
Kidney beans are ideal for chili because of their versatility. However, some swear that pinto beans are the bread and butter of chili. We used red kidney beans and black beans because that’s what we had onhand.
Great northern, cannellini, white and navy make their own kind of chili, white bean.
How about garbanzos? Choose your favorites. After all, there are lots of ways to make a great chili.
Beer or Broth?
My mom made the best chili ever! She would make a big pot on a cold afternoon. We would all be cozy by the fireplace, watching football and eating chili…and more chili. There were never any leftovers. I never did get mom’s recipe, and I’m not sure she even had one. But one ingredient I do remember was the beer.
There are many gluten-free beers. A heavier beer will add a more flavorful dimension than a lite beer. However, the type of beer you should use is up to you. If you’re not sure, try an Ale or IPA.
Or…if you’re not into beer, vegetable, chicken, or turkey broth makes a great substitution.

Make Mine Veggie!
There are so many options to making this vegan. Dice 8 ounces of mushrooms and cook for 8 minutes. Add the onions and follow the recipe, eliminating the turkey. Substituting plant-based Beyond Meat is another excellent option. You can also add a can of pinto beans or garbanzos in place of the turkey. We used fusilli pasta. Why not add steamed veggies at the last minute, like broccoli and cauliflower florets? Sounds great!
Whichever you choose, this chili mac is really a one pot wonder.
Turkey Chili Mac
Yield 6 Servings
Free of: gluten and top 8 allergens.
Filled with hearty flavors of turkey, beans, and macaroni, this turkey chili mac is simple to prepare and makes a great meal that even picky kids will love!
Ingredients
6 ounces dry weight elbow macaroni pasta
1 tbsp olive oil
1 cup diced onion
1/2 cup diced green bell pepper
2 tsp minced garlic
1 pound lean ground turkey
1 1/2 tsp chili powder
1 tsp ground cumin
1/2 tsp smoked paprika
1/2 tsp salt
1 (15-ounce) can red kidney beans, rinsed and drained
1 (15-ounce) can black beans, rinsed and drained
1 (14.5-ounce) can diced tomatoes
1 (8-ounce) can tomato sauce
1 cup gluten-free beer or chicken stock
1 cup cheddar style shreds, such as Daiya
1 jalapeno, thinly sliced (garnish)
Instructions
- Cook pasta according to package directions. Drain in a colander and rinse under cold water, draining well. Set aside.
- Heat oil in large heavy duty pot (or casserole pot) over medium-high heat. Add onions and cook for 4 minutes, stirring often. Add peppers and garlic and cook for 1 minute.
- Add turkey and cook until browned, breaking up any big chunks. Drain any excess fat.
- Stir in the chili powder, cumin, paprika, and salt and mix through until turkey is fully coated in the seasonings.
- Mix in the beans, diced tomatoes, tomato sauce, and beer or broth. Bring to a boil, then lower heat to medium-low and simmer while stirring occasionally, until the chili thickens, about 10 minutes.
- Add the cooked pasta and gently toss to combine.
- Portion into bowls. Top with cheese and sliced jalapeños.
Notes
Make Mine Veggie!
Substitute any of the following for the ground turkey:
- 8 ounces chopped mushrooms, button or cremini
- 2 cups steamed veggies, such as broccoli and/or cauliflower florets
- 1 cup frozen corn, thawed
- 1 (15-ounce) can pinto or garbanzo beans, drained and rinsed
If using mushrooms, start the recipe by sautéing mushrooms for about 8 minutes. Add onions and proceed with recipe, omitting the turkey.
If adding steamed veggies, add during the last 5 minutes.
For corn, also add during the last 5 minutes of cooking.
For the extra can of beans, add with the kidney and pinto beans.
Courses Mains
The post Turkey Chili Mac appeared first on Your Allergy Chefs.
]]>The post Food Allergy Questions Left Unanswered Could Kill appeared first on Your Allergy Chefs.
]]>
What a privilege it was to present at the FARECon Featuring Teen Summit earlier this month in Washington, D.C. We had an incredible time talking with parents and teens living with food allergies.
During the adult session, “Behind the Scenes, Tips for Safe Dining,” I asked participants to share their biggest frustrations about dining out and any questions they had. We got some great responses which may resonate with you.
Here’s our best advice in answering your questions and frustrations in the following Q&A with Chef Joel, former Manager of Product Development and Special Diets at Walt Disney World…
7 Questions
Q: Saying I have food allergies doesn’t sound strong enough for exactly what will happen if I eat food I’m allergic to. What else can be said to get my point of severity across to the servers and chefs who don’t even understand the term “anaphylaxis?”
A: An excellent question! To make your point crystal clear, you need to say that you could die if you eat even a trace particle of the allergen.
Q: Can you explain filtration again? Also, are there really any designated fryers in restaurants?
A: Filtration is the act of filtering cooking oil to remove food particles, so the oil lasts longer. The problem with filtration is that the protein molecules that are in the oil are not removed during the process, thus the allergen proteins remain in the oil. Cooking and the high temperatures of the fryer do not destroy the proteins.
Yes, some restaurants can have a designated fryer. However, they have to filter the oil from the designated fryer separately and put it back into the designated fryer without commingling with the common fryer oil. A mistake is made when an establishment has 2 fryers that share the same oil. They may designate one side for frying foods that are allergen free, but cross contact occurs because of the shared oil.
Q: A restaurant lists gluten free items with a red “GF” symbol and the asterisk on the menu says, “gluten friendly.” What does that mean?
A: Gluten friendly can mean 2 things. (1) A dish that is naturally gluten free, such as chicken or rice. (2) No gluten was added to the dish. By saying gluten friendly, the establishment is not guaranteeing the item is gluten free and free from cross contact. In a nutshell, the establishment is not taking any liability for cross contact, which happens when an allergen is accidentally transferred from one food to another.
Q: How do you deal with objections of restaurant owners in setting up allergy safe processes?
A: No deal. Don’t eat there. Appreciate their honesty. It’s better to know that they are unwilling to help than to half-ass try to accommodate you and make a mistake.
Q: Why can Disney manage food allergies so well and other food service operations cannot?
A: The culture of Disney is to make magic for every guest. It’s a huge commitment that they have made. It’s about training, processes, menus, and ingredients. They start with training, which is ongoing. They follow processes, modify menus, and source special products to make serving people with food allergies easy.
Q: What national chains have the best food allergy procedures?
A: The leading guide to allergy friendly restaurants nationwide is AllergyEats. Check out their website to find the restaurants in your area that are ready and willing to accommodate your allergies…and find those that aren’t.
Q: When we buy food at a grocery store, we don’t buy foods that say, “made on shared equipment.” When we call a restaurant and they say “we don’t serve anything with peanuts, how likely is that true and do you think they are looking for or are even aware of cross contact in products?
A: It is likely the restaurant doesn’t serve anything containing peanuts. However, there is always the possibility of cross contact. It is very likely they don’t understand cross contact. After advising the chef or manager of your allergy, you need to make sure you are able to see all ingredient labels to ensure the ingredients they use are not made on shared equipment.
It may be hard to see all of the ingredient labels. Many items are received in boxes where the ingredient label is on the outside of the box which gets broken down and recycled. But, if the establishment is committed to serving people with food allergies, this label would have been removed from the outer box and put in a recipe ingredient binder or other such practice. It’s also important to know if the binder is updated when there are ingredient changes from the manufacturer.
7 Frustrations
- When different people at the restaurant give different answers for the same questions.
- When the restaurant staff think an allergy means gluten free.
- When restaurant staff are not being trained on food allergies.
- Apathy from restaurant staff about food allergies, i.e. eyes rolling, lack of action, not letting kitchen staff know of my allergy.
- Servers not knowing what ingredients are in their restaurant’s food.
- When our family eats out, the waitstaff respond to our allergy ingredient questions with “that should be fine” or “I don’t think those ingredients are in that.”
- Restaurant staff not taking our food allergy requests seriously, i.e. taking a burger off the bun that my son is allergic to and giving the same burger back to him.
Chef Joel’s Advice
These 7 frustrations are all too familiar. They are all signs of restaurants not committed to serving guests with food allergies.
Only eat at restaurants that are 100% committed!
Most important, don’t be afraid to ask questions. After all, no question is a bad question for those living with food allergies.
Check out our post, 7 Questions To Ask That Could Save Your Life When Dining Out for additional tips.
Stay tuned for more of the questions from the FARECon Featuring Teen Summit in the upcoming section of the website, “Ask Chef Joel.”

The post Food Allergy Questions Left Unanswered Could Kill appeared first on Your Allergy Chefs.
]]>The post Roasted Tomatillo Salsa appeared first on Your Allergy Chefs.
]]>
A delicious Mexican green salsa, roasted tomatillo salsa is made with roasted tomatillos, chile peppers, onions, cilantro and lime juice.
Tasty not only with tortilla chips, but on grilled meats or your favorite Mexican dishes, like enchiladas, tacos, or tamales.
A must-have in your refrigerator, this roasted tomatillo salsa recipe is so easy and delicious! Once you make your own, you won’t want to go back to the store-bought versions!
A tomatillo is a tangy lime-green fruit, also known as a Mexican husk tomato. Because they are wrapped in a papery husk, it can be hard to tell the quality.
When purchasing tomatillos, ripe ones are firm, juicy and tangy, and bright green in color. The husks should be light green and moist. As the tomatillos age, their husks turn brown and dry out. By the way, smaller tomatillos tend to be sweeter than larger ones.
We usually buy a few more tomatillos than we need in case we run across a bad one and also to account for the weight of the husks.
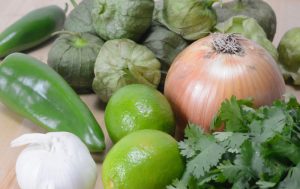
It’s best not to peel the husks from the tomatillos until you’re ready to use them.
We’re ready!
Four Easy Steps
- Place tomatillos in a bowl and cover with warm water. Letting them sit for about 20 minutes in water is not necessary, but makes removing the husks easier. Go ahead and peel the husks, rinsing off the sticky residue from the tomatillos.
- Toss tomatillos, anaheim pepper, jalapeno, onion, and garlic with a little olive oil. Spread out on a rimmed baking sheet. Roast in oven until charred, about 15-20 minutes, turning peppers halfway through.
- Place peppers in a small bowl and cover with plastic wrap and let cool for 10-15 minutes. This process helps to loosen their skins. Remove the stem, seeds, and outer skin from the peppers.
- Transfer the cooled vegetables, peppers, and their juices to a food processor. Add cilantro, lime juice, and a bit of sugar. Pulse until mixture is as smooth or as chunky as you want it with no super big chunks of tomatillos remaining.
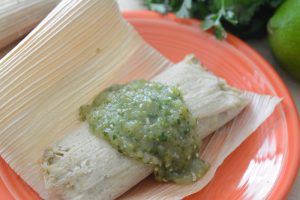
roasted tomatillo salsa and tamales – what a pair!
A bit of sugar?
Sugar is optional. However, we use a tablespoon of organic cane sugar to balance the acidity of the tomatillos.
Transfer your roasted tomatillo salsa to a sealed contained and store in the fridge for up to four days, if it lasts that long.

Enjoy this roasted tomatillo salsa on game day with chips, or as a condiment to almost any Mexican dish!
Roasted Tomatillo Salsa
Yield 2 Cups
Free of: gluten and top 8 allergens.
Tasty not only with chips, roasted tomatillo salsa is great on grilled meats or your favorite Mexican dishes, like enchiladas, tacos, or tamales.
Ingredients
1 pound tomatillos
1 anaheim chili pepper
1 jalapeno pepper
1 cup onions, cut in chunks
1 garlic clove, peeled
1 tbsp olive oil
1/2 cup packed cilantro
2 tbsp fresh lime juice
1 tbsp granulated sugar
Instructions
- In a medium bowl, cover the tomatillos with warm water. Set aside for 20 minutes. This is not necessary, but makes removing the husks easier.
- Preheat oven to 400-degrees F.
- Peel the husks from tomatillos and rinse off the sticky residue from their skins, discarding the husks.
- Toss tomatillos, anaheim pepper, jalapeño, onion, and garlic with olive oil. Spread out on a rimmed baking sheet, lined with foil or parchment paper.
- Place in oven and roast until soft and a bit charred, about 15-20 minutes, turning peppers halfway through.
- Remove from oven. Place the anaheim and jalapeño pepper in a small bowl. Cover tightly with plastic wrap and allow to cool for 10-15 minutes. This process will help to loosen their skins, making them easier to remove.
- Remove the stem, seeds, and outer skin from the peppers.
- Transfer the cooled vegetables, peppers, and their juices to a food processor. Add cilantro, lime juice, and sugar. Pulse until mixture is as smooth or as chunky as you want with no big chunks of tomatillos remaining, scraping down sides of bowl as needed.
Notes
- The salsa will be a bit thinner at first, but will thicken as it sits for a few hours in the refrigerator, due to the natural pectin in the tomatillos.
Courses Sauces & Condiments
The post Roasted Tomatillo Salsa appeared first on Your Allergy Chefs.
]]>

