The post Sugar Cookies appeared first on Your Allergy Chefs.
]]>
vegan and free from gluten and top 9 allergens
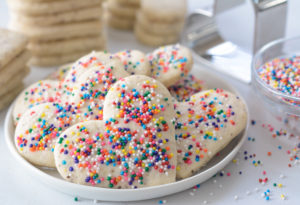
These delicious sugar cookies are so easy to make and they keep their shape when baked. You can enjoy them plain, decorated with sprinkles or sanding sugar, or frosted with royal icing.
A sugar cookie everyone can enjoy!
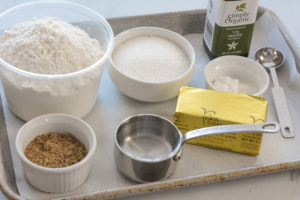
mise en place
These easy no-spread sugar cookies are great for cutouts and decorating. You can also freeze the cookie dough and baked cookies!
Look How Easy
- Make your flax eggs.
- Combine flour, baking powder, and xanthan gum.
- Cream non-dairy butter and sugar with a hand mixer for 1-1/2 minutes.
- Add flax eggs and vanilla to butter mixture and beat until combined.
- Add flour mixture and beat on low just until incorporated. Finish combining dough by hand. Form dough into a disk and wrap in plastic wrap. Place in fridge for at least 30 minutes.
- Take half the chilled dough and knead briefly. Shape into a flat disk and roll with a rolling pin between 2 sheets of parchment paper or plastic wrap to the thickness of about 1/4-inch.
- Using cookie cutters, cut dough into desired shapes. Place on a baking sheet lined with parchment or silicone baking mat. Decorate with sprinkles or sanding sugar, if desired. Bake for 10-12 minutes.
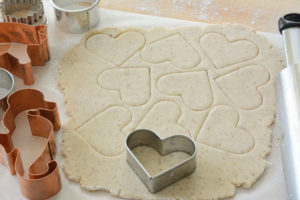
When cutting out your sugar cookies, make sure to keep your cuts as close together to get as many cookies out of your dough as possible. Re-roll any scraps.
Freeze
Plain or decorated baked cookies freeze beautifully for up to 3 months.
You can also freeze the dough. Divide dough in half and flatten both halves into a disk. Wrap well in plastic wrap and freeze. When ready to bake cookies, thaw the disks in the fridge, then bring to room temperature for 20 minutes. Roll away!
Getting the Most Accurate Measurement
Proper measuring and sifting of dry ingredients is essential in baking. Dry ingredients, including flour, naturally settle on standing. Texture, how long the flour has been stored, and humidity can all influence the degree to which flour settles.
To get the most accurate measurement, start by whisking the flour in its container to aerate.
Scooping the flour directly into your measuring cup packs the flour into the cup, causing you to end up with significantly more flour than the recipe calls for.
To measure the flour, spoon into measuring cup, overfilling. Use a knife or other straight edge to level off the top. Whisk again with the other dry ingredients to combine and further aerate the ingredients before incorporating them into the dough.
Some baked goods may require an extra step of sifting to obtain light and airy baked goods. Sifting also helps to filter out any impurities and/or clumps.
Allergy-Friendly Decorations
Tru Color Natural Sanding Sugars are free from the top 8 allergens, artificial colors, sesame, and mustard. They can be purchased online.
Betty Crocker Nonpareils are free from the top 8. However, they are not all processed at the same facility/lines. They take allergies VERY seriously and advise to check the labels. If the sprinkles are processed on a line that may process other allergens, they will state on the label “may contain”. The container does have a phone number that you can call for peace of mind.
Sugar Cookies
Yield 32 small cookies
Free of: gluten and top 9 allergens.
Finally, a sugar cookie everyone can enjoy!
Ingredients
Cookies
2 tablespoons ground flaxseed
1/3 cup lukewarm water
2 cups all-purpose gluten-free flour blend (1:1 baking flour)
1/2 teaspoon baking powder
1/4 teaspoon xanthan gum (omit if using a flour blend containing xanthan gum)
1/2 cup non-dairy butter (such as Earth Balance Soy Free Buttery Sticks), softened to room temperature
1/2 cup granulated sugar
1 teaspoon pure vanilla extract
Nonpareils or sanding sugar for decorating, optional
Royal Icing, Optional
6 tablespoons aquafaba (from a 15-ounce can of garbanzo beans)
1/2 teaspoon cream of tartar or 1/2 teaspoon fresh lemon juice
4-5 cups powdered sugar
1 teaspoon pure vanilla extract
Instructions
Prep
- Line 2 large baking sheets with parchment; set aside.
- Preheat oven to 350-degrees F.
Steps
- For the cookies, in a small bowl, whisk together flaxseed meal and water. Set aside for 5-10 minutes.
- In a medium bowl, whisk together the flour, baking powder, and xanthan gum. If the baking powder contains lumps, sift into the flour. Set aside.
- Return to the flax eggs and whisk vigorously.
- In a large bowl, cream together the butter and sugar with a hand mixer. Mix until the sugar is slightly dissolved into the butter, about 1-1/2 minutes. Add the flax eggs and vanilla. Beat until incorporated.
- Add the flour mixture and beat on low speed just until the dough starts to come together. Turn off hand mixer and finish combining the dough by hand.
- Once the dough is made, form the dough into a flat disk and wrap with plastic wrap. Let the dough chill in the refrigerator for at least 30 minutes. If making the dough in advance, store wrapped in refrigerator. Let rest on counter for 15 minutes before ready to use.
- When ready to make cookies, lightly flour a clean rolling surface and a rolling pin. Take half of the dough and knead briefly. Shape into a flat disk and roll with a rolling pin until dough is about 1/4-inch thick. It’s easiest to roll between 2 sheets of parchment paper or plastic wrap.
- Using cookie cutters, cut dough into desired shapes. Decorate with nonpareils or sanding sugar. If you’re going to decorate with royal icing, leave plain. Place cookies on prepared baking sheets.
- Repeat with remaining dough.
- Bake cookies for 10-12 minutes or until the edges are just beginning to turn lightly golden. Do not over bake, as they won’t turn much of a golden brown. Remove cookies from oven and place on cooling rack to cool. Enjoy plain or decorated with nonpareils or sanding sugar. The royal icing instructions follow if you will be decorating plain cookies with royal icing.
- For the royal icing, open a can of garbanzo beans (also known as chickpeas). Drain and strain the aquafaba (brine) through a fine mesh sieve. Reserve garbanzo beans for another use such as Chickpea Melts.
- Measure 6 tablespoons of aquafaba (brine) into a bowl. Add cream of tartar. Mix on medium to high speed using a hand mixer with a whisk attachment or in a stand mixer until mixture is frothy/foamy. Gradually add 4 cups of powdered sugar and continue beating on low speed until thick and everything is incorporated.
- Turn the mixer off and lift the whisk to check the consistency of your icing. It should be thick with a glue-like consistency. If it’s not there yet, add another cup of powdered sugar (or more) until a thick consistency is achieved. Add vanilla extract. Turn the mixer up to medium-high and beat for about 8 minutes.
- After 8 minutes or so, turn the mixer off. You should have a nice, stiff royal icing. Store in an airtight container, covered with plastic wrap and closed with a lid in the fridge up to 7 days. Let come to room temperature before decorating cookies. You may need to thin icing with a little water.
- Royal icing can be colored with gel food colors. Adding too much food coloring can result in excessive drying times.
Notes
Getting the Most Accurate Measurement
Proper measuring and sifting of dry ingredients is essential in baking. Dry ingredients, including flour, naturally settle on standing. Texture, how long the flour has been stored, and humidity can all influence the degree to which flour settles.
To get the most accurate measurement, start by whisking the flour in its container to aerate.
Scooping the flour directly into your measuring cup packs the flour into the cup, causing you to end up with significantly more flour than the recipe calls for.
To measure the flour, spoon into measuring cup, overfilling. Use a knife or other straight edge to level off the top. Whisk again with the other dry ingredients to combine and further aerate the ingredients before incorporating them into the dough.
Some baked goods may require an extra step of sifting to obtain light and airy baked goods. Sifting also helps to filter out any impurities and/or clumps.
Courses Sweets
The post Sugar Cookies appeared first on Your Allergy Chefs.
]]>The post Pumpkin Bread Pudding with Vanilla Sauce appeared first on Your Allergy Chefs.
]]>
Vegan and free of gluten and top 9 allergens
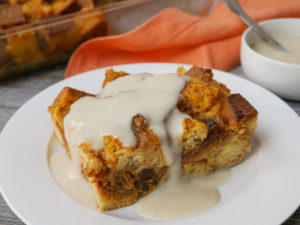
During the fall we look for any way to use pumpkin. Soft cushions of brioche soaked with a vegan pumpkin custard, make this easy dessert an autumn and holiday showstopper.
We love our favorite allergy-friendly brioche for this bread pudding, but you could use challah, French bread, or other crusty loaf.
Try this old-fashioned dessert that’s never out of style!
Aquafaba
We made two batches of bread pudding, one with flax eggs and one with aquafaba. For this recipe, we preferred aquafaba over flax eggs as the egg replacer.
Aquafaba is the viscous liquid in which garbanzo beans (also know as chickpeas) and other beans have been cooked. In many cases, aquafaba can be used as a replacement for eggs.
Take a 15.5 ounce can of garbanzo beans (chickpeas). Shake the can well. Open and drain liquid into a small bowl, reserving both liquid and beans. There you have the liquid, an amazing egg replacer!
Need an idea for the leftover beans? Try our delicious Chickpea Melt.
Ingredients Needed
Cornstarch, water, vanilla bean (optional), unsweetened alternative milk, pure maple syrup, pure vanilla extract, pumpkin puree, spices (cinnamon, ginger, nutmeg), sea salt, aquafaba, golden raisins, and allergy-friendly brioche (our favorite is from Rising Hearts Bakery) or other bread.
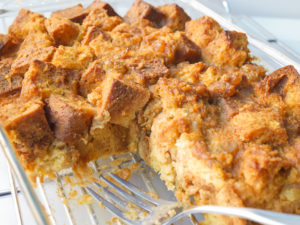
Follow our recipe below for an easy and amazing autumn dessert that’s sure to be a favorite.
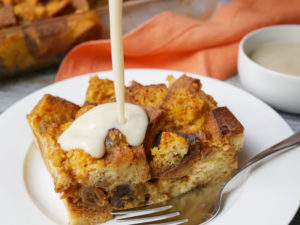
Pour on the vanilla sauce and enjoy!
Your Allergy Chefs are participants in the Amazon Associates Program, an affiliate advertising program designed to provide a means for sites to earn advertising fees by advertising and linking to Amazon.
Pumpkin Bread Pudding with Vanilla Sauce
Yield 6 servings
Free of: gluten and top 9 allergens.
Old-fashioned but never out of style!
Ingredients
Vanilla Sauce
2 tablespoons cornstarch
2 tablespoons water
1/2 vanilla bean, optional
1-1/2 cups unsweetened alternative milk (such as gluten-free oat)
2 tablespoons pure maple syrup
1 teaspoon pure vanilla extract
Bread Pudding
1-1/4 cups pure pumpkin puree
1-1/2 teaspoons ground cinnamon
1/2 teaspoon ground ginger
1/2 teaspoon sea salt
1/4 teaspoon ground nutmeg
1 cup unsweetened alternative milk (such as hemp or gluten-free oat)
1/2 cup pure maple syrup
2 teaspoons pure vanilla extract
1/2 cup aquafaba (liquid from can of garbanzo beans/chickpeas)
1/2 cup golden raisins
1 (14 to 16-ounce) loaf allergy-friendly brioche, French bread, or other crusty bread cut into 3/4 to 1-inch cubes
Instructions
Prep
- Cut bread into cubes and place in a large bowl.
- Lightly grease an 11x7x1-1/2 inch baking pan; set aside.
- Preheat oven to 350-degrees F.
Steps
- For the vanilla sauce, whisk together cornstarch and water in a small bowl. Set aside. Cut vanilla bean (if using) in half lengthwise and scrape out seeds. Add seeds with bean, milk, and syrup to a small saucepan. Bring just to a boil over medium-high heat.
- Return to cornstarch and water, whisk again and whisk into hot milk. Reduce heat to medium-low, whisking constantly until sauce thickens. When sauce thickens, simmer an additional 2 minutes, whisking constantly. Remove from heat; remove and discard vanilla bean. Whisk in vanilla extract.
- Transfer sauce to a container and place a piece of plastic wrap directly onto surface of the sauce to prevent a skin from forming while it cools. When cool enough, place in refrigerator until needed. Makes 1-1/2 cups.
- For the bread pudding, in a large bowl, whisk together pumpkin, cinnamon, ginger, salt, and nutmeg. Add milk, maple syrup, and vanilla, whisking to combine. Whisk in aquafaba.
- Sprinkle raisins over bread cubes. Pour liquid over bread cubes and gently toss to coat. Let sit for 15 minutes for mixture to soak into bread.
- Gently mix to ensure bread is coated. Gently pour mixture into baking pan or casserole dish. Evenly arrange bread cubes and gently press bread cubes down. Bake uncovered for 25-30 minutes or until top is golden brown and firm to the touch. Transfer to a wire rack and allow to cool for at least 15 minutes.
- Serve warm or cold with vanilla sauce.
Notes
The best bread for bread pudding is day old. Some gluten-free breads tend to be crumbly. If the bread you are using is crumbly or fresh, cube and spread on a baking sheet. Toast for 6-7 minutes in a preheated 350-degree F oven. If you’re using day-old bread, just cube bread and move on to next step.
Courses Sweets
The post Pumpkin Bread Pudding with Vanilla Sauce appeared first on Your Allergy Chefs.
]]>The post Banana Chocolate Chip Single Layer Cake appeared first on Your Allergy Chefs.
]]>
free of gluten and top 9 allergens
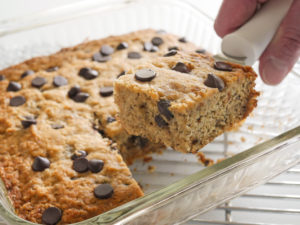
If you crave a little simplicity in your baking, this no-fuss banana chocolate chip single layer cake is just for you.
Do you have bananas ripening on your counter? Grab ’em and let’s get baking!
Be sure to check out our short video to see just how easy it is to make this allergy-friendly vegan treat!
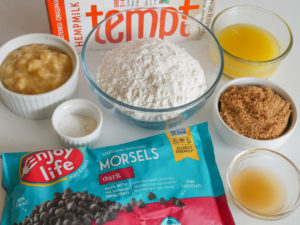
mise en place
The recipe calls for 1 cup of mashed bananas (2-3 ripe bananas). More brown spots on the bananas equal sweeter, more banana flavor.
In a medium bowl, whisk together a gluten free flour blend, brown sugar, baking powder, baking soda, xanthan gum, and salt; set aside.
In another bowl, whisk together bananas, vegan margarine (melted and cooled to room temperature), alternative milk, and cider vinegar. Combine wet and dry ingredients and gently combine without over mixing. Fold in chocolate chips.
Immediately pour into a lightly greased 8-inch square baking pan and smooth surface. Sprinkle with additional chocolate chips.
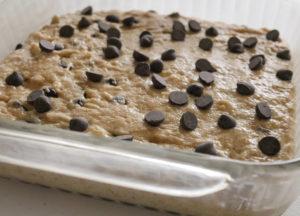
Bake 25-30 minutes, or until a toothpick comes out clean when inserted in the middle. Remove from oven and cool on a wire rack.
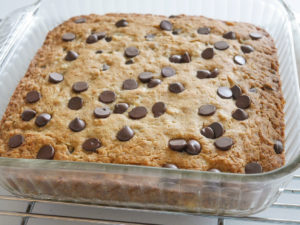
I’ll have mine with ice cream please!
Banana Chocolate-Chip One Layer Cake
Yield 1 (8-inch) square pan
Free of: gluten and top 9 allergens.
Delicious no-fuss banana chocolate-chip one layer cake!
Ingredients
1-3/4 cups gluten-free all-purpose flour blend
1/2 cup packed light brown sugar
1 tsp baking powder
1/2 tsp baking soda
1/2 tsp xanthan gum (omit if using flour blend containing xanthan gum)
1/4 tsp salt
1 cup mashed ripe bananas, about 2-3 medium
6 tbsp plant-based margarine, such as Earth Balance Soy Free Buttery Sticks, melted and cooled to room temperature
1/4 cup alternative milk, such as gluten-free oat or unsweetened hemp
1 tbsp apple cider vinegar
1/2 cup allergy-friendly chocolate chips, such as Enjoy Life’s Dark Chocolate Morsels
Instructions
- Preheat oven to 350-degrees F. Lightly grease an 8-inch square baking pan; set aside.
- In a medium bowl, whisk together flour, sugar, baking powder, baking soda, xanthan gum, and salt; set aside.
- In another medium bowl, whisk together bananas, margarine, milk, and cider vinegar.
- Combine wet and dry ingredients and gently combine without overmixing. Fold in chocolate chips, reserving a small handful.
- Pour into prepared baking pan and smooth surface. Sprinkle with the reserved chips.
- Bake 25-30 minutes or until a toothpick comes out clean. Cool in pan on a wire rack.
Courses Sweets
The post Banana Chocolate Chip Single Layer Cake appeared first on Your Allergy Chefs.
]]>The post Blueberry Pound Cake appeared first on Your Allergy Chefs.
]]>
free of gluten and top 9 allergens
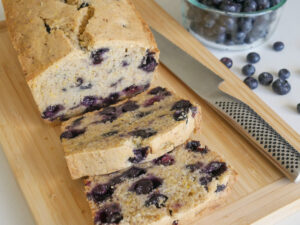
With fresh blueberries so plentiful, we couldn’t resist making this quick bread. It’s a spin off from the Strawberry Pound Cake recipe we developed for Allergic Living Magazine. The soft, buttery crumb is perfectly dense without being dry and crumbly.
While pound cake is traditionally made with a pound each of butter, sugar, eggs, and flour, we’ve made some adjustments for a great tasting loaf that’s free of the butter, eggs, and wheat flour.
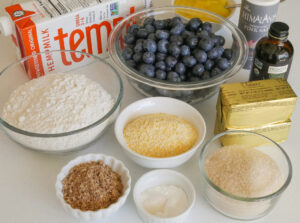
mise en place
The Method
- Preheat oven to 350°F. Lightly coat a 9×5-inch loaf pan with dairy-free margarine. Set aside.
- Make 3 flax eggs by whisking together 3 tablespoons of flaxseed meal with 1/2 cup of water. Set aside for 5-10 minutes. If egg allergy is not an issue and you’re not vegan, you can use 3 whole eggs in place of flaxseed meal and water.
- In a medium bowl, combine a gluten-free flour blend (such as King Arthur’s Gluten Free All-Purpose Flour), fine or medium grind yellow cornmeal, baking powder, xanthan gum (if not in flour blend), and salt. Set aside.
- Cream dairy-free, soy-free margarine and sugar using a hand-held mixer. Start on low and increase to medium. Blend until light and fluffy, about 2-3 minutes. If using a KitchenAid or similar stand mixer, use the paddle attachment to cream the margarine and sugar.
- Return to flax eggs and whisk vigorously; it will be gelatinous. On low speed, gradually blend flax eggs and vanilla into creamed margarine. The mixture may curdle slightly as seen in photo below.
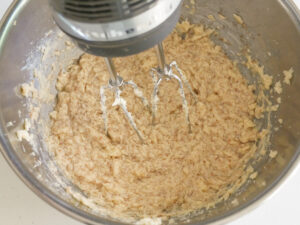
- In 3 stages, alternate adding flour mixture and alternative milk (such as unsweetened gluten-free oat milk or hemp milk) into creamed mixture on low speed.
- In a small bowl, toss 1 tablespoon of gluten-free flour blend with 1-1/2 cups of fresh blueberries that have been rinsed. Gently stir the lightly coated blueberries by hand into the batter. Spread batter level into prepared loaf pan.
- Bake on oven’s middle rack until done, about 60-70 minutes. Cool in the pan on a rack about 15 minutes. Gently invert cake onto cooling rack. Let cool completely, at least an hour.
So Many Ways to Enjoy
Serve a slice with our sweet and tangy lemon curd and more fresh blueberries.
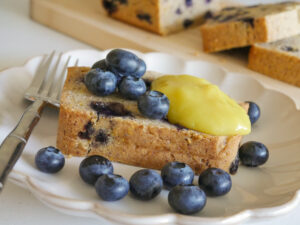
Enjoy with an alternative whipped cream and fresh strawberries and blueberries.
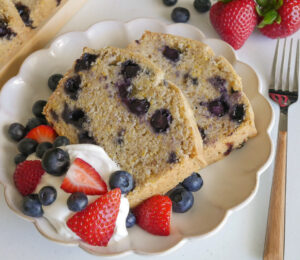
Contrary to most quick breads, we find this loaf better the second day. We like to toast the slices on a grill or in a skillet. How about maple syrup? Oh yeah! It’s almost like French Toast, and just as good.
Chef Mary’s Tips
- The light coating of flour around the blueberries will absorb some of the fruit’s liquid, making them less likely to sink.
- The purpose for adding dry and liquid ingredients alternately is that whipped margarine and sugar cannot absorb much liquid without separating. Beginning with dry ingredients and alternating with liquid ingredients will produce a better pound cake.
- Before measuring flour, use a spoon or whisk to fluff up the flour in the container or bag its in. Rather than scooping the flour with a measuring cup, spoon the flour into the measuring cup until it is heaping. Use a knife or other straight edge tool to level the flour across the top of the measuring cup. Scooping flour directly into your measuring cup packs the flour so you can end up with significantly more flour than the recipe calls for.
For another variation of this delicious quick bread, check out our Strawberry Pound Cake at Allergic Living.
Your Allergy Chefs are participants in the Amazon Associates Program, an affiliate advertising program designed to provide a means for sites to earn advertising fees by advertising and linking to Amazon.
Blueberry Poundcake
Yield 1 (9×5-inch) loaf pan
Free of: gluten and top 9 allergens.
Blueberries abound!
Ingredients
3 tbsp flaxseed meal
1/2 cup water
2 cups + 1 tbsp gluten-free flour blend, such as King Arthur’s Gluten Free All-Purpose Flour, divided (2 cups + 1 tbsp)
1/2 cup fine or medium yellow cornmeal
2 tsp baking powder
1/2 tsp xanthan gum (omit if using a flour blend with xanthan)
1/2 tsp salt
3/4 cup dairy-free soy-free margarine, such as Earth Balance buttery sticks, room temperature
3/4 cup granulated sugar
2 tsp pure vanilla extract
1/2 cup plus 1 tbsp alternative milk, such as unsweetened oat or hemp milk
1-1/2 cups fresh blueberries, rinsed
Allergen-safe whipped topping, optional
Mixed fresh berries, optional
Lemon Curd, optional
Instructions
- Preheat oven to 350-degrees F. Lightly coat a 9×5-inch loaf pan (or an 8.5×4.5-inch loaf pan) with dairy-free margarine. Set aside.
- Make 3 flax eggs by whisking together flaxseed meal and water. Set aside for 5-10 minutes.
- In a medium bowl, combine gluten-free flour blend, cornmeal, baking powder, xanthan gum, and salt. Set aside.
- Cream margarine and sugar using a hand-help mixer. Start on low and increase to medium. Blend until light and fluffy, about 2-3 minutes. If using a KitchenAid or similar stand mixer, use the paddle attachment to cream the margarine and sugar.
- Return to flax eggs and whisk vigorously; it will be gelatinous. On low speed, gradually blend flax eggs and vanilla into creamed margarine. The mixture will curdle slightly.
- In 3 stages, alternate adding flour mixture and alternative milk into creamed mixture on low speed.
- In a small bowl, toss remaining 1 tablespoon of gluten-free flour blend with blueberries. Gently stir the blueberries by hand into the batter. Spread the thick batter level into prepared loaf pan.
- Bake on oven’s middle rack until done, about 60-70 minutes. (A toothpick in the center should come out clean.) Cool in the pan on a rack about 15 minutes. Gently invert cake onto cooling rack. Let cool completely, at least an hour.
- Garnish with fresh berries and allergen-safe whipped topping and/or lemon curd.
Notes
You can substitute frozen blueberries when they’re not in season. Stir into the batter while still frozen, not allowing the blueberries to thaw. If using frozen blueberries, the bake time may be 5-10 minutes longer.
This recipe is a spin off from the Strawberry Pound Cake we developed for our friends at Allergic Living Magazine.
Courses Sweets
The post Blueberry Pound Cake appeared first on Your Allergy Chefs.
]]>The post Chocolate Pudding appeared first on Your Allergy Chefs.
]]>
plant-based and free from gluten and top 8 allergens
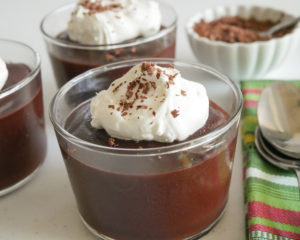
Always a treat, this homemade chocolate pudding is as magical as it is delicious. It’s one of the easiest and quickest desserts you can make, and it’s divine eaten on its own or garnished with allergy-friendly whipped cream, fresh berries, or chocolate shavings.
Our friend Mark’s grandmother, Flo Surkin, died on April 25 from COVID-19. She loved to bake and claimed a dessert wasn’t a dessert unless it contained chocolate. Mark asked his friends to post their favorite chocolate dessert recipe and picture on his Facebook page in memory of Flo.
This one’s for Flo. We know she would have loved it!
Let’s get started with our mise en place.
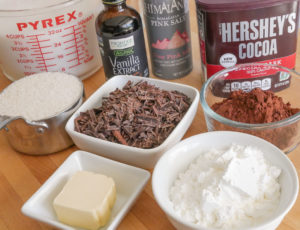
mise en place
Easy Steps
- Combine sugar and salt in a medium saucepan. Sift cornstarch and cocoa powder into the pan and whisk to combine the ingredients. Slowly whisk in an alternative milk. Our favorite is gluten-free oat milk. Coconut milk beverage is another good choice, or almond milk, if almonds are not an issue.
- Place the saucepan over medium-high heat and cook, whisking constantly, until the mixture begins to thicken and is close to a boil. This can take as long as 5-8 minutes. The pudding will fully thicken at the boil. When it just comes to a boil, immediately lower the heat to medium-low and cook at a gentle simmer for another 1-2 minutes, whisking frequently.
- Remove from the heat and add chopped chocolate, softened vegan butter, and vanilla, whisking until smooth and the chocolate has melted.
- Immediately spoon the pudding into individual bowls or one large serving dish. A slight skin will form on the top of the cooling pudding. We don’t mind the skin. However, if you don’t want the skin, press a piece of plastic wrap or parchment paper directly onto the surface while the pudding is still hot.
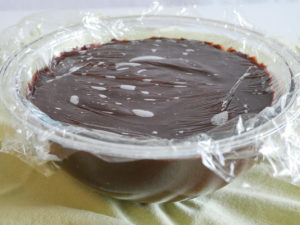
- Allow to cool, then cover and refrigerate, for up to 3 days.
Chef Mary’s Tips
- This pudding is not freezer worthy, as it contains cornstarch, a high-amylose starch. These starch molecules in cornstarch tighten up and weep when frozen.
- Cocoa powder is available in two forms, alkalized (Dutch process) or non-alkalized (natural). Alkalized, or Dutch, is treated with an alkali to neutralize its acids. Dutch process cocoa is darker than natural cocoa, has a mellower flavor and dissolves easily in liquids.
- Choose a good quality vegan chocolate bar that is around 60%. Cacao or cocoa beans plus any extra part of the bean, such as cocoa butter = the percentage. The higher the percentage, the more intense and less sweet the chocolate is. Even if two different chocolates have the same percentage, they can vary in flavor and sweetness as different chocolate makers add different amounts of cocoa butter, and some may not add any at all. The percentage also tells you about the sugar content. A 60% bar contains about 40% sugar. An 80% bar contains about 20% sugar. Our advice for a pudding you will love is to use your favorite chocolate.
Chocolate Pudding
Yield 6 Servings
Free of: gluten and top 8 allergens.
Ingredients
1 cup organic cane sugar (or granulated sugar)
1/2 tsp salt
1/2 cup cornstarch
6 tbsp alkalized cocoa powder (Dutch process), (see recipe notes)
4 cups alternative milk, (see recipe notes)
3 ounces vegan chocolate (around 55-65%), chopped into small pieces
2 tbsp vegan butter, such as Earth Balance Soy-Free Buttery Sticks, room temperature
2 tsp pure vanilla extract
Allergy-friendly whipped topping, optional garnish
Grated chocolate, optional garnish
Instructions
- Combine the sugar and salt in a medium saucepan. Sift the cornstarch and cocoa powder into the pan, whisk to blend the ingredients. Slowly whisk in the milk.
- Place the saucepan over medium-high heat and cook, whisking constantly, until the mixture begins to thicken and is close to a boil. This can take as long as 5-8 minutes. Whisk vigorously, reaching down around the bottom and sides of the saucepan.
- The pudding will thicken fully at the boil. When it just comes to a boil, immediately lower the heat to medium-low and cook at a gentle simmer for another 1-2 minutes, whisking frequently.
- Remove from the heat. Add the chopped chocolate, butter, and vanilla, whisking until smooth and the chocolate has melted.
- Immediately spoon the pudding into individual bowls or into one large serving dish. A skin will form on the top of cooling pudding. If you don’t want the skin, press a piece of plastic wrap or parchment paper directly onto the surface while pudding is still hot. But the skin is really okay.
- Allow to cool, then cover and refrigerate, for up to 3 days.
Notes
- Cocoa powder is available in two forms, alkalized (Dutch process) or non-alkalized (natural). Alkalized, or Dutch, is treated with an alkali to neutralize its acids. Dutch process cocoa is darker than natural cocoa, has a mellower flavor and dissolves easily in liquids.
- Gluten-free oat milk is a great choice. Coconut milk beverage or almond milk, if almonds are not an issue, are other good options.
Courses Sweets
The post Chocolate Pudding appeared first on Your Allergy Chefs.
]]>The post Chocolate Cupcakes with Strawberry Frosting appeared first on Your Allergy Chefs.
]]>
vegan and free of gluten and the top 8 allergens
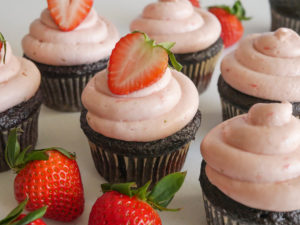
These chocolate cupcakes with strawberry frosting start with moist, fudgy chocolate cake. Then they’re topped with creamy strawberry buttercream that’s made with fresh strawberries.
Not just any cupcake…but no doubt one of the best cupcakes we’ve ever eaten!
Just in time for Valentine’s Day…
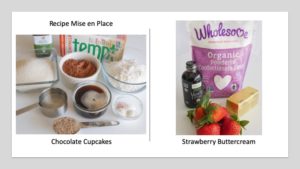
Guidelines For Baking Cupcakes and Cakes
- Read the recipe at least two times all the way through. Read the first time to get a basic understanding of the ingredients needed and recipe procedures. Read the second time to check that you have all the ingredients and tools and plan your time. See what tasks need to be done, or can be done, ahead of time.
- Prepare your mise en place.
- Prepare your muffin pan by lining with muffin liners or lightly greasing the muffin cavities.
- Set your oven racks. Cupcakes should be baked in the upper third of the oven, just above the middle rack. This encourages doming. Cakes bake on the middle rack.
- Allow time for your oven to preheat.
- Do not make the batter until the oven is at the proper temperature. If a recipe contains baking soda, the leavening starts when the baking soda, acidic ingredient, and liquid are mixed. If the oven is not ready, the cupcakes will lose leavening power waiting for the oven to preheat and the finished cupcakes will not rise like they should.
- If you fill the liners too full, the cupcakes will overflow. Filling too full also results in crisp mushroom tops and sinking in the center. Fill the liners 2/3’s to 3/4’s full. We use a level scoop using the number 20 portion scoop which is often identified by the color yellow. This ensures we don’t overfill the muffin pan and each cupcake is uniform in size.
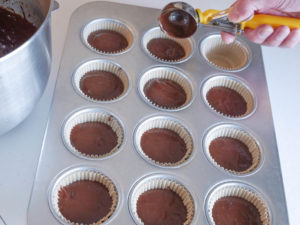
Let’s Get Started
First of all, this recipe is a modification of Catherine Ruehle’s chocolate cake. For the cupcake batter, combine flour, sugar, cocoa powder, baking powder, baking soda, xanthan gum (if not already in gluten-free flour blend), and salt. Whisk to combine.
In a medium bowl, lightly whisk together flax eggs, alternative milk, oil, and vanilla. Add to the flour mixture and mix on low for 30 seconds. Scrape down bowl with a rubber spatula, and mix on medium-low for 1 minute. Pour in coffee and mix on low for 30 seconds. Scrape down sides and bottom and mix again on medium-low for 30 seconds more, until smooth.
Coffee In My Chocolate Cake?
If you bake chocolate cake or cupcakes often, you may have seen recipes that call for coffee. Coffee is a great way to enhance the flavor of cocoa powder, resulting in a more chocolaty cake, not a coffee-flavored one.
Fill the cupcake liners 2/3’s to 3/4’s full. Bake in an oven preheated to 350°F for about 30 minutes, or until a toothpick inserted into the center of a cupcake comes out clean.
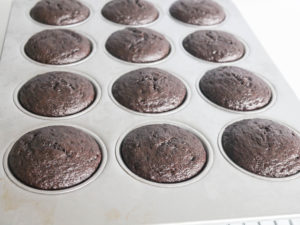
Cooling
When cupcakes are finished baking, remove pan from oven and place on a wire rack to cool for 10 minutes. Condensation may collect on the bottom of the cupcakes if left in the pan for too long, which will result in cupcakes with soggy bottoms.
Carefully remove the cupcakes from the pan and set on wire rack to finish cooling. It is normal that allergy-friendly cupcakes are more fragile than their wheat counterpart.
Once the cupcakes are completely cooled, they can be refrigerated or frozen. We made ours a day ahead and stored them in the fridge until we were ready to frost them.
Simple Buttercream
A quick version is made by whipping vegan butter with confectioners’ sugar, a little vanilla, and pureed strawberries. It’s that simple.
To decorate, trim the bottom of a piping bag and insert an open round tip. For easy filling, put the bag into a tall jar. Fold the bag down around the container and fill bag with buttercream not more than 2/3 full. Push the filling down into the tip to eliminate air pockets.
Start on one of the edges of the cupcake and pipe the icing around and hug the outside of the cupcake. When the buttercream meets, pull it in and go three rotations, bringing the buttercream to the center. When the cupcake is covered, pull up.
Decorate the cupcakes using your favorite method. There are so many different decorating tips that make fun finishes for cupcakes.
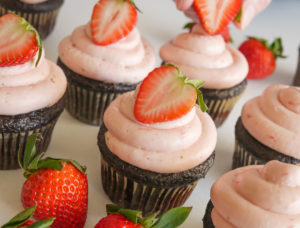
Chef Mary’s Tip About Cocoa Powder
Cocoa powder is available in two forms, non-alkalized (or natural) and alkalized (or Dutch process).
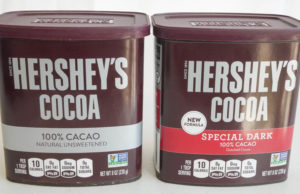
Non-Alkalized, aka Natural Cocoa is untreated cocoa powder that has a more acidic taste. If baking soda is called for in a recipe, use natural cocoa powder as the recipe relies on the acidity of natural cocoa powder to react with baking soda in order to leaven (expansion or rising of the batter).
Alkalized, aka Dutch Process is cocoa treated with an alkali to neutralize its acids. It does not react with baking soda alone. Dutch process cocoa is darker than natural cocoa, but has a mellower flavor.
Recipes should specify natural or Dutch process cocoa. The two cocoa powders are not interchangeable in batter-based desserts. For these delicious cupcakes we used Hershey’s natural, non-alkalized cocoa powder.
The Crumb
Check out the amazing crumb, aka the interior of the cupcakes.
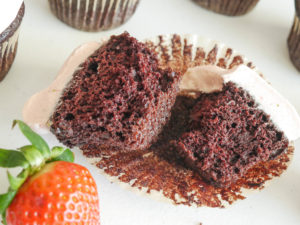
We really minimize our sweets and sugar intake. But for those times of celebration or when we just need a cupcake, these will be our go-to cupcakes. We hope you enjoy them as much as we do!
Your Allergy Chefs are participants in the Amazon Associates Program, an affiliate advertising program designed to provide a means for sites to earn advertising fees by advertising and linking to Amazon.
Chocolate Cupcakes with Strawberry Frosting
Yield 12 Standard Cupcakes
Free of: gluten and top 8 allergens.
The best moist and fudgy chocolate cupcakes!
Ingredients
Cupcake Batter
4 tbsp lukewarm water
4 tsp flaxseed meal
1-1/4 cups gluten-free all-purpose flour
1-1/4 cups cane sugar
2/3 cup natural (non-alkalized) cocoa powder
1 tsp baking powder
1 tsp baking soda
1/2 tsp xanthan gum (omit if using flour blend that contains xanthan gum)
1/2 tsp sea salt
2/3 cup alternative milk, such as unsweetened hemp milk
1/3 cup melted and cooled coconut oil
1-1/2 tsp pure vanilla extract
1/2 cup hot coffee
Buttercream
1/2 cup vegan butter, such as Earth Balance Soy-Free Buttery Sticks
1/2 tsp pure vanilla extract
4 cups confectioners’ sugar, sifted (see recipe notes)
3-4 tbsp strawberry puree (see recipe notes)
Instructions
- For the batter, position an oven rack in the top third of the oven, just above the middle rack. Preheat the oven to 350-degrees F. Line a 12-cavity, standard cupcake pan with paper liners or lightly grease cavities. Set aside.
- Make the flax eggs by whisking together the water and flaxseed meal in a medium bowl. Set aside for 5 minutes.
- In the bowl of a stand mixer, add the flour and sugar. Sift the cocoa powder, baking powder, baking soda, and xanthan gum into the bowl. Add the salt and whisk the dry ingredients together.
- Return to the flaxseed eggs and whisk vigorously. To the flax eggs add milk, coconut oil, and vanilla. Whisk lightly to combine.
- Add the flax egg mixture to the flour mixture and mix on low for 30 seconds. Scrape down the bowl with a rubber spatula, and mix on medium-low for 1 minute. Pour the coffee into the batter and carefully mix on low for 30 seconds, being careful the coffee doesn’t splash out. Scrape down sides and bottom of bowl and mix on medium-low for another 30 seconds until smooth.
- Portion the batter into the muffin liners, filling no more than 2/3’s to 3/4’s full. We like to use a #20 yellow portion scoop. Overfilling will result in crisp mushroom tops and sinking in the center.
- Bake in the top third of the oven for about 30 minutes, or until a toothpick inserted in the center comes out clean. Remove the pan and place on a wire rack to cool for 10 minutes. After 10 minutes, carefully remove the cupcakes from the pan and place on the wire rack to cool completely. It is normal for allergy-friendly cupcakes to be more fragile than their wheat counterparts.
- When completely cool, the cupcakes are best stored in the fridge for up to 2 days before decorating. The cupcakes can also be wrapped and stored in the freezer for up to 3 months.
- For the buttercream, place the vegan butter and vanilla in the bowl of an electric stand mixer fitted with the paddle attachment. Beat on low to blend. Increase the speed and beat until the mixture is creamy and light, 2-3 minutes, scraping down the sides of the bowl from time to time.
- Lower the speed and begin adding the confectioners’ sugar, 1/2 cup at a time, increasing to medium-high after each addition. Once the mixture gets dry, add 1 tablespoon of strawberry puree. Continue to add remaining sugar, 1/2 cup at a time and strawberry puree, beating for about 3-4 minutes. Add just enough puree to reach a buttercream of a consistency you desire.
- The buttercream is ready to use. Store, airtight, at room temperature until ready to decorate (see recipe notes). The buttercream yields 2 cups.
- For a plain buttercream, replace the strawberry puree with an alternative milk. To color plain buttercream, a variety of commercially-prepared natural, vegetable-based colors are available. Some are liquid and some are powdered. Natural colors are not as vibrant as the chemical-laden, artificial colors.
Notes
Sifting Confectioners’ Sugar
- Sifting the sugar prevents the buttercream from being grainy. Organic confectioners’ sugar is coarser than conventional confectioners’ sugar and should be sifted twice.
Strawberry Puree
- To make the strawberry puree for the buttercream, rinse and core 4-6 strawberries. Place in a blender or food processor and blend until you have a puree, about 30 seconds. If you don’t want seeds in your buttercream, put the puree through a metal sieve.
Decorating
- To decorate, trim the bottom of a piping bag and insert an open round tip. For easy filling, put the bag into a tall jar. Fold the bag down around the container and fill bag with buttercream not more than 2/3 full. Push the filling down into the tip to eliminate air pockets.
- Start on one of the edges of the cupcake and pipe the icing around, hugging the outside of the cupcake. When the buttercream meets, pull it in and pipe three rotations, bringing the buttercream to the center. When the cupcake is covered, pull up.
This cupcake batter is a modification of Catherine Ruehle’s Chocolate Cake.
Courses Sweets
The post Chocolate Cupcakes with Strawberry Frosting appeared first on Your Allergy Chefs.
]]>The post Raspberry Thumbprints appeared first on Your Allergy Chefs.
]]>
free of gluten and top 8 allergens
‘Tis the season for cookies!
This past week we received an email from Amber asking for a raspberry thumbprint recipe for a gluten-free cookie swap party she’s attending this coming week.
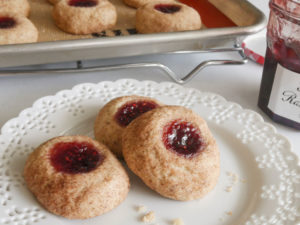
Here you are Amber! These raspberry thumbprints are a holiday favorite, easy to make, and easy to customize with a variety of fillings.
They are indeed melt-in-your-mouth, sugary bites of bliss!
Called by many different names including Polish Tea Cakes and Hallongrotta (which means “Raspberry Cave” in Swedish), the origin of the cookie is still heavily disputed. Was it Poland, Sweden, or East Europe?
But one thing’s for sure…the name comes from the way this cookie is made. They’re rolled into a ball and an indentation is made in the center with one’s thumb for the jam filling.
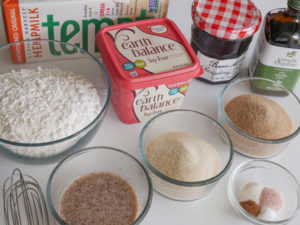
mise en place
Making the Dough
- Whisk together your favorite gluten-free flour blend, xanthan gum (omit if your blend contains xanthan gum), salt, baking soda, and ground cinnamon. Set aside.
- Make a flax egg by whisking together flaxseed meal and water. Allow to sit for 5 minutes.
- With the paddle attachment of a stand mixer, beat vegan buttery spread (such as Earth Balance Natural Buttery Spread, Soy Free) on medium until creamy for 20-30 seconds. Add granulated and brown sugars and beat until incorporated, about 30 seconds, scraping down the sides of the bowl as needed.
- Return to the flax egg and vigorously whisk. Gradually add flax egg and vanilla extract to creamed mixture and mix just until combined.
- Add half of the flour mixture and mix on low for 5-10 seconds. Add the remaining flour mixture and mix just until combined and a dough forms, about 30 seconds. Depending on the flour blend you are using, you may need to add a little alternative milk. Not all flours hydrate at the same rate. If your dough is crumbly, add alternative milk a teaspoon at a time, mixing by hand.
Let’s Get Thumbprinting
- Portion the cookie dough with a scoop, also known in the industry as a disher. We use a #40 scoop, which is usually identified by a purple handle or some portion of the handle being purple. The portion is equivalent to a heaping tablespoon.
- Roll each scoop into a smooth ball.
- Roll the ball into cinnamon-sugar. We find the easiest and neatest way is to put the cinnamon-sugar in a ziploc bag and add the dough balls one by one, tossing to coat in the mixture.
- Place the cookie ball on a baking sheet lined with parchment paper or a silpat. Do not flatten.
- Use your thumb to form an indentation in the middle of the cookie, gently pressing about 1/2 way in.
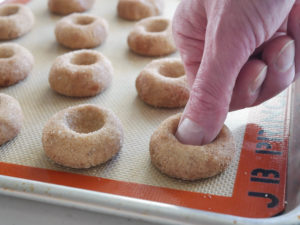
- Once the tray is filled with cookies, fill the wells with jam. We like to use a pastry piping bag. However, if you don’t have piping bags, a ziploc bag will work just fine. Place jam in the ziploc. Cut one of the bottom corners to make a small hole and pipe the jam into the wells, securing the open end so the jam does not spill out.
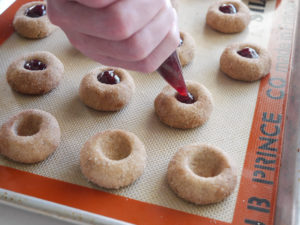
- Bake in a preheated oven at 375°F for approximately 14-16 minutes. The bottom of the cookie should be lightly golden.
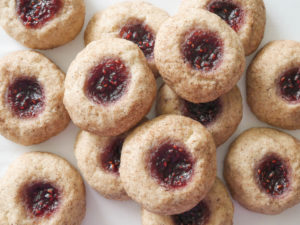
Thumbprint cookies are a treat that can be made with so many fillings, from raspberry to apricot jam and from caramel to chocolate.
Chef Mary’s Tip
Be sure not to overmix the buttery spread. Overmixing will warm the spread, causing the finished dough to be too soft.
We made 4 batches experimenting with mix times and amounts of sugar. We’re giving you our best batch.
Creaming butter and sugar is a method of mechanical leavening for many cookies and cakes. During the creaming process, small air cells are whipped into the butter/sugar mixture and expand when baked, causing the product to rise. The properties in the buttery spread are not the same as butter, so we’re not able to mix in the same fashion.
Nonetheless, these cookies rival the best of the thumbprint cookies that are made with butter, eggs, and wheat flour!
For another fabulous holiday cookie, try our Pumpkin Chocolate Chip Drops!
Your Allergy Chefs are participants in the Amazon Associates Program, an affiliate advertising program designed to provide a means for sites to earn advertising fees by advertising and linking to Amazon.
Raspberry Thumbprints
Yield 18-20 Cookies
Free of: gluten and top 8 allergens.
Melt-in-your-mouth, sugary bites of bliss!
Ingredients
Cinnamon-Sugar
1/2 cup granulated sugar
2 tsp ground cinnamon
Dough
1 tbsp ground flaxseed meal
3 tbsp lukewarm water
2 cups gluten-free all-purpose flour blend
1/2 tsp xanthan gum (omit if your flour blend contains xanthan gum)
1/2 tsp sea salt
1/4 tsp baking soda
1/4 tsp ground cinnamon
1/3 cup vegan buttery spread, such as Earth Balance Natural Buttery Spread, Soy Free
1/2 cup granulated sugar
1/4 cup light brown sugar, lightly packed
1 tsp pure vanilla extract
2 tbsp alternative milk, such as unsweetened hemp milk, if needed
Filling
1/3 cup raspberry jam
Instructions
- Preheat oven to 375-degrees F.
- To make the cinnamon-sugar, in a small bowl or ziploc bag, combine 1/2 cup granulated sugar and 2 teaspoons ground cinnamon. Mix well and set cinnamon-sugar aside.
- Make the flax egg by whisking together flaxseed meal and water in a small bowl. Set aside for 5 minutes.
- In a medium bowl whisk together flour blend, xanthan gum, salt, baking soda, and ground cinnamon. Set aside.
- In the bowl of a stand mixer, using the paddle attachment, beat vegan buttery spread on medium until creamy for 20-30 seconds. Add granulated sugar and brown sugar and beat until incorporated, about 30 seconds, scraping down the sides of the bowl as needed. Be sure not to overmix the buttery spread. Overmixing will warm the spread, causing the finished dough to be too soft.
- Return to flax egg and whisk vigorously. Gradually add flax egg and vanilla to creamed mixture and mix just until combined.
- Add half of the flour mixture and mix on low for 5-10 seconds. Add the remaining flour mixture and mix just until combined and a dough forms, about 30 seconds. Depending on the flour blend you are using, you may need to add a little alternative milk. Not all flours hydrate at the same rate. If your dough is dry and crumbly, add alternative milk a teaspoon at a time, mixing by hand.
- Portion the cookie dough with a scoop, also known in the industry as a disher. We use a #40 scoop, which is usually identified by a purple handle or some portion of the handle being purple. The portion is equivalent to a heaping tablespoon.
- Roll each scoop into a smooth ball. Roll the balls in cinnamon-sugar. We find the easiest and neatest way is to put the cinnamon-sugar in a ziploc bag and add the dough balls one by one, tossing to coat.
- Place the cookie balls on a baking sheet lined with parchment paper or a silpat, spacing them 2-inches apart. Do not flatten.
- Use your thumb to form an indentation in the middle of the cookie, gently pressing about 1/2 way in.
- Once the tray is filled with cookies, fill each well with 1/2 teaspoon of jam. A small spoon will do the job. However, we find that piping the jam is super quick. If you don’t have a decorating or pastry bag, place jam in a ziploc bag. Cut one of the bottom corners to make a small hole and pipe the jam into the wells, securing the open end so the jam does not spill out. Do not use jelly, as jellies tend to melt.
- Bake for approximately 14-16 minutes. The bottom of the cookies should be lightly golden.
Notes
- There’s nothing wrong with a few cracks along the edges of a thumbprint. After all, that’s part of the charm. However, the dough cracks less if you make the indentation after rolling the balls in batches of 6, instead of rolling them all first.
- Adding too much milk or beating the buttery spread too long will cause the dough to be too soft to handle. If your dough is too soft, chill for an hour in the fridge. The cookies may still spread more than normal.
- The cookies can be kept at room temperature for about 3 days before they start to lose their luster.
Courses Sweets
The post Raspberry Thumbprints appeared first on Your Allergy Chefs.
]]>The post Crepes Belle Helene appeared first on Your Allergy Chefs.
]]>
free of gluten and top 8 allergens
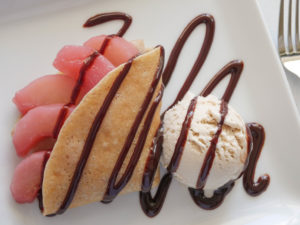
Crêpes Belle Hélène is a spin-off from the German dessert, Poire belle Helene which was created around 1864 by Auguste Escoffier and named after the operetta La belle Helene. The original dessert consisted of pears poached in sugar syrup served with vanilla ice cream, chocolate sauce, and crystallized violets.
We first developed our spin on this classic for Allergic Living Magazine. It quickly became one of our favorite desserts and we’re excited to share it while pears are plentiful.
Let’s get poaching!
Poaching is a cooking method where foods are cooked in a flavorful liquid over low heat.
The pears are best poached a day in advance. This allows time for the pears to absorb more color and flavor from the poaching liquid.
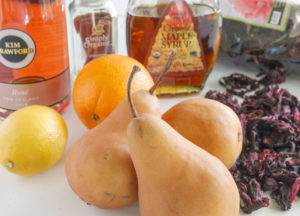
ingredients for poached pears
Bring Rosé wine, water, and sugar to a boil, stirring to dissolve the sugar. You can replace sugar with maple syrup or honey. We tried all three. Joel’s favorite is with organic cane sugar because it provided a more neutral sweetness. We only used 1/2 cup of maple syrup and 1/3 cup of honey in those batches. The flavors in the latter 2 seemed to slightly overpower the pears.
We love poaching pears to achieve a brilliant pink color. Our original recipe had an option of adding 1/4 cup of grenadine. What a beautiful pear the combination produced!
However, the only grenadine we could find was the popular Rose’s brand which is made from high fructose corn syrup, citric acid, sodium citrate, sodium benzoate, Red dye 40 and Blue dye 1, and natural and artificial flavors. Yikes! Okay, I’ve used Rose’s in the industry because that’s what we had available and I wasn’t paying attention to the label. Because we’ve stopped using high fructose corn syrup and artificial stuff, let’s skip the grenadine. Although there are some brands of grenadine that do use real pomegranates without artificial ingredients. You can even make your own with pomegranate juice, sugar, lemon juice, and orange flower water.
To just make things easier we thought about dried hibiscus flowers, also known as jamaica. We had some in the pantry so decided to give it a try. So let’s continue…
When the poaching liquid comes to a boil, remove the pot from the heat. Add hibiscus flowers and let steep for 10 minutes.
While the hibiscus flowers are steeping, peel the pears and cut them in half from top to bottom. Using a melon baller, scoop out the seed pocket. With a small paring knife, cut a shallow “V” down the center of the pear’s cut side to remove the stem, string, and bud end.
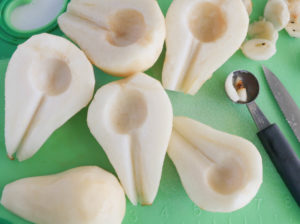
Strain the poaching liquid into a container, discarding the hibiscus flowers. Return the liquid to the saucepan.
Place the pear halves, strips of lemon and orange rinds, and a cinnamon stick in the saucepan with the poaching liquid. Cut a circle from parchment paper and set directly on top of the pears. The parchment paper will ensure the pears are submerged in the liquid so they take on the color of the poaching liquid.
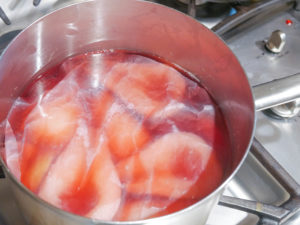
Simmer the pears until tender, about 15-20 minutes. Don’t stir, but flip the pears over from time to time to ensure they absorb color evenly. Poaching time will vary depending on the size and ripeness of the pears.
The Best Pear for Poaching
The popular Bosc pear is the best option for poaching because they hold their shape well when poached. Anjou pears are another top choice. It’s best to use firm pears that are ripe, but not overly ripe.
When the pears are done, turn off the heat and let the pears cool in the poaching liquid. When cool enough, place pears and liquid in the refrigerator overnight to let the pears absorb more color and flavor.
Chocolate Sauce
For the chocolate sauce, melt the chocolate over a double boiler. Gently warm hemp milk in a microwave or heat in a small saucepan just until warm. Whisk the milk into the melted chocolate until smooth and glossy. Set aside at room temperature.
Crepes
For the crepes, make a half batch of Basic Crepe Batter.

Folds
- Half it: To add fillings, you can either add to the top of the crepe before folding in half or add a half poached pear fanned out on top of your folded crepe.
- Roll it: Cut each pear half lengthwise into 6 slices. Fan 3 in the middle at 12 o’clock and fan 3 at 6 o’clock. Fold one side over the filling towards the middle. Fold the other side up and over the pears to overlap in the middle as shown below.
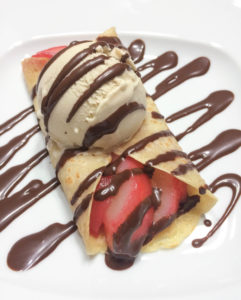
roll it
- Quarter it: Gently fold the crepe in half, then fold in half again. Slide the pear slices underneath the top fold as shown below.

quarter it
To assemble, choose your fold. Serve with a scoop of your favorite vanilla ice cream and drizzle with chocolate sauce.
We hope you enjoy these as much as we do!
Your Allergy Chefs are participants in the Amazon Associates Program, an affiliate advertising program designed to provide a means for sites to earn advertising fees by advertising and linking to Amazon.
Crepes Belle Helene
Yield 6 Crepes
Free of: gluten and top 8 allergens.
A delicious fall dessert you’ll want all year round!
Ingredients
Poached Pears
2 cups Rosé wine (see recipe notes)
3-1/4 cups water
3/4 cup organic cane sugar (see recipe notes)
1/2 cup dried hibiscus flowers (jamaica)
3 (2-inch) strips lemon rind
3 (2-inch) strips orange rind
1 cinnamon stick
3 bosc pears
Chocolate Sauce
8 ounces good quality allergen free chocolate, chopped into pieces
1 cup hemp milk
Crepes
1/2 recipe Basic Crepe Batter
Instructions
- For the poached pears, in a medium saucepan combine the Rosé, water, and sugar. Bring to a boil over medium-high heat, stirring to dissolve the sugar. Remove from heat and add hibiscus flowers. Let steep for 10 minutes.
- While the hibiscus flowers are steeping, peel the pears and cut them in half from top to bottom. Using a melon baller, scoop out the seed pockets. With a small paring knife, cut a shallow “V” down the center of each pear’s cut side to remove the stem, string, and bud end.
- Strain the poaching liquid into a container, discarding the hibiscus flowers. Return the liquid to the saucepan.
- Place the pear halves, lemon and orange rinds, and cinnamon stick in the saucepan with the poaching liquid and rest a circle of parchment paper directly on top of the pears. The parchment paper will ensure the pears are submerged in the liquid so they take on the color of the poaching liquid. Bring to a boil over medium-high heat. When boiling reduce heat to medium-low and a gentle simmer and poach until tender, about 15-20 minutes. Don’t stir, but flip the pears over occasionally to ensure they absorb color evenly. When the pears can be pierced easily with a fork, they are done. Turn off the heat and let the pears cool in the liquid. When cool enough, place pears and liquid in the refrigerator overnight to let the pears absorb more color and flavor. Bring to room temperature before serving.
- For the chocolate sauce, melt the chocolate over a double boiler. Gently warm the hemp milk in a microwave or heat in a small saucepan just until warm. Add the milk to the chocolate and whisk together for several minutes until smooth and glossy. Set aside at room temperature.
- For the crêpes, make crepes using a half batch of Basic Crepe Batter.
- To assemble, place a crêpe in the center of a plate. Cut each pear half lengthwise into 6 slices. Fan 3 in the middle at 12 o’clock and fan 3 at 6 o’clock. Fold the edges of the crepe up and over the pears to overlap in the middle. Place a scoop of your favorite frozen dessert in the center. Drizzle with chocolate sauce. Delicious!
Notes
We first developed Crepes Belle Helene for Allergic Living Magazine.
For an alcohol free version, substitute pomegranate juice or cranberry juice for the wine and increase the sugar to 1 cup.
You can substitute 1/2 cup of maple syrup or 1/2 cup honey for the sugar. Be aware that these substitutions will slightly overpower the pears…but will still be good.
Dried hibiscus flowers, or jamaica, can be found at Mexican markets, some Whole Foods Markets, and online.
Courses Sweets
The post Crepes Belle Helene appeared first on Your Allergy Chefs.
]]>The post Basic Crepe Batter appeared first on Your Allergy Chefs.
]]>
free of gluten and top 8 allergens
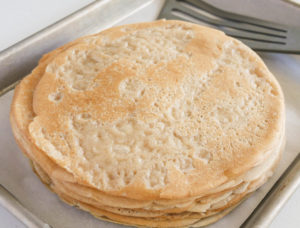
This basic crepe batter is a simple, foolproof crepe recipe that can be dressed up with sweet or savory toppings and any number of flavorful fillings.
Crepes sound fancy, but they’re so simple to make.
The classic French street-food is made with wheat flour, eggs, milk, butter, sugar, and vanilla (or orange blossom water). Check out our recipe to see how we’ve taken out the wheat flour, eggs, milk, and butter…
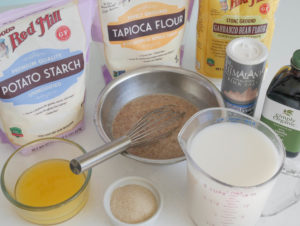
mise en place
Step 1
To make the crepe batter, in a blender combine rice milk beverage, flax eggs, chickpea flour, potato starch, tapioca flour, a little granulated sugar and sea salt, vanilla extract, and dairy-free, soy-free margarine that has been melted. Blend until the batter is smooth, about 20-30 seconds. Scrape the sides and blend again briefly until batter is lump-free. Refrigerate batter for one hour.
Step 2
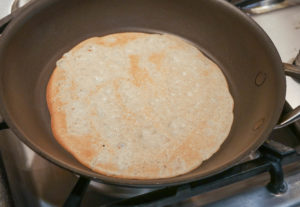
Heat a crepe pan, or 8-inch or 10-inch nonstick pan over medium heat. Our pan here is 8-inches in diameter. Lightly oil the pan with a small amount of dairy-free margarine. Lift pan off heat, and ladle 1/4 cup of batter into the center. Tilt and swirl pan to evenly coat bottom with a thin layer of batter.
Return pan to heat and cook until edges are dry and crepe’s underside is lightly golden, about 1 to 1-1/2 minutes. Flip crepe over and cook for another minute or so, until lightly golden.
Step 3
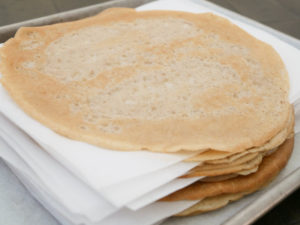
Slide crepe onto a plate or tray. Cover with foil or parchment paper to keep warm while cooking remaining crepes. Fill crepes immediately and serve or…
Storage
Layer parchment paper between crepes and portion cooled crepes into large zip lock bags. Crepes can be made a day ahead and stored in the refrigerator. Any leftovers can be stored in the freezer for up to 2 months.
To reheat, heat in the microwave or in a pan until warm.
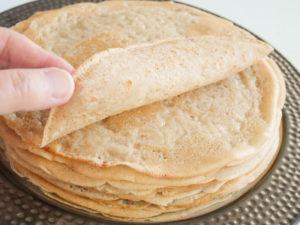
Fillings for crepes are endless. Here are a few options that can be made allergy-friendly.
Sweet
- poached pears (check out our Crêpes Belle Hélène)
- your favorite jam
- apple butter
- chocolate ganache
- lemon curd
- blueberry lemon
- roasted pineapple
- peach or plum compote
- sautéed bananas
- fresh strawberries and berries
- honey-brandy oranges
Savory
- wild mushrooms
- zucchini, spinach, and onions
- broccoli and cheddar shreds (or broccoli, ham, and cheddar shreds)
- hummus, roasted red pepper, and Violife Feta
- asparagus with hollandaise (or asparagus and prosciutto with hollandaise)
- chicken florentine
- chickpea salad, avocado, and citrus (or tuna salad, avocado, and citrus)
- beef or beyond meat picadillo
We’d love to hear what your favorites are!
Your Allergy Chefs are participants in the Amazon Associates Program, an affiliate advertising program designed to provide a means for sites to earn advertising fees by advertising and linking to Amazon.
Basic Crepe Batter
Yield 14-16 Crepes
Free of: gluten and top 8 allergens.
The perfect canvas for any sweet or savory filling!
Ingredients
1/4 cup flaxseed meal
3/4 cup lukewarm water
2 cups rice milk beverage
1 cup chickpea flour (also known as garbanzo bean flour)
1 cup potato starch
2/3 cup tapioca flour
4 tbsp dairy-free, soy-free margarine (such as Earth Balance sticks) melted & cooled
2 tbsp granulated sugar
1 tsp sea salt
1 tsp vanilla extract
dairy-free, soy-free margarine as needed, for cooking crepes
Instructions
- In a small bowl, make the flax eggs by whisking together the flaxseed meal and water. Set aside while you “mise en place,” or organize remaining ingredients. Return to flaxseed mixture and whisk again. The consistency will be gelatinous.
- Using a blender, add flax eggs, rice milk, chickpea flour, potato starch, tapioca flour, margarine, sugar, salt, and vanilla and blend until smooth, about 20-30 seconds. Scrape the sides and blend again briefly until batter is lump-free. Cover batter and let rest in the refrigerator for one hour.
- Heat a crepe pan, or 8-inch or 10-inch non-stick pan, over medium heat. Grease the pan with a small amount of dairy-free margarine. Lift pan off heat, and ladle a heaping 1/4 cup of batter into the center of the pan. Tilt and swirl pan to evenly coat bottom with a thin layer of batter. Return pan to heat and cook until edges are dry and crepe’s underside is lightly golden, about 1 to 1-1/2 minutes. Gently flip crepe over and allow to cook for another minute or so, until lightly golden. Slide crepe onto a plate or tray. Cover with foil or parchment paper to keep warm while cooking remaining crepes.
- Use crepes immediately or lay parchment paper between crepes and portion cooled crepes into large zip lock bags. Crepes can be made a day ahead and stored in the refrigerator. Any leftovers can be stored in the freezer for up to 2 months. To reheat, heat in the microwave or in a pan until warm.
Courses Breakfast & Brunch
The post Basic Crepe Batter appeared first on Your Allergy Chefs.
]]>The post Roasted Peach Shortcakes appeared first on Your Allergy Chefs.
]]>
plant-based, free of gluten and top 8 allergens
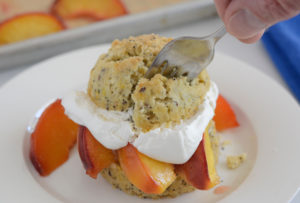
Few desserts say summer like these roasted peach shortcakes. Our version gets an upgrade with three-seed biscuits.
These hearty, golden biscuits provide a delicious platform for peak-season fruit and fluffy dollops of allergy-friendly whipped topping.
Check out this unforgettable summer dessert!
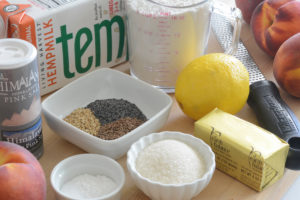
mise en place
Three-Seed Biscuits
In a large bowl, sift together gluten-free all-purpose flour, baking powder, xanthan gum, and baking soda. Add organic cane sugar (granulated), poppy seeds, sesame seeds, flax seeds, lemon zest, and salt. Whisk to combine.
Cut in the margarine.
Trick for Cutting Butter or Margarine into Flour
The usual way to cut butter or margarine into flour is to cut the cold butter into small pieces. These pieces are tossed with the flour mixture until coated. The butter is then worked into the dry ingredients with a pastry cutter or by pinching and rubbing small pieces between your fingers until they are pea sized.
These small, uneven pieces of unincorporated butter create steam pockets as the biscuits bake, resulting in a tender, flaky product.
This is a great way to cut the butter into the flour. However, we have another way that is super quick and easy.
Take a stick of allergy-friendly margarine (we like Earth Balance Soy Free Buttery Sticks) and place in the freezer for an hour or two.
Remove the margarine from the freezer, grate half of it into the flour and toss together. Then grate the remaining margarine into the flour and toss well, breaking up any large clumps with your fingers. Work fast so the margarine doesn’t warm up.
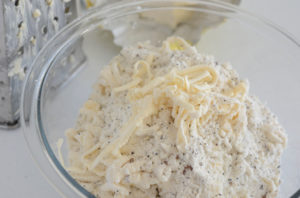
Once the margarine shreds are worked with fingers into the flour to the size of peas, gently stir in chilled unsweetened hemp milk, just until combined.
Line a baking sheet with a silpat and portion the dough into rings (3-inches in diameter by 1 3/4-inches tall) using a green (#12) portion scoop (also know as a disher).
If you don’t have rings, don’t worry. Use a portion scoop or a 1/3-cup measuring cup to mound balls of dough onto prepared baking sheet.
Bake the biscuits for about 18-20 minutes in an oven preheated to 400-degrees F.
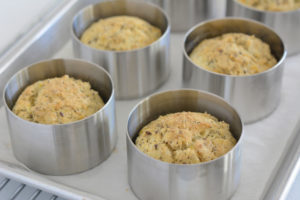
We made 2 batches, one with xanthan gum and one without xanthan gum. The batch without the xanthan gum had a texture that was too crumbly, so we suggest not leaving out the xanthan gum. We also used King Arthur Flour’s Gluten Free All-Purpose Flour.
Just like most baked goods, even those containing gluten, these biscuits are best the same day they are made.
At Walt Disney World, baked goods were baked fresh daily. We even baked some items fresh every couple of hours.
Peachy Keen
Take 4 large peaches, pit and cut into 1/2-inch slices. Toss with pure maple syrup and a little olive oil.
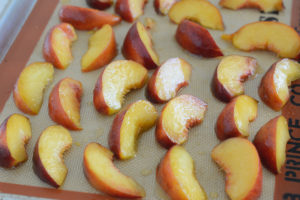
Place in the oven and roast at 425-degrees F for about 12-15 minutes, until peaches are soft but not mushy.
Allow the peaches to cool…or not! Wouldn’t the shortcakes be great with warm peaches and vanilla or caramel ice cream alternative? We think so!
Roasting?
Roasting peaches takes the tart edge off and intensifies their flavor. This is especially helpful if peaches are not at the peak of perfection.
However, if you have perfectly ripe peaches, you don’t have to roast them. Just pit and slice ’em up, tossing with a tablespoon of sugar and a squeeze (about a tablespoon) of fresh lemon juice. Refrigerate for 30 minutes or up to an hour before assembling.
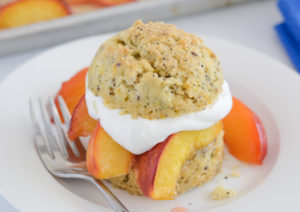
Now for the fun! Split biscuits. Place bottom halves on serving plates and top with peaches and allergy-friendly whipped topping. Replace shortcake tops and enjoy these roasted peach shortcakes!
Roasted Peach Shortcakes
Yield 8 Servings
Free of: gluten and top 8 allergens.
An unforgettable summer dessert!
Ingredients
Biscuits
2 cups all-purpose gluten-free flour blend
2 tsp baking powder
1/2 tsp xanthan gum (omit if using a flour blend with xanthan)
1/2 tsp baking soda
3 tbsp granulated organic cane sugar
1 tbsp poppy seeds
1 tbsp toasted sesame seeds
1 tbsp flax seeds
1 tbsp lemon zest (zest from one lemon)
1 tsp fine sea salt
8 tbsp allergy-friendly margarine (placed in freezer for 1-2 hours), such as Earth Balance Soy Free Buttery Sticks
1 cup unsweetened hemp milk, chilled
Peaches
4 large peaches
2 tbsp pure maple syrup
2 tbsp olive oil
Instructions
- For the biscuits, preheat the oven to 400-degrees F.
- In a large bowl, sift together the flour, baking powder, xanthan gum, and baking soda. Add sugar, poppy seeds, sesame seeds, flax seeds, lemon zest, and salt. Whisk to combine.
- Remove margarine from the freezer. Grate half of the margarine into the flour. Toss together. Grate remaining margarine into the flour and toss well, breaking up any large clumps.
- If you don’t have a box grater, cut the cold margarine into small pieces and work into the flour mixture with your fingers or a pastry cutter to the size of peas.
- Working fast, so the margarine doesn’t warm up, stir in the milk until incorporated. Line a baking sheet with a silpat or parchment paper and portion the dough into rings (3-inches in diameter by 1 3/4-inches tall) using a green (#12) portion scoop.
- If you don’t have rings, don’t worry. Use a portion scoop or a 1/3-cup measuring cup to mound balls of dough onto prepared baking sheet. If desired, sprinkle lightly with demerara sugar.
- Bake about 18-20 minutes or until done. Cooking time will depend on thickness of the biscuit.
- Remove from oven and set aside to cool.
- For the peaches, preheat oven to 425-degrees F. Pit and cut peaches into 1/2-inch slices. In a medium bowl, gently toss peaches with maple syrup and olive oil.
- Arrange peach slices in a single layer on a baking sheet lined with parchment paper or a silpat. Bake for 12-15 minutes, until peaches are soft but not mushy. Remove from oven and let cool.
- To assemble dessert, split biscuits. Place bottom halves on serving plates; top with peaches and allergy-friendly whipped topping. Replace shortcake tops.
Notes
Roasting peaches takes the tart edge off and intensifies their flavor. This is especially helpful if peaches are not at the peak of perfection.
However, if you have the perfectly ripe peaches, you don’t have to roast them. Just pit and slice ’em up, tossing with a tablespoon of sugar and a squeeze (about a tablespoon) of fresh lemon juice. Refrigerate for 30 minutes or up to an hour before assembling.
Courses Sweets
The post Roasted Peach Shortcakes appeared first on Your Allergy Chefs.
]]>