The post Mushroom Jun appeared first on Your Allergy Chefs.
]]>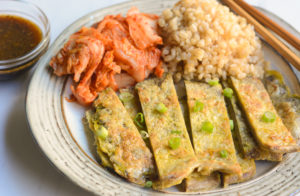
vegan and free of gluten and top 8 allergens
There’s meat jun and fish jun. Well, why not mushroom jun!
Introduced by a local Korean restaurant in Kaneohe, Hawaii, meat jun has become popular Hawaiian comfort food. Thin strips of marinated beef are dredged in flour and egg, and pan fried. It’s sort of Hawaiian, and it’s sort of Korean.
When we got the most amazing grey oyster mushrooms from Las Vegas Mushrooms, we immediately wanted to create a mushroom jun, vegan and free from gluten and the top 8 allergens.
We miss the fusion of ethnic culinary influences that is part of Hawaii’s cuisine. Joel reminisces often about his neighborhood Soon’s Kal-Bi Drive In. He says the secret is the sauce. We share with you one of our new favorites!
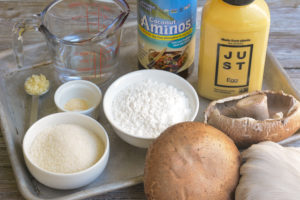
mise en place
The Mushrooms
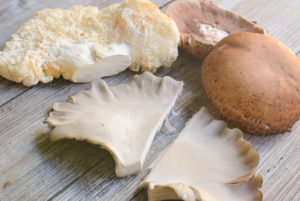
We tried the 3 different mushrooms pictured below. On the top left, are the lion’s mane. Then we have the portobello, followed by the grey oyster on the bottom. These grey oysters have huge caps with very short stems.
We love portobellos. However, they are not the best mushroom for this dish. They don’t press as thin as lion’s mane and grey oyster. And it’s important that the mushrooms are very thin, about 1/4-inch thick. Cut lion’s mane mushrooms into 1-inch steaks before cooking and pressing, as they are usually globe-shaped.
Steps
- Make a marinade (coconut aminos, water, sugar, and garlic)
- Make a dipping sauce (coconut aminos, sugar, rice vinegar, sesame oil, grated ginger, pepper, and sriracha)
- Trim, cook and press the mushrooms for about 2 minutes on each side in a large skillet, with a smaller heavy pot or cast-iron pan placed on top.
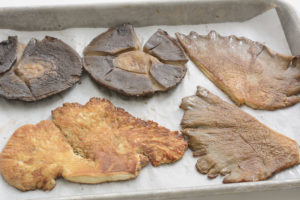
- Cooked and pressed mushrooms are placed in marinade for 15 minutes.
- Mushrooms are dredged in gluten-free flour blend, then in Just Eggs (or eggs, if egg is not an issue). They are then cooked until golden brown, about 1-2 minutes on each side.
Mushroom jun is aloha with love!
Mushroom Jun
Yield 4 servings
Free of: gluten and top 8 allergens.
Mushroom jun fun!
Ingredients
Marinade
1/2 cup coconut aminos
6 tablespoons water
6 tablespoons organic granulated cane sugar
1 teaspoon minced garlic
Dipping Sauce
1/4 cup coconut aminos or allergy-friendly soy sauce (such as Ocean’s Halo organic, gluten-free and soy-free sauce)
1 tablespoon organic granulated cane sugar
1 tablespoon rice vinegar or rice wine vinegar
1 teaspoon sesame oil
1/2 teaspoon grated fresh ginger (or 1/8 teaspoon ground ginger)
1/4 teaspoon black pepper
1/4 teaspoon sriracha, or to taste
Mushroom Jun
1 pound grey oyster mushrooms, caps only (about 8 caps)
3 tablespoons vegetable oil, divided and as needed
1/4 teaspoon onion powder
1/4 teaspoon garlic powder
1/2 cup gluten-free all-purpose flour blend
1/2 cup Just Egg
1-2 tablespoons thinly sliced green onions, garnish
Instructions
- For the marinade, in a small bowl, combine coconut aminos, water, sugar, and garlic. Stir to dissolve the sugar. Set aside.
- For the dipping sauce, in a small bowl, combine the coconut aminos, sugar, rice vinegar, sesame oil, ginger, pepper, and sriracha. Stir to dissolve the sugar. Set aside in refrigerator.
- For the mushroom jun, heat a large nonstick skillet over medium-high heat. Add 1 tablespoon oil. Combine the onion and garlic powders. When oil is hot, add 4 mushroom caps, gill sides up. Sprinkle mushrooms with half of the onion and garlic powder mixture. Press the mushrooms with a smaller heavy pot or cast-iron pan, applying pressure to flatten the mushroom caps. After 2 minutes, remove the top pan and flip mushrooms over. Cook mushrooms for another 2 minutes. Add 1 tablespoon oil and repeat with remaining mushrooms.
- Place mushroom caps in marinade for 15 minutes, turning occasionally to cover both sides.
- Place flour in a wide shallow bowl. In another wide shallow bowl, add Just Egg and whisk in about 2-3 teaspoons of water to thin eggs.
- In the same nonstick skillet over medium heat, add 1-2 teaspoons oil. Remove a mushroom from the marinade and dip in flour making sure to cover each mushroom well. Gently shake off any excess flour, then dip in eggs making sure to coat well. Cook immediately until golden brown, about 1-2 minutes per side. Continue with all the mushroom caps, adding a little oil as needed. Transfer to a plate. Slice mushrooms into strips about 1-inch wide.
- Garnish with green onions, if desired. Serve with dipping sauce on the side. Add kimchi and rice to make dinner a Korean favorite!
Notes
- If soy is not an issue, coconut aminos can be replaced with equal amount of soy sauce.
- If egg is not an issue, substitute 2 large eggs for Just Egg, lightly whisking eggs with a fork.
Courses Mains
The post Mushroom Jun appeared first on Your Allergy Chefs.
]]>The post Black-Eyed Peas and Tomato Stew with Sautéed Bananas appeared first on Your Allergy Chefs.
]]>
vegan and free of gluten and top 9 allergens
Black-eyed peas are a Southern good-luck tradition for the New Year. I grew up on this tradition and my mom never missed serving up black-eyed peas on New Year’s Day.
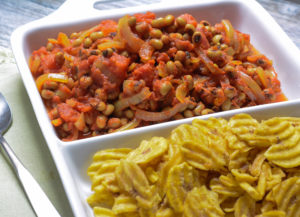
This year we’re enjoying them in a stew. Inspired by the dish Red-Red from Ghana, this simple black-eyed peas and tomato stew is traditionally served with fried plantains. We like dishing it up with plantain chips or sautéed bananas, which make a great stand in for plantains.
Enjoy this healthy stew throughout the year!
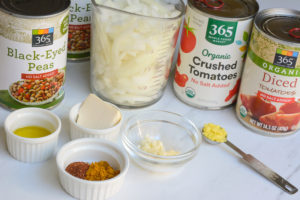
mise en place
The Ingredients
Using canned black-eyed peas slashes time without sacrificing flavor.
Thinly sliced onions are sautéed until lightly caramelized. Minced garlic, curry powder, grated fresh ginger, and chili powder are added and cooked with the onions for one minute. Tomatoes and black-eyed peas are added and the stew simmers for 15 minutes.
Sautéed Bananas or Plantain Chips
While the stew is simmering, cut 2 firm bananas in half lengthwise and then crosswise into 2 to 3-inch pieces. Sauté the bananas in a little vegan butter for about 5 minutes, until browned on both sides. The combination of the stew and bananas is incredible!
Or enjoy with plantain chips.
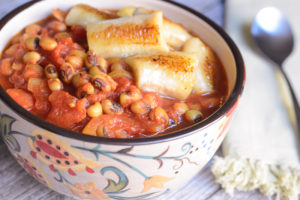
Black-Eyed Peas and Tomato Stew with Sautéed Bananas
Yield 6 cups
Free of: gluten and top 9 allergens.
This simple and delicious stew is inspired by the dish Red-Red from Ghana.
Ingredients
1 tablespoon vegan butter (such as Earth Balance Soy Free Buttery Sticks), divided
2 teaspoons olive oil
1 yellow onion, thinly sliced (about 2 cups)
1 teaspoon minced garlic (about 1 clove)
1 teaspoon curry powder
1/2 teaspoon ancho or chipotle chili powder
1/2 teaspoon grated fresh ginger
1 (15-ounce) can crushed tomatoes
1 (14.5-ounce) can diced tomatoes
2 (15-ounce) cans black-eyed peas, drained and rinsed (3 cups drained peas)
2 firm bananas, optional
Store-bought plantain chips, optional
Instructions
Prep
- If serving the stew with sautéed bananas, cut each banana crosswise into 3 or 4 pieces, depending on size. Cut each piece in half lengthwise. Set aside.
Steps
- Heat 1 teaspoon butter and the oil in a large saucepan over medium heat. Add onion and cook about 8-10 minutes, until lightly caramelized, stirring frequently.
- Add garlic, curry powder, chili powder, and ginger and cook for 1 minute, stirring constantly.
- Add crushed and diced tomatoes and black-eyed peas and bring to a simmer. Reduce heat to medium-low, cover and cook for 15 minutes, stirring occasionally.
- While black-eyed peas and tomatoes are simmering, if you are serving with sautéed bananas, melt remaining 2 teaspoons butter in a skillet over medium-high heat. Add bananas and reduce heat to medium. Cook about 5 minutes or until browned on both sides, gently flipping halfway through.
- Serve the stew with sautéed bananas, plantain chips, or brown rice.
Courses Mains
The post Black-Eyed Peas and Tomato Stew with Sautéed Bananas appeared first on Your Allergy Chefs.
]]>The post Squasho Tacos appeared first on Your Allergy Chefs.
]]>
free of gluten and top 9 allergens
There are so many ways to dress up a taco. Such a simple food to which you can add all kinds of veggies, proteins, sauces and salsas.
Taco Tuesday is one of our favorite nights of the week. We can’t ever get enough Mexican food, and tacos are a definite favorite!
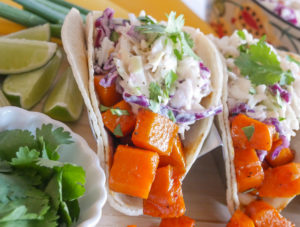
Check out our dream tacos…While we lived in Santa Clarita, one of our favorite dining spots was Wolf Creek Brewery. They have the most amazing sweet and spicy roasted butternut squash tacos.
Now that we’re in Las Vegas, the only way we can have our favorite is to replicate those tacos at home. So that’s just what we did!
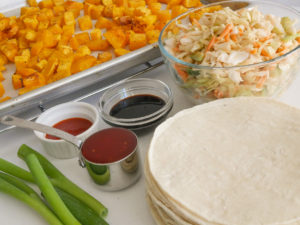
mise en place
The sauce is key and the refrigerator chef struck again by raiding the pantry and mixing together sweet chili sauce, molasses, sriracha and minced green onions. This is gonna work!
Cut a large butternut squash into cubes and toss 6 cups with a little olive oil, salt and pepper. Roast cubes in an oven heated to 425°F for about 20-25 minutes until the squash is tender and lightly golden on the edges.
Tortillas Abound!
Heat your favorite corn or flour tortillas. If you avoid or can’t have corn, try “Potapas Gluten-Free Sweet Potato Tortillas. They are grain-free and free from corn and the top 9 allergens. We just found these in the freezer section at Sprouts and they are fantastic! As far as flour tortillas, our favorite are Follow Your Heart Gluten-Free Classic Tortillas. We haven’t found them yet here in Las Vegas, but we’re working on it.
In a large bowl, toss the warm butternut squash with the sauce. Fill 2 corn tortillas stacked together or 1 flour tortilla with about 1/2 cup of roasted squash and top with 1/2 cup creamy coleslaw. Garnish with chopped green onions, if desired.
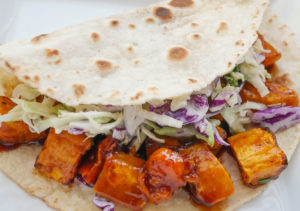
squasho tacos with gluten-free flour tortillas
We hope you enjoy our take on our favorite from Wolf Creek Brewery.
Squasho Tacos
Yield 8 tacos
Free of: gluten and top 9 allergens.
Just in time for Taco Tuesday!
Ingredients
1 large butternut squash (about 2-1/2 pounds), peeled and cut into 1-inch cubes
1 tbsp olive oil
1/2 tsp salt
1/8 tsp black pepper
1/4 cup sweet chili sauce, such as Sky Valley Sweet Chili Sauce
2 tbsp molasses
1 tbsp minced green onions
2 tsp sriracha
16 corn tortillas or 8 gluten-free flour tortillas
4 cups creamy coleslaw
Chopped green onions, garnish
Instructions
- Preheat the oven to 425-degrees F. Measure out 6 cups of butternut squash cubes and place in a large bowl. Add oil, salt, and pepper. Toss well until evenly coated. Arrange the squash in a single layer on a parchment paper lined baking sheet, making sure they have a little space between them. Cook butternut squash for about 20-25 minutes until the squash is tender and lightly golden on the edges.
- While the squash is roasting, prepare the sauce by whisking together the chili sauce, molasses, green onions, and sriracha in a small bowl until well blended.
- Heat the tortillas and keep warm.
- Place warm squash cubes in a bowl and add the sauce, tossing to combine and coat all cubes with the sauce.
- If using corn tortillas, stack 2 together and fill with ½ cup of roasted squash and top with ½ cup coleslaw. If using flour tortillas, use 1 tortilla per taco. Garnish with chopped green onions, if desired.
Notes
How to Peel Butternut Squash
To make the squash easier to peel, microwave the whole squash for about 30 seconds.
Lay the butternut squash on its side on a large cutting board. Using a chef’s knife, cut off about ½-inch from the bottom of the squash. Then cut off ½-inch from the stem end. Holding the squash in one hand, use a sharp vegetable peeler in the other hand to peel all of the skin off of the squash, while carefully holding the squash with your other hand. Discard the peel.
Stand the peeled squash upright on the cutting board. If it’s wobbly, make another cut at the bottom to even it out. Make one long cut, down the middle from the top to bottom. Use a spoon to scoop out the seeds and pulp from the squash cavity.
Lay the squash halves, cut side down on the cutting board. Cut in half crosswise. Working with one piece at a time, cut the squash into 1-inch slices, lengthwise. Lay the slices down (you can stack a few at a time) and make another set of lengthwise cuts. Then cut crosswise to make cubes.
Courses Mains
The post Squasho Tacos appeared first on Your Allergy Chefs.
]]>The post Pad Thai Delicious appeared first on Your Allergy Chefs.
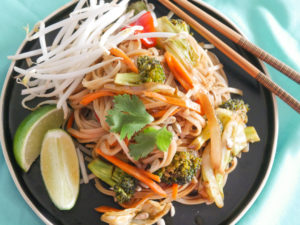
]]>
free of gluten and top 9 allergens
This restaurant-quality Pad Thai starts with fresh ingredients including rice noodles, broccoli, cabbage, and carrots that are tossed in a delicious homemade sauce.
Enjoy the most popular Thai dish in America…and skip the delivery!
Check out our video…
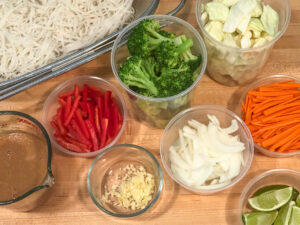
mise en place
Pad Thai is one of our favorite things to eat. This is the dish by which we used to measure every Thai restaurant.
Traditional pad Thai recipes call for tamarind paste. Since it’s not always easy to find, we went with ingredients that most people have or can easily purchase.
Once you have your mise en place, it only takes 10 minutes to cook up. So let’s talk a little about the prep.
Prepping the Cabbage
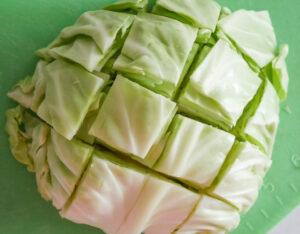
Peel away and discard any tough outer layers or leaves. Rinse and dry the cabbage. Cut the head of cabbage in half lengthwise, all the way through the core. Cut into the core at an angle and remove it from each half.
Place each cabbage half on a cutting board, flat side down. Cut about 3 slices horizontally, and 3 slices crosswise, as shown below. If the head of cabbage is large, make 4 cuts in both directions.
Noodles
Our favorite pad Thai noodles are Annie Chun’s Pad Thai Brown Rice Noodles. There are instructions for both boiling or soaking the noodles. We cooked the noodles in boiling water for about 5 minutes, then drained and rinsed under cold water.
However, follow the cooking instructions on the package of noodles of your choice.
The best thing about making your own pad Thai is that you know exactly what’s in it!
We ordered takeout this week from one of the most popular Thai restaurants, allergy-friendly and known for their vegan and gluten-free options. The manager even has life threatening allergies. I was assured several times that my pad Thai was gluten-free, vegan, and soy-free. Shortly after eating, I had trouble breathing, my stomach swelled and I felt odd. I’m thankful it was a mild reaction, but it still took several days to completely get back to normal.
We just made the easy decision to avoid Thai restaurants. We’ll enjoy our Thai food, homemade and safely at home.
Pad Thai Delicious
Yield 6 Servings
Free of: gluten and top 9 allergens.
Homemade Pad Thai that is restaurant-worthy!
Ingredients
Sauce
4.5 tbsp fresh lime juice
4.5 tbsp light brown sugar, packed
1/3 cup vegetable broth
3 tbsp rice vinegar (aka rice wine vinegar)
3 tbsp coconut aminos
3 tbsp sunflower seed butter
1-1/2 tsp sriracha
2 tbsp cornstarch
Pad Thai
8 ounces dry pad Thai noodles (we like Annie Chun’s Pad Thai Brown Noodles)
2 cups of bite-sized broccoli florets
2 tbsp vegetable oil
1 thinly sliced or diced yellow onion (about 1-1/2 cups)
1 cup julienne cut carrots
1 tbsp minced garlic
1 cup julienne cut red bell pepper, about 1 medium pepper (see recipe notes)
4 cups roughly chopped green cabbage
Water or veggie broth, as needed
Garnishes, optional
2 cups bean sprouts
1/2 cup chopped fresh cilantro or basil
1/2 cup toasted sunflower seeds
Lime wedges
Instructions
- For the sauce, in a small bowl whisk together lime juice, brown sugar, veggie broth, rice vinegar, coconut aminos, sunbutter, and sriracha. Set aside in fridge until ready to use. The cornstarch will be added later.
- For the Pad Thai, prepare the rice noodles according to the package directions. Drain and rinse under cold water to cool completely. Toss with a little vegetable oil to prevent sticking. Set the pasta aside, in the strainer.
- Steam the broccoli just until tender, about 4 minutes, being careful not to overcook. Transfer the broccoli to an ice bath (bowl with water and ice). Once cool, drain well.
- Heat a large, nonstick skillet or wok over medium-high heat. Pour oil into the pan and heat until oil is shimmering. Add the onions and carrots. Stir-fry for about 2 minutes. Add garlic, cabbage, and bell pepper. Stir-fry for about 3 minutes. Add broccoli and ¼ cup of water or veggie broth. Cover and let broccoli heat through for 1-2 minutes.
- While broccoli is heating up, whisk cornstarch into the reserved sauce. Remove lid and pour the sauce over the vegetables. When sauce comes to a boil, stir to coat vegetables and cook for 2 minutes, stirring occasionally.
- With the noodles in the pasta strainer, rinse under hot water to warm the noodles. Drain well and add noodles to the vegetables, tossing gently to combine.
- Garnish with toasted sunflower seeds, cilantro, lime wedges, and bean sprouts, if desired.
Notes
There are several ways to julienne bell peppers. One way is to cut the top and bottom off the pepper, reserving for another use. Hold the pepper upright and cut off each side, so you end up with four or five pieces, discarding the remaining core. Turn the large pepper pieces skin side down on the cutting board. Flatten them with your fingers and use the tip of the knife to remove rib from inside. Cut the pepper into thin strips. If it is a long pepper, cut each section into half to shorten the strips.
Courses Mains
The post Pad Thai Delicious appeared first on Your Allergy Chefs.
]]>The post Roasted Cauliflower Stew appeared first on Your Allergy Chefs.
]]>
free of gluten and top 9 allergens
You’ll love this hearty and satisfying roasted cauliflower stew loaded with veggies and warm spices. We enjoyed it with brown rice, but serve it on top of your favorite cooked grains, or with your favorite crusty bread.
Joel put this together 2 weeks ago with leftovers from the fridge. Yes, the refrigerator chef strikes again! And we’re so obsessed with this dish, we’ve made it twice since!
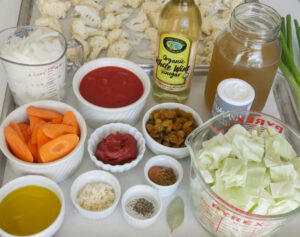
mise en place
Cutting Cauliflower
Cutting cauliflower into even pieces can be challenging. Here are a few steps to make it easy.
- Remove large leaves from the base of the cauliflower head and discard.
- With a paring knife, cut around the stem and remove the stem.
- Break the cauliflower into large florets with your fingers and rinse.
- Cut the cauliflower into smaller bite-sized florets. The large florets can be cut in half or quarters.
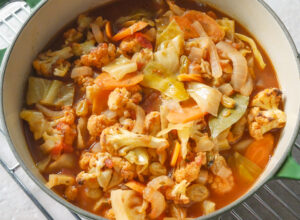
Why Roast Cauliflower?
Roasting cauliflower really brings out its sweetness and buttery flavor…and the texture is unmatched.
Besides roasting the cauliflower, it’s important to use a marinara sauce versus a canned tomato sauce for a more robust flavor. Not all tomato sauces are created equal.
The first time Joel made this, he used our leftover tomato sauce which is more like a marinara. The second time we used canned tomato sauce, and the third time we used Rao’s marinara. We did not like the second version with the canned tomato sauce as much as the other two. Both the first one with our tomato sauce and last night’s with Rao’s marinara were outstanding!
We hope you enjoy this recipe!
Chef Joel’s Tips
- Bias slicing, or cutting on the diagonal is a popular cut for vegetables. For the carrots in this recipe, hold a small chef’s knife at a 45-degree angle to the carrot. Begin cutting slices at the same angle, about 1/8 to 1/4-inch thick.
- Your best bet is to use stainless steel or enameled cookware or stove-safe glass or ceramics if you have them. These materials don’t react with the acid in tomatoes as cast iron and aluminum do. Cast iron and aluminum react chemically with the acid in tomatoes and may give the sauce an unpleasant flavor or color.
Roasted Cauliflower Stew
Yield 6 servings
Free of: gluten and top 9 allergens.
A hearty and satisfying roasted cauliflower stew!
Ingredients
4 cups cauliflower florets, about 1 small head (see recipe notes)
4 tbsp olive oil, divided (2 tbsp + 2 tbsp)
3/4 tsp salt, divided (1/2 tsp + 1/4 tsp)
1/4 tsp black pepper
1 onion, thinly sliced into quarter moons, about 1-1/2 cups (see recipe notes)
4 cups chopped green cabbage
1 cup sliced carrots on the diagonal (see recipe notes)
2 tsp minced garlic
1 tsp ground cinnamon
1/2 tsp ground cumin
1 bay leaf
4 cups vegetable broth
1 cup prepared marinara sauce, such as Rao’s or our homemade tomato sauce
1/2 cup golden raisins
3 tbsp white wine vinegar
3 tbsp tomato paste
Instructions
- Preheat oven to 400-degrees F. In a large bowl, toss the cauliflower with 2 tbsp oil, ½ tsp salt, and pepper. Arrange the cauliflower florets in a single layer, cut side down, on a parchment or foil lined baking sheet, making sure they have a little space between them. If you use parchment, be sure to use a brand that can tolerate 400-degrees F oven heat. Brands vary with their heat tolerances. Roast for about 25 minutes or until the cauliflower is tender and slightly caramelized, but not overcooked. Remove from oven and set aside.
- Heat large saucepan over medium heat. Add remaining 2 tbsp oil. When oil is hot, add onions and remaining ¼ tsp salt and cook for 10 minutes, stirring occasionally. Add cabbage and carrots; cook for 1 minute.
- Add garlic, cinnamon, cumin, and bay leaf; cook for 1 minute.
- Add broth, marinara, raisins, vinegar, and tomato paste and increase heat to high. When it just comes to a boil, reduce heat to medium and simmer for 10 minutes. Remove and discard the bay leaf.
- Add roasted cauliflower and stir to combine. Heat for 2-5 minutes to reheat the cauliflower.
- Eat as is or serve with steamed rice and garnish with green onions, if desired.
Notes
- To cut cauliflower, remove large leaves from the base and discard. With a paring knife, cut around the stem and remove the stem. Break the cauliflower into large florets with your fingers and rinse. Cut the cauliflower into smaller bite-sized florets. The larger florets can be cut in half or quarters.
- Cut onion in half lengthwise from root to stem end. Remove papery outer skin. Place onion, cut side down, on a cutting board. Cut off root and stem ends. Cut onion in half in same direction from root to stem end. Rotate onion and hold onion with free hand, keeping your fingertips curled backwards and the flat of your knife resting against your knuckles. Start slicing perpendicular to last cut. As you get to the end, rotate the onion so its lying on its most stable side and continue slicing.
- Bias slicing, or cutting on the diagonal is a popular cut for vegetables. Hold a small chef’s knife at a 45-degree angle to the carrot. Begin cutting slices at the same angle, about 1/8 to 1/4-inch thick.
Courses mains
The post Roasted Cauliflower Stew appeared first on Your Allergy Chefs.
]]>The post Garden Veggie Lasagna with Cauliflower Cream appeared first on Your Allergy Chefs.
]]>
free of gluten and top 9 allergens
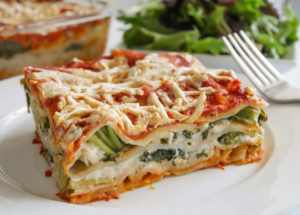
Tender sheets of pasta, cauliflower cream, and veggies with a tomato sauce make the perfect lasagna. No ricotta cheese needed!
We took a shortcut for this recipe by using store-bought marinara. However, if you prefer to make sauce from scratch, we have just the recipe for you.
Lasagna takes a little work, but it’s definitely worth it and the leftovers will keep you happy for days.
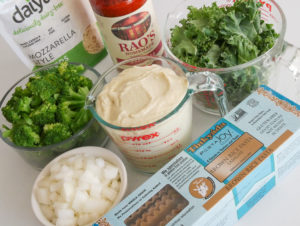
mise en place
Method
- Mix together olive oil, garlic powder, salt and pepper in a large bowl. Add cauliflower florets and toss to coat. Roast cauliflower at 400°F until tender. Remove from oven and let cool slightly.
- Puree cauliflower, hemp milk, nutritional yeast, and Dijon style mustard in a blender until smooth. Store in fridge until needed.
- In a large saucepan, bring about 2-inches of water to a boil. Place kale in a steamer basket and set in saucepan. Lower heat, cover and steam for 4 minutes. Remove steam basket and roughly chop kale when cool. Set Aside.
- In the same saucepan, repeat the steaming process with broccoli florets. Steam florets for 4 minutes, or until broccoli is crisp tender. Transfer broccoli to an ice bath (bowl of water and ice) to stop the cooking process. When broccoli is chilled, drain well. We like to drain by spinning the florets in a salad spinner. Set aside.
- Sauté diced onions for 6-8 minutes. Set aside.
The Trick to the Noodles
Lasagna noodles need structure to hold all the yummy ingredients layered between them. To ensure they’re not mushy, cook the noodles al dente, typically two minutes before the time on the box instructs. Stir often to prevent sticking.
When noodles are ready, drain in a colander and rinse with cool water, gently separating any noodles that may be sticking together.
Spread a little olive oil on a large rimmed baking sheet, and lay the cooked noodles on the sheet, gently flipping them over so both sides get coated with a little oil to prevent them from sticking.
We have our favorite gluten free pastas. For lasagna, we like Tinkyada Brown Rice Lasagna Noodles. There are gluten free oven-ready lasagna noodles that don’t need to be cooked. However, we prefer Tinkyada.
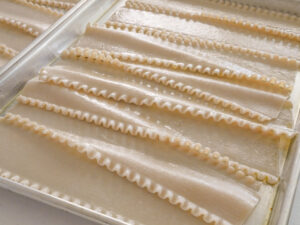
Assembly
- Spread 1-1/2 cups of marinara on the bottom of a 13x9x2-inch casserole or lasagna dish. When we’re in a hurry we use store-bought marinara, such as Rao’s. If you have time and like to make your own sauce, try our tomato sauce. It’s delicious! Arrange a layer of noodles lengthwise over marinara, slightly overlapping.
- Spread half of the cauliflower cream over the noodles. Evenly top with half of the onions, followed by half of the kale, and then half of the broccoli. Sprinkle with 1/2 cup mozzarella style shreds.
- Arrange a second layer of noodles in the opposite direction of first layer, trimming with shears to fit. Repeat with remaining cauliflower cream, onions, kale, broccoli, and 1/2 cup mozzarella style shreds.
- Arrange the third layer of noodles lengthwise. Spread 1-1/2 cups marinara sauce over the noodles and top with 1 cup mozzarella style shreds.
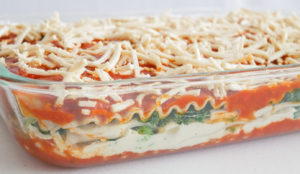
- Cover lasagna with parchment paper to prevent cheese from sticking to the foil. Then wrap tightly in foil and bake 40 minutes in an oven preheated to 350°F. If you don’t have parchment paper, be sure to spray the foil with cooking spray to prevent cheese from sticking to the foil.
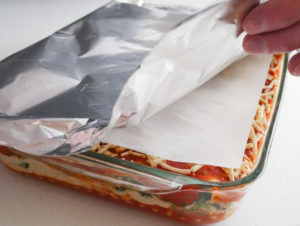
Uncover and bake an additional 15 minutes, or until sides are bubbling. Cool for 15 minutes before serving.
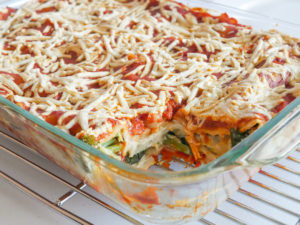
Enjoy with a nice big green salad and some gluten free garlic bread!
Your Allergy Chefs are participants in the Amazon Associates Program, an affiliate advertising program designed to provide a means for sites to earn advertising fees by advertising and linking to Amazon.
Garden Veggie Lasagna with Cauliflower Cream
Yield one (13x9x2-inch) pan
Free of: gluten and top 9 allergens.
Cauliflower cream, veggies, and tomato sauce make the perfect lasagna.
Ingredients
Cauliflower Cream
1 tbsp olive oil
1/4 tsp garlic powder
1/2 tsp salt, divided (1/4 tsp + 1/4 tsp)
1/4 tsp ground black pepper
4 cups cauliflower florets (14-16 ounces of florets from about one medium cauliflower head)
1 cup unsweetened hemp milk
2 tbsp nutritional yeast
2 tsp Dijon-style mustard
Lasagna
1 tbsp olive oil
1-1/2 cups chopped onion
1/2 tsp salt
4 cups firmly packed kale
5 cups broccoli florets
3 cups store-bought marinara, such as Rao’s
15 sheets cooked lasagna noodles, such as Tinkyada Lasagna Brown Rice Pasta (about 14 ounces), see recipe notes
2 cups mozzarella style shreds
Instructions
- For the cauliflower cream, preheat oven to 400-degrees F.
- In a large bowl, mix together oil, garlic powder, 1/4 tsp salt, and pepper. Add cauliflower florets and toss to coat. Spread cauliflower, cut side down, on a baking sheet lined with parchment paper or foil. Bake for 20 minutes, or until cauliflower is tender. Remove from oven and let cool slightly.
- Place cauliflower in a blender with 1/4 tsp of salt, milk, nutritional yeast, and mustard. Puree until smooth, about 30-40 seconds. Transfer to a container and store in fridge until needed.
- For the lasagna, preheat oven to 350-degrees F.
- Heat olive oil in a small saucepan over medium heat. Add onions and 1/2 tsp salt and cook until onions are soft and translucent, about 6-8 minutes. Set aside.
- In a large saucepan, bring about 2-inches of water to a boil. Place kale in a steamer basket and set in saucepan over boiling water. Lower heat, cover and steam for 4 minutes. Remove steam basket and roughly chop kale when cool. Set aside.
- In the same saucepan, cover and repeat the steaming process with the broccoli for about 4 minutes, or until broccoli is crisp tender. Transfer broccoli to an ice bath (bowl of water and ice) to stop the cooking process. When broccoli is chilled, drain well. We like to drain by spinning the florets in a salad spinner. Set aside.
- To assemble, spread 1-1/2 cups of marinara on the bottom of a 13x9x2-inch casserole or lasagna dish. When we’re in a hurry we use store-bought marinara. If you have time and like to make your own sauce, our tomato sauce recipe is delicious! Arrange a layer of noodles lengthwise over the marinara, slightly overlapping.
- Spread half of the cauliflower cream over the noodles. Evenly top with half of the onions, followed by half of the kale, and then half of the broccoli. Sprinkle with 1/2 cup mozzarella style shreds.
- Arrange a second layer of noodles in the opposite direction of first layer, trimming with shears to fit. Repeat with remaining cauliflower cream, onions, kale, broccoli, and 1/2 cup mozzarella style shreds.
- Arrange the third layer of noodles lengthwise. Spread 1-1/2 cups marinara over the noodles and top with 1 cup mozzarella style shreds.
- Cover lasagna with parchment paper to prevent cheese from sticking to the foil. Then wrap tightly in foil and bake for 40 minutes. If you don’t have parchment paper, be sure to spray the foil with cooking spray to prevent sticking.
- Uncover and bake an additional 15 minutes, or until sides are bubbling. Cool 15 minutes before serving.
- Enjoy with a green salad and some gluten free garlic bread!
Notes
Lasagna noodles need structure to hold all the yummy ingredients layered between them. To ensure they’re not mushy, cook the noodles al dente, typically two minutes before the time on the box instructs. Stir often to prevent sticking.
When noodles are ready, drain in a colander and rinse with cool water, gently separating any noodles that may be sticking together.
Spread a little olive oil on a large rimmed baking sheet, and lay the cooked noodles on the sheet, gently flipping them over so both sides get coated with a little oil to prevent them from sticking.
Courses Mains
The post Garden Veggie Lasagna with Cauliflower Cream appeared first on Your Allergy Chefs.
]]>The post Sweet and Sour Veggie Stir Fry appeared first on Your Allergy Chefs.
]]>
free of gluten and top 9 allergens
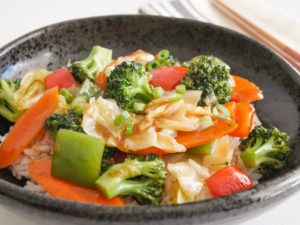
For an easy and budget-friendly meal in minutes, you can’t beat stir frying. We’ll teach you the simple techniques that go into making a restaurant-worthy dish.
This sweet and sour veggie stir fry has the perfect balance of sweet and savory. It’s great served over rice, quinoa, cauliflower rice, noodles, or even in lettuce cups.
You can totally use whatever veggies you have on hand.
At the end of this post we share a link to this past Saturday’s live Facebook cooking video, At Home With Your Allergy Chefs. Chef Joel’s fundamentals of cooking class takes you through the process of blanching and making this incredible stir fry.
Mise en Place
Because stir frying is so fast, it’s important to have all ingredients measured out and ready to go before you start cooking.
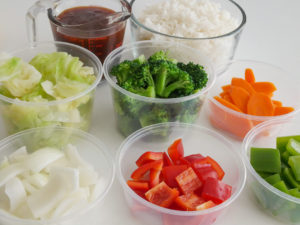
mise en place
So before firing up the stove, be sure to have all the veggies prepped, rice cooked, and your sauce made.
For the Sauce
Whisk together light brown sugar, vegetable broth or water, apple cider vinegar, ketchup, coconut aminos, and cornstarch and place in a small saucepan. Turn the heat to medium, whisking constantly until the mixture comes to a simmer, which could take up to 5 minutes. When it comes to a simmer, whisk for another 2 minutes before removing from heat and setting aside.
The sauce can be made several days in advance and stored in the fridge until needed.
For the Stir Fry
Heat a flat-bottomed wok or large sauté pan over medium-high heat until a drop of water vaporizes immediately on contact. Add oil and swirl around in the pan. When oil is hot add onions, bell peppers, and a little salt. Cook and toss for 1 to 1-1/2 minutes.
Add cabbage, broccoli, and carrots, which have been blanched. See Chef Joel’s tip below for blanching. Stir or toss for another 1 to 1-1/2 minutes.
Add sauce and bring to a boil, stirring for 1 minute.
Serve over rice, quinoa, or noodles and garnish with green onions.
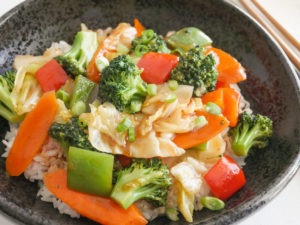
Do you want yours meaty?
Add chicken in place of 1 cup of the broccoli or other vegetables. Cut 1-pound boneless, skinless chicken breasts or thighs into 1-inch cubes. Heat oil in a wok or large sauté pan. Add half of the chicken in a single layer and season with salt and pepper. Cook for 3 to 5 minutes until cooked through. Remove from skillet and repeat with remaining chicken.
Continue with the directions for the veggie stir fry, adding the chicken back into the skillet with the cabbage, broccoli, and carrots.
Chef Joel’s Tip on Blanching
Some foods, especially vegetables, are blanched or parboiled before being used in a recipe where they will be finished by another cooking method, such as stir frying. To do so, they are immersed in a large quantity of boiling water and partially cooked. Blanching is done quickly, usually 30 seconds to a minute. Parboiling is usually several minutes.
Vegetables that are blanched or parboiled in water are shocked or refreshed in an ice bath to stop the cooking process. An ice bath is simply a container of ice cubes and cold water.
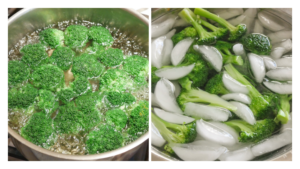
blanching and then shocking in an ice bath
Check out this past Saturday’s link to At Home With Your Allergy Chefs live video on Facebook. Here we talk about the blanching technique and walk you through making this delicious stir fry. Come and learn why blanching is an important preliminary cooking technique and see how easy and fun it is to make a stir fry!
Sweet and Sour Veggie Stir Fry
Yield 4 Servings
Free of: gluten and top 9 allergens.
The perfect balance of sweet and savory!
Ingredients
Sauce
1/2 cup packed light brown sugar
1/2 cup vegetable broth or water
1/4 cup apple cider vinegar
1/4 cup ketchup
2 tbsp coconut aminos
4 tsp cornstarch
Stir Fry
2 tbsp olive oil
1 cup diced onions
1/2 cup diced red bell pepper
1/2 cup diced green bell pepper
1/8 tsp salt
4 cups chopped green cabbage, blanched (see recipe notes)
3 cups broccoli florets, blanched (see recipe notes)
1/2 cup diagonally cut carrots, blanched (see recipe notes)
4 cups cooked brown or white rice
1/4 cup chopped green onions, garnish
Instructions
- For the sauce, place all sauce ingredients in a small saucepan over medium heat, whisking to combine. Whisk constantly. It could take up to 5 minutes, but when it comes to a simmer, whisk for another 2 minutes. Remove from heat and set aside. This makes 1-1/4 cups of sauce.
- For the stir fry, heat flat-bottomed wok or large sauté pan over medium-high heat until a drop of water vaporizes immediately on contact. Add oil and swirl around in pan. When oil is hot add onions, bell peppers, and salt. Cook and toss for 1 to 1-1/2 minutes. Add cabbage, broccoli, and carrots. Stir or toss for another 1 to 1-1/2 minutes. Add sauce and bring to a boil, stirring for 1 minute.
- Serve over rice and garnish with green onions.
Notes
- Diagonal cut carrots: After peeling the carrot, place on a cutting board. Holding the carrot firmly, use a sharp knife to cut the carrot at a 60-degree angle. Continue cutting the carrot on the diagonal, keeping the pieces uniform in width.
- Blanching the Vegetables: For the cabbage, place cabbage in boiling water for 30 seconds to 1 minute. With a slotted spoon, transfer into an ice bath (bowl of water and ice) to shock and stop cooking process; drain. For the broccoli, place broccoli in boiling water and blanch for 2 minutes. Shock in ice bath; drain. For the carrots, blanch in boiling water for 30 seconds to 1 minute, shock in ice bath, and drain. These vegetables can be blanched, cooled down, drained, and stored in the fridge for several days until needed.
- Other veggies that can be substituted are mushrooms, celery, zucchini, bok choy, sugar snap peas, bamboo shoots, water chestnuts, blanched green beans, pineapple, baby corn, cauliflower, bean sprouts – you name it. Choose your favorite veggies.
- Add chicken if you desire, reducing broccoli from 3 to 2 cups. Cut 1-pound boneless, skinless chicken breasts or thighs into 1-inch cubes. Heat oil in wok or large sauté pan. Add half of the chicken in a single layer and season with salt and pepper. Cook for 3 to 5 minutes until cooked through. Remove from skillet and repeat with remaining chicken. Follow directions for the veggie stir fry, adding the chicken back into the skillet with the cabbage, broccoli, and carrots.
- This stir fry is great served over rice, quinoa, cauliflower rice, noodles, or lettuce cups.
Courses Mains
The post Sweet and Sour Veggie Stir Fry appeared first on Your Allergy Chefs.
]]>The post Mushroom Bolognese appeared first on Your Allergy Chefs.
]]>
free of gluten and the top 9 allergens
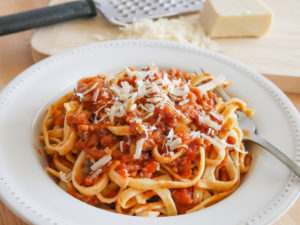
This rich-tasting Bolognese sauce is loaded with veggies. Onions, celery, carrots, and mushrooms are simmered with garlic, tomato sauce, red wine, chickpeas, and a few seasonings before being transformed into an intensely flavorful and healthy sauce.
It’s perfect for serving over your favorite pasta, polenta, or even zucchini noodles.
So delicious and hearty, we know you won’t miss the beef…
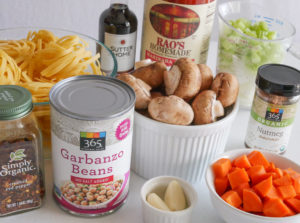
mise en place
Cook up whatever kind of pasta you have onhand.
While in Italy just before the Covid-19 pandemic, we picked up some amazing allergy-friendly tagliatelle. It shouldn’t be a surprise that Italy makes some of the best gluten-free pasta. It was perfect with this sauce. Spaghetti, rigatoni, or any other pasta will be just as delicious. We also like Andean Dream Organic Quinoa Pastas.
Step 1
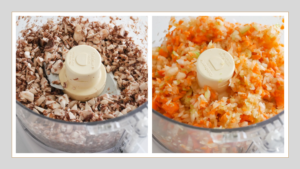
In a food processor, pulse mushrooms in two batches, 7 – 10 pulses each, scraping down the sides of the bowl as needed. See processed mushrooms in the photo below on the left. Set the work bowl aside…no need to clean it yet.
Heat oil in a medium saucepan over medium heat. Add mushrooms and cook, stirring occasionally, about 6 -8 minutes.
Step 2
While mushrooms cook, combine chopped onions, chopped celery, and chopped carrots. Place in work bowl of food processor and pulse in two batches, 7-10 pulses each batch, scraping down the sides of the bowl as needed. See the photo below on the right of the processed veggies. Transfer to the pan with mushrooms and cook for 5 minutes.
Step 3
Pulse chickpeas in food processor until chopped into 1/4-inch pieces, about 7-10 pulses. You do want a chunky texture. Set chickpeas aside.
Step 4
Add garlic and red pepper flakes to vegetable mixture and cook for 30 seconds. Pour red wine into saucepan and cook until wine is evaporated by about half. Add chickpeas, purchased marinara or homemade tomato sauce, and a little sugar. Bring to a boil. Cover and reduce heat to medium-low. Simmer for 10-15 minutes, stirring occasionally. Stir in a little nutmeg.
The sauce should be rather thick. However, if you feel it is too thick, add 1/4 cup of veggie broth or water.
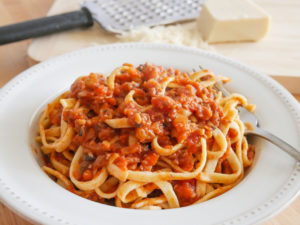
Spoon mushroom Bolognese over your favorite cooked pasta. If desired, garnish with grated allergy-friendly parmesan cheese, such as Violife Just Like Parmesan.
Enjoy!
Mushroom Bolognese
Yield 6 Servings
Free of: gluten and top 9 allergens.
You won’t miss the beef!
Ingredients
12 ounces cremini mushrooms, cleaned, trimmed, and quartered
1 tbsp vegetable oil
1-1/4 cups coarsely chopped onion
3/4 cup coarsely chopped celery
3/4 cup coarsely chopped carrots
1 (15-ounce) can chickpeas, drained and rinsed
1 tbsp minced garlic
1/4 – 1/2 tsp red pepper flakes
1/2 cup dry red wine
1 (32-ounce) jar marinara, such as Rao’s -or- our 4 cups of homemade Tomato Sauce
1 tsp sugar
1/4 tsp ground nutmeg
1 pound allergy-friendly spaghetti, tagliatelle, or pasta of choice, cooked according to package directions
1/2 cup grated allergy-friendly parmesan cheese, such as Violife Just Like Parmesan
Instructions
- Pulse mushrooms in two batches in a food processor, 7 to 10 pulses each, scraping down sides of bowl as needed. It is not necessary to clean workbowl.
- Heat oil in Dutch oven or medium saucepan over medium heat. Add mushrooms and cook, stirring occasionally, about 6-8 minutes.
- While mushrooms cook, combine onion, celery, and carrots. Pulse in two batches, 7 to 10 pulses each batch, scraping down sides of bowl as needed. Transfer to the pan with mushrooms and cook for 5 minutes. Pulse chickpeas in food processor until chopped into ¼-inch pieces, 7 to 10 pulses. Set aside.
- Add garlic and red pepper flakes to vegetable mixture; cook for 30 seconds. We like to use ½ tsp of red pepper flakes. However, if you don’t like it too spicy, use ¼ tsp.
- Pour in red wine and cook until wine is evaporated by about half.
- Add chickpeas, marinara, and sugar. Bring to a boil. Cover and reduce heat to medium-low. Simmer for 10-15 minutes, stirring occasionally. Add nutmeg.
- The sauce should be rather thick. However, if you feel it is too thick, add ¼ cup of veggie broth or water. This recipe yields 6-1/2 cups of sauce.
- To serve with pasta, spoon sauce over your pasta and garnish with parmesan cheese, if desired. Enjoy!
Courses Mains
The post Mushroom Bolognese appeared first on Your Allergy Chefs.
]]>The post Mini Corn Dogs appeared first on Your Allergy Chefs.
]]>
free of gluten and top 8 allergens
Corn dogs are top dog at theme parks and fairs. They’re portable, they’re sweet, and they’re salty. It may be awhile before theme parks reopen. However, this easy theme park fare can be made at home.
On this week’s “At Home With Your Allergy Chefs” live cooking segment on Facebook, Chef Joel demonstrates how quick and easy it is to make this kid friendly favorite.
Corn dogs can be on your menu any day of the year with this easy recipe. And they can be enjoyed with beef or plant-based hotdogs…
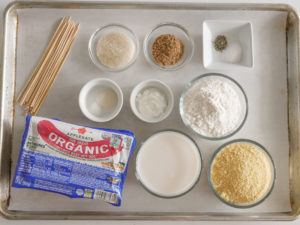
mise en place
We don’t deep fry often, but once in awhile it’s worth it!
If you’ve never made homemade corn dogs before, we think you’ll be surprised by how easy it is.
Cornmeal
Cornmeal ranges in texture from fine to medium to coarse, all of which refer the the size of the meal. Choose fine or medium grind for corn dogs. Medium grind will give you more texture. Avoid coarse cornmeal as it will be way too gritty for a corn dog.
Step 1 – Mix together the dry ingredients, which include gluten-free flour, cornmeal, sugar, baking powder, baking soda, salt, and xanthan gum. Whisk the dry ingredients to combine and evenly distribute.
Step 2 – Combine a flax egg (1 tbsp flaxseed meal + 3 tbsp water), honey (if using), and alternative milk. Add the wet ingredients to the dry and whisk gently to create a smooth batter.
The honey is optional. However, the corn dogs fry up more golden brown with the addition of honey. And besides, Disney’s famous corn dogs contain honey in the batter. If you omit the honey, increase the sugar from 2 tablespoons to 3.
Step 3 – Cut hotdogs in half, crosswise. Thread a wooden skewer into the center of the cut end of each, inserting about 3/4’s into the dog. Roll the hot dogs in flour and shake off any excess.
Step 4 – Transfer the cornbread batter to a tall glass or mason jar and dip the hot dogs into the batter, rolling until fully coated. Fry corn dogs in a deep fat fryer or heavy pot in batches of 2-3 at a time until golden brown, about 3 minutes.
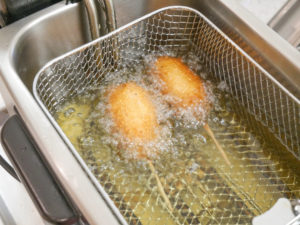
Remove corn dogs from the fat and hold them over the fryer, allowing the excess fat to drain off. Transfer to a baking pan lined with paper towels.
Serve accompanied by your favorite ketchup and/or mustard.

Chef Joel’s diggin’ the dogs with his Covid-19 hair!
If you have leftovers, place in a ziplock bag and store in the fridge for up to 2 days. Reheat in the oven for 10 minutes at 350°F or reheat in an air fryer.
Can You Freeze Corn Dogs?
It’s super easy to freeze what you don’t eat. Just let them cool completely and store in an airtight ziplock or container for up to two months.
Preheat oven to 350°F. If corn dogs are frozen, bake for 15-18 minutes. If corn dogs have been thawed, bake for about 10 minutes.
Make Mine Veggie
Plant-based hot dogs make delicious corn dogs!
Chef Joel’s Deep-Frying Tips
- Excessive greasiness is usually caused by frying at too low a temperature. Most foods are fried at 350°-375° F. Use a deep frying thermometer to gauge when the temperature is just right.
- Cook in batches to avoid overcrowding the fryer, which can greatly lower the oil temperature and cause pieces to stick together.
- The oil temperature will decrease as you cook, so let it recover between batches.
- If using a pot to deep fry, make sure it is deep, rising at least 4-6 inches over the oil to avoid splatters.
- Never add salt in the final step of breading and never salt foods over the fat as salt breaks down the oil.
- Store used oil in a sealed and light-proof container in the fridge for up to 3 months. Some oils may become cloudy when refrigerated, but this disappears when they return to room temperature. If the oil has a foul odor, discard it.
Your Allergy Chefs are participants in the Amazon Associates Program, an affiliate advertising program designed to provide a means for sites to earn advertising fees by advertising and linking to Amazon.
Mini Corn Dogs
Yield 6 Servings
Free of: gluten and top 8 allergens.
Inspired by Disney!
Ingredients
2 quarts vegetable oil for frying, or more as needed
3 tbsp lukewarm water
1 tbsp flaxseed meal
1 cup gluten-free all-purpose flour blend, divided (3/4 cup + 1/4 cup)
3/4 cup fine or medium ground cornmeal
2 tbsp granulated sugar
2 tsp baking powder
1/2 tsp salt
1/4 tsp xanthan gum (omit if using a flour blend with xanthan)
1/4 tsp baking soda
1/8 tsp black pepper
3/4 – 1 cup alternative milk
2 tbsp honey, optional (see recipe notes)
6 beef hot dogs (or vegan dogs), cut in half crosswise
12 (4-inch) wooden skewers
Ketchup or yellow mustard, for serving
Instructions
- Pour vegetable oil in a large, heavy pot over medium to medium-high heat or place amount of oil needed in a deep fat fryer. Heat oil to 350 degrees F. If using a pot to deep fry, make sure it is deep, rising at least 4-6 inches above the oil to avoid splatters.
- Make flax egg by whisking together water and flaxseed meal. Set aside for 5 minutes.
- Insert skewers into the center of the cut end of each hot dog, going 3/4’s into the hot dog. Set aside.
- In a medium bowl, combine flour, cornmeal, sugar, baking powder, salt, xanthan gum, baking soda, and pepper. Whisk to evenly distribute ingredients.
- Return to flax egg and whisk vigorously. Add milk and honey to flax egg and stir to combine. Add to dry mixture and whisk gently to create a smooth batter. Transfer the batter into a tall glass or mason jar.
- Once oil reaches 350 degrees F, roll each hot dog in flour, shaking off excess.
- Dip each into batter, rolling until fully coated, and carefully drop entire stick into oil. Fry, 2 to 3 at a time until deep golden brown, about 3 to 4 minutes. Turn in oil halfway through so they brown evenly. Remove corn dogs from the fat and hold them over the fryer, allowing the excess fat to drain off. Transfer to a baking pan lined with paper towels. Repeat with remaining hot dogs and batter. Make sure you give the oil time to return to temp between each batch.
- Serve warm, accompanied by your favorite ketchup and/or mustard.
Notes
The honey is optional. However, the corn dogs fry up more golden brown with the addition of honey. And besides, Disney’s famous corn dogs contain honey in the batter. If you omit the honey, increase the sugar from 2 tablespoons to 3.
Courses Mains
The post Mini Corn Dogs appeared first on Your Allergy Chefs.
]]>The post Chicken Tenders appeared first on Your Allergy Chefs.
]]>
We just made these chicken tenders for FARE’s website (Food Allergy Research & Education) and we wanted to share the recipe with you.
Coated in a golden potato chip crust with an addictive crunch, these juicy oven baked chicken tenders dipped in honey mustard sauce make the perfect finger food.
A meal the entire family will love! And we share crispy portobello mushrooms as our plant-based option…
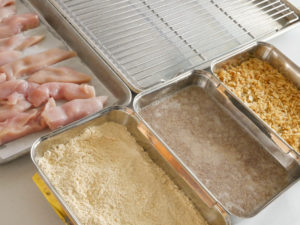
mise en place
Sassy Sauce
For the honey mustard, whisk together allergy-friendly mayonnaise, honey, Dijon-style and yellow mustards, apple cider vinegar, garlic powder (optional), smoked paprika (optional), and salt in a small bowl. Set aside in fridge until you’re ready for dipping.
Crumbs
Kettle chips, corn flakes, and gluten-free pretzels are all good options for the crumbs. If making with kettle or potato chips, choose an oven baked brand. Some brands that are fried contain a lot of oil and could make for greasy tenders.
Juicy Tenders
Preheat oven to 400°F. Place a wire rack on a baking sheet and set aside. The wire rack will prevent sticking and allow the chicken to bake up nice and crispy on all sides. However, if you don’t have a wire rack, that’s okay. Line the baking sheet with parchment paper or foil.
In a medium bowl, make flax eggs by whisking together flaxseed meal and water. Set aside.
Pat the chicken breasts dry. Lay the breasts on a cutting board and cut off any fat or tendons. Place one hand flat on top of the chicken breast. Hold a knife along the long side and thicker end of the chicken. Slice through the breast almost to the end, being careful not to cut all the way through. Open the chicken breast. It should resemble a butterfly shape. Cut in half and cut each half crosswise into 1-inch strips. Repeat with second chicken breast. Set chicken strips aside.
In a shallow bowl or breading pan, combing garbanzo bean flour, garlic powder, salt, and pepper.
Add kettle chips or gluten-free corn flakes to a food processor and pulse into crumbs. Alternately, you can place the chips or corn flakes in a large ziplock bag and use a rolling pin or meat mallet to crush the chips or corn flakes. Transfer 1 cup of the crumbs to a shallow bowl or breading pan, reserving the remaining crumbs to refill the bowl or breading pan as needed during breading.
Return to the flaxseed mixture and vigorously whisk until gelatinous. Transfer to a shallow bowl or breading pan.
Breading pans or trays can be found online or at specialty kitchen stores.
Organizing the Breading Station
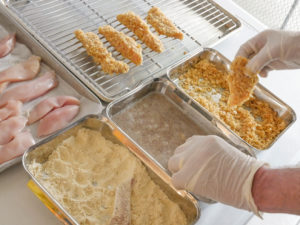
To organize the breading station, start with the flour on the left. Place the flaxseed mixture in the middle, followed by the crushed potato chips on the right.
With left hand, dredge a chicken strip in seasoned flour. Using the same hand, drop chicken in flaxseed mixture. With right hand, completely coat chicken strip in the liquid. Lift and let excess liquid drip off. Transfer chicken to the container of crumbs. Then use your right hand to carefully coat all sides of the chicken with chips, pressing them lightly onto the chicken to help them stick. Use your right hand to transfer the chicken strip to the prepared baking sheet. Repeat with remaining chicken.
Clean fingers! It’s an extra step, but you can use tongs to transfer the chicken from the flaxseed mixture to the crumbs. It’s very important that your left hand stays dry, so that you don’t create any lumps in the flour.
Place in the oven and bake for about 10-15 minutes, until chicken is cooked to an internal temperature of 165°F. If you don’t have a wire rack, flip tenders half way through baking.
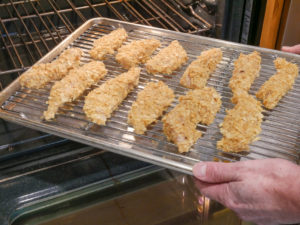
Serve with honey mustard and/or your favorite barbecue sauce.

Make Mine Veggie
For a plant-based version, make these tenders portobello. Check out our first post, Crispy Baked Portobello Strips!
Chef Joel’s Tip
Butterflying is the technique used in cutting our tenders. Cutting meat this way creates a uniform thickness throughout a piece of meat, so that it will cook more quickly and evenly.
Your Allergy Chefs are participants in the Amazon Associates Program, an affiliate advertising program designed to provide a means for sites to earn advertising fees by advertising and linking to Amazon.
Chicken Tenders
Yield 6 Servings
Free of: gluten and top 8 allergens.
A meal the entire family will love!
Ingredients
Honey Mustard
1 cup allergy-friendly mayonnaise, such as Follow Your Heart’s Soy-Free Vegenaise
3 tbsp honey
1-1/2 tbsp Dijon style mustard
1-1/2 tbsp yellow mustard
1-1/2 tsp apple cider vinegar
1/8 tsp garlic powder, optional
1/8 tsp smoked paprika, optional
1/8 tsp salt
Tenders
1 cup lukewarm water
1/4 cup flaxseed meal
1 pound boneless, skinless chicken breasts (about 2)
1 cup garbanzo bean flour
1/2 tsp garlic powder
1/4 tsp salt
1/8 tsp ground black pepper
1 (8-ounce) bag kettle chips or 6 cups gluten-free corn flakes
Instructions
- For the honey mustard, in a small bowl whisk together mayonnaise, honey, both mustards, vinegar, garlic powder, paprika, and salt. Cover and place in fridge.
- For the tenders, preheat oven to 400°F. Place a wire rack on a baking sheet and set aside. The wire rack will prevent sticking and allow the chicken to bake up nice and crispy on all sides. If you don’t have a wire rack, that’s okay. Line your baking sheet with parchment or foil. If using foil, lightly spray foil-lined baking sheet with olive or vegetable oil spray.
- In a medium bowl, whisk together water and flaxseed meal. Set aside for 5-10 minutes.
- Pat the chicken breasts dry. Lay the breasts on a cutting board and cut off any fat or tendons. Place your hand flat on top of the chicken breast. Hold a knife along the long side and thicker end of the chicken. Slice through the breast almost to the end, being careful not to cut all the way through. Open the chicken breast. It should resemble a butterfly shape. Cut in half and cut each half crosswise into 1-inch strips. Repeat with the second chicken breast. Set chicken strips aside.
- In a shallow bowl, combine the garbanzo bean flour, garlic powder, salt, and pepper.
- Add the chips or corn flakes to a food processor and pulse in two batches into coarse crumbs. Alternately, place the chips in a large zip-lock plastic bag. With a rolling pin or meat mallet, crush the chips by lightly pounding. Transfer 1 cup of the crushed chips to a shallow bowl. Reserve the remaining chips to refill the bowl as needed during breading.
- Return to the flaxseed mixture and vigorously whisk until gelatinous. Transfer to a shallow dish.
- To organize the breading station, start with the flour on the left. Place the flaxseed mixture in the middle, followed by the crushed potato chips or corn flakes on the right.
- With left hand, dredge a chicken strip in seasoned flour. Using same hand, place chicken in flaxseed mixture without getting left hand wet. With right hand, completely coat chicken strip in the liquid. Lift and let excess liquid drip off. Transfer chicken to the bowl of crumbs. Then use your right hand to carefully coat all sides of the chicken with crumbs, pressing them lightly onto the chicken to help them stick. Use your right hand to transfer the chicken strip to the prepared baking sheet. Repeat with remaining chicken.
- Bake for about 10-15 minutes, until chicken is cooked to an internal temperature of 165°F. If you don’t have a wire rack, flip tenders half way through baking.
- Serve with honey mustard and/or your favorite barbecue sauce.
Notes
Baking in an Air Fryer
If making with corn flakes, lightly spray the chicken tenders with olive oil or vegetable spray.
Spray the wire rack of your air fryer with vegetable or olive oil spray before preheating to 390-degrees F. Once preheated, place 4 or 5 chicken tenders into the basket at a time, spacing them out so they don’t touch. Cook for 4 minutes. Using tongs, flip the chicken tenders and cook for another 4-6 minutes, or until done.
Once golden and crispy, transfer the chicken tenders to a wire rack and place rack on a baking pan. Place in warm oven while repeating with remaining tenders.
Courses Mains
The post Chicken Tenders appeared first on Your Allergy Chefs.
]]>