The post Sugar Cookies appeared first on Your Allergy Chefs.
]]>
vegan and free from gluten and top 9 allergens
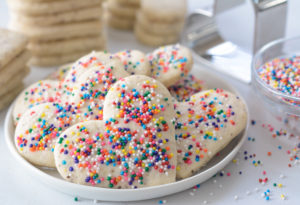
These delicious sugar cookies are so easy to make and they keep their shape when baked. You can enjoy them plain, decorated with sprinkles or sanding sugar, or frosted with royal icing.
A sugar cookie everyone can enjoy!
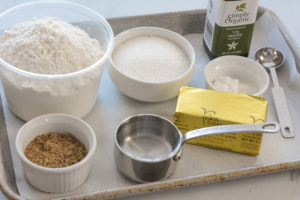
mise en place
These easy no-spread sugar cookies are great for cutouts and decorating. You can also freeze the cookie dough and baked cookies!
Look How Easy
- Make your flax eggs.
- Combine flour, baking powder, and xanthan gum.
- Cream non-dairy butter and sugar with a hand mixer for 1-1/2 minutes.
- Add flax eggs and vanilla to butter mixture and beat until combined.
- Add flour mixture and beat on low just until incorporated. Finish combining dough by hand. Form dough into a disk and wrap in plastic wrap. Place in fridge for at least 30 minutes.
- Take half the chilled dough and knead briefly. Shape into a flat disk and roll with a rolling pin between 2 sheets of parchment paper or plastic wrap to the thickness of about 1/4-inch.
- Using cookie cutters, cut dough into desired shapes. Place on a baking sheet lined with parchment or silicone baking mat. Decorate with sprinkles or sanding sugar, if desired. Bake for 10-12 minutes.
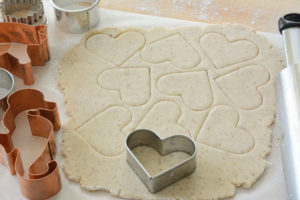
When cutting out your sugar cookies, make sure to keep your cuts as close together to get as many cookies out of your dough as possible. Re-roll any scraps.
Freeze
Plain or decorated baked cookies freeze beautifully for up to 3 months.
You can also freeze the dough. Divide dough in half and flatten both halves into a disk. Wrap well in plastic wrap and freeze. When ready to bake cookies, thaw the disks in the fridge, then bring to room temperature for 20 minutes. Roll away!
Getting the Most Accurate Measurement
Proper measuring and sifting of dry ingredients is essential in baking. Dry ingredients, including flour, naturally settle on standing. Texture, how long the flour has been stored, and humidity can all influence the degree to which flour settles.
To get the most accurate measurement, start by whisking the flour in its container to aerate.
Scooping the flour directly into your measuring cup packs the flour into the cup, causing you to end up with significantly more flour than the recipe calls for.
To measure the flour, spoon into measuring cup, overfilling. Use a knife or other straight edge to level off the top. Whisk again with the other dry ingredients to combine and further aerate the ingredients before incorporating them into the dough.
Some baked goods may require an extra step of sifting to obtain light and airy baked goods. Sifting also helps to filter out any impurities and/or clumps.
Allergy-Friendly Decorations
Tru Color Natural Sanding Sugars are free from the top 8 allergens, artificial colors, sesame, and mustard. They can be purchased online.
Betty Crocker Nonpareils are free from the top 8. However, they are not all processed at the same facility/lines. They take allergies VERY seriously and advise to check the labels. If the sprinkles are processed on a line that may process other allergens, they will state on the label “may contain”. The container does have a phone number that you can call for peace of mind.
Sugar Cookies
Yield 32 small cookies
Free of: gluten and top 9 allergens.
Finally, a sugar cookie everyone can enjoy!
Ingredients
Cookies
2 tablespoons ground flaxseed
1/3 cup lukewarm water
2 cups all-purpose gluten-free flour blend (1:1 baking flour)
1/2 teaspoon baking powder
1/4 teaspoon xanthan gum (omit if using a flour blend containing xanthan gum)
1/2 cup non-dairy butter (such as Earth Balance Soy Free Buttery Sticks), softened to room temperature
1/2 cup granulated sugar
1 teaspoon pure vanilla extract
Nonpareils or sanding sugar for decorating, optional
Royal Icing, Optional
6 tablespoons aquafaba (from a 15-ounce can of garbanzo beans)
1/2 teaspoon cream of tartar or 1/2 teaspoon fresh lemon juice
4-5 cups powdered sugar
1 teaspoon pure vanilla extract
Instructions
Prep
- Line 2 large baking sheets with parchment; set aside.
- Preheat oven to 350-degrees F.
Steps
- For the cookies, in a small bowl, whisk together flaxseed meal and water. Set aside for 5-10 minutes.
- In a medium bowl, whisk together the flour, baking powder, and xanthan gum. If the baking powder contains lumps, sift into the flour. Set aside.
- Return to the flax eggs and whisk vigorously.
- In a large bowl, cream together the butter and sugar with a hand mixer. Mix until the sugar is slightly dissolved into the butter, about 1-1/2 minutes. Add the flax eggs and vanilla. Beat until incorporated.
- Add the flour mixture and beat on low speed just until the dough starts to come together. Turn off hand mixer and finish combining the dough by hand.
- Once the dough is made, form the dough into a flat disk and wrap with plastic wrap. Let the dough chill in the refrigerator for at least 30 minutes. If making the dough in advance, store wrapped in refrigerator. Let rest on counter for 15 minutes before ready to use.
- When ready to make cookies, lightly flour a clean rolling surface and a rolling pin. Take half of the dough and knead briefly. Shape into a flat disk and roll with a rolling pin until dough is about 1/4-inch thick. It’s easiest to roll between 2 sheets of parchment paper or plastic wrap.
- Using cookie cutters, cut dough into desired shapes. Decorate with nonpareils or sanding sugar. If you’re going to decorate with royal icing, leave plain. Place cookies on prepared baking sheets.
- Repeat with remaining dough.
- Bake cookies for 10-12 minutes or until the edges are just beginning to turn lightly golden. Do not over bake, as they won’t turn much of a golden brown. Remove cookies from oven and place on cooling rack to cool. Enjoy plain or decorated with nonpareils or sanding sugar. The royal icing instructions follow if you will be decorating plain cookies with royal icing.
- For the royal icing, open a can of garbanzo beans (also known as chickpeas). Drain and strain the aquafaba (brine) through a fine mesh sieve. Reserve garbanzo beans for another use such as Chickpea Melts.
- Measure 6 tablespoons of aquafaba (brine) into a bowl. Add cream of tartar. Mix on medium to high speed using a hand mixer with a whisk attachment or in a stand mixer until mixture is frothy/foamy. Gradually add 4 cups of powdered sugar and continue beating on low speed until thick and everything is incorporated.
- Turn the mixer off and lift the whisk to check the consistency of your icing. It should be thick with a glue-like consistency. If it’s not there yet, add another cup of powdered sugar (or more) until a thick consistency is achieved. Add vanilla extract. Turn the mixer up to medium-high and beat for about 8 minutes.
- After 8 minutes or so, turn the mixer off. You should have a nice, stiff royal icing. Store in an airtight container, covered with plastic wrap and closed with a lid in the fridge up to 7 days. Let come to room temperature before decorating cookies. You may need to thin icing with a little water.
- Royal icing can be colored with gel food colors. Adding too much food coloring can result in excessive drying times.
Notes
Getting the Most Accurate Measurement
Proper measuring and sifting of dry ingredients is essential in baking. Dry ingredients, including flour, naturally settle on standing. Texture, how long the flour has been stored, and humidity can all influence the degree to which flour settles.
To get the most accurate measurement, start by whisking the flour in its container to aerate.
Scooping the flour directly into your measuring cup packs the flour into the cup, causing you to end up with significantly more flour than the recipe calls for.
To measure the flour, spoon into measuring cup, overfilling. Use a knife or other straight edge to level off the top. Whisk again with the other dry ingredients to combine and further aerate the ingredients before incorporating them into the dough.
Some baked goods may require an extra step of sifting to obtain light and airy baked goods. Sifting also helps to filter out any impurities and/or clumps.
Courses Sweets
The post Sugar Cookies appeared first on Your Allergy Chefs.
]]>The post Chocolate Cupcakes with Strawberry Frosting appeared first on Your Allergy Chefs.
]]>
vegan and free of gluten and the top 8 allergens
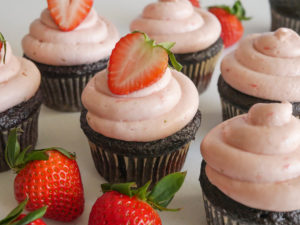
These chocolate cupcakes with strawberry frosting start with moist, fudgy chocolate cake. Then they’re topped with creamy strawberry buttercream that’s made with fresh strawberries.
Not just any cupcake…but no doubt one of the best cupcakes we’ve ever eaten!
Just in time for Valentine’s Day…
Guidelines For Baking Cupcakes and Cakes
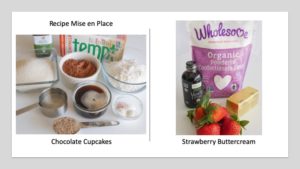
- Read the recipe at least two times all the way through. Read the first time to get a basic understanding of the ingredients needed and recipe procedures. Read the second time to check that you have all the ingredients and tools and plan your time. See what tasks need to be done, or can be done, ahead of time.
- Prepare your mise en place.
- Prepare your muffin pan by lining with muffin liners or lightly greasing the muffin cavities.
- Set your oven racks. Cupcakes should be baked in the upper third of the oven, just above the middle rack. This encourages doming. Cakes bake on the middle rack.
- Allow time for your oven to preheat.
- Do not make the batter until the oven is at the proper temperature. If a recipe contains baking soda, the leavening starts when the baking soda, acidic ingredient, and liquid are mixed. If the oven is not ready, the cupcakes will lose leavening power waiting for the oven to preheat and the finished cupcakes will not rise like they should.
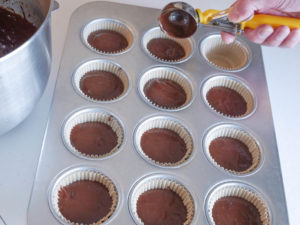
- If you fill the liners too full, the cupcakes will overflow. Filling too full also results in crisp mushroom tops and sinking in the center. Fill the liners 2/3’s to 3/4’s full. We use a level scoop using the number 20 portion scoop which is often identified by the color yellow. This ensures we don’t overfill the muffin pan and each cupcake is uniform in size.
Let’s Get Started
First of all, this recipe is a modification of Catherine Ruehle’s chocolate cake. For the cupcake batter, combine flour, sugar, cocoa powder, baking powder, baking soda, xanthan gum (if not already in gluten-free flour blend), and salt. Whisk to combine.
In a medium bowl, lightly whisk together flax eggs, alternative milk, oil, and vanilla. Add to the flour mixture and mix on low for 30 seconds. Scrape down bowl with a rubber spatula, and mix on medium-low for 1 minute. Pour in coffee and mix on low for 30 seconds. Scrape down sides and bottom and mix again on medium-low for 30 seconds more, until smooth.
Coffee In My Chocolate Cake?
If you bake chocolate cake or cupcakes often, you may have seen recipes that call for coffee. Coffee is a great way to enhance the flavor of cocoa powder, resulting in a more chocolaty cake, not a coffee-flavored one.
Fill the cupcake liners 2/3’s to 3/4’s full. Bake in an oven preheated to 350°F for about 30 minutes, or until a toothpick inserted into the center of a cupcake comes out clean.
Cooling
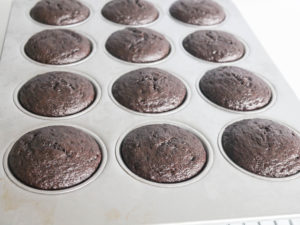
When cupcakes are finished baking, remove pan from oven and place on a wire rack to cool for 10 minutes. Condensation may collect on the bottom of the cupcakes if left in the pan for too long, which will result in cupcakes with soggy bottoms.
Carefully remove the cupcakes from the pan and set on wire rack to finish cooling. It is normal that allergy-friendly cupcakes are more fragile than their wheat counterpart.
Once the cupcakes are completely cooled, they can be refrigerated or frozen. We made ours a day ahead and stored them in the fridge until we were ready to frost them.
Simple Buttercream
A quick version is made by whipping vegan butter with confectioners’ sugar, a little vanilla, and pureed strawberries. It’s that simple.
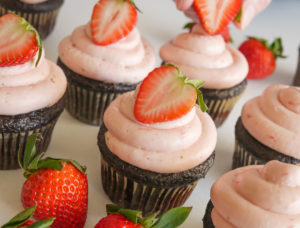
To decorate, trim the bottom of a piping bag and insert an open round tip. For easy filling, put the bag into a tall jar. Fold the bag down around the container and fill bag with buttercream not more than 2/3 full. Push the filling down into the tip to eliminate air pockets.
Start on one of the edges of the cupcake and pipe the icing around and hug the outside of the cupcake. When the buttercream meets, pull it in and go three rotations, bringing the buttercream to the center. When the cupcake is covered, pull up.
Decorate the cupcakes using your favorite method. There are so many different decorating tips that make fun finishes for cupcakes.
Chef Mary’s Tip About Cocoa Powder
Cocoa powder is available in two forms, non-alkalized (or natural) and alkalized (or Dutch process).
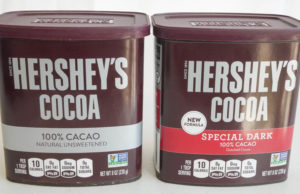
Non-Alkalized, aka Natural Cocoa is untreated cocoa powder that has a more acidic taste. If baking soda is called for in a recipe, use natural cocoa powder as the recipe relies on the acidity of natural cocoa powder to react with baking soda in order to leaven (expansion or rising of the batter).
Alkalized, aka Dutch Process is cocoa treated with an alkali to neutralize its acids. It does not react with baking soda alone. Dutch process cocoa is darker than natural cocoa, but has a mellower flavor.
Recipes should specify natural or Dutch process cocoa. The two cocoa powders are not interchangeable in batter-based desserts. For these delicious cupcakes we used Hershey’s natural, non-alkalized cocoa powder.
The Crumb
Check out the amazing crumb, aka the interior of the cupcakes.
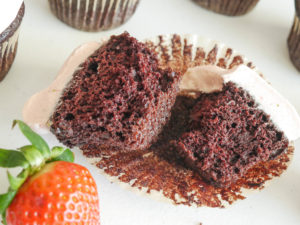
We really minimize our sweets and sugar intake. But for those times of celebration or when we just need a cupcake, these will be our go-to cupcakes. We hope you enjoy them as much as we do!
Your Allergy Chefs are participants in the Amazon Associates Program, an affiliate advertising program designed to provide a means for sites to earn advertising fees by advertising and linking to Amazon.
Chocolate Cupcakes with Strawberry Frosting
Yield 12 Standard Cupcakes
Free of: gluten and top 8 allergens.
The best moist and fudgy chocolate cupcakes!
Ingredients
Cupcake Batter
4 tbsp lukewarm water
4 tsp flaxseed meal
1-1/4 cups gluten-free all-purpose flour
1-1/4 cups cane sugar
2/3 cup natural (non-alkalized) cocoa powder
1 tsp baking powder
1 tsp baking soda
1/2 tsp xanthan gum (omit if using flour blend that contains xanthan gum)
1/2 tsp sea salt
2/3 cup alternative milk, such as unsweetened hemp milk
1/3 cup melted and cooled coconut oil
1-1/2 tsp pure vanilla extract
1/2 cup hot coffee
Buttercream
1/2 cup vegan butter, such as Earth Balance Soy-Free Buttery Sticks
1/2 tsp pure vanilla extract
4 cups confectioners’ sugar, sifted (see recipe notes)
3-4 tbsp strawberry puree (see recipe notes)
Instructions
- For the batter, position an oven rack in the top third of the oven, just above the middle rack. Preheat the oven to 350-degrees F. Line a 12-cavity, standard cupcake pan with paper liners or lightly grease cavities. Set aside.
- Make the flax eggs by whisking together the water and flaxseed meal in a medium bowl. Set aside for 5 minutes.
- In the bowl of a stand mixer, add the flour and sugar. Sift the cocoa powder, baking powder, baking soda, and xanthan gum into the bowl. Add the salt and whisk the dry ingredients together.
- Return to the flaxseed eggs and whisk vigorously. To the flax eggs add milk, coconut oil, and vanilla. Whisk lightly to combine.
- Add the flax egg mixture to the flour mixture and mix on low for 30 seconds. Scrape down the bowl with a rubber spatula, and mix on medium-low for 1 minute. Pour the coffee into the batter and carefully mix on low for 30 seconds, being careful the coffee doesn’t splash out. Scrape down sides and bottom of bowl and mix on medium-low for another 30 seconds until smooth.
- Portion the batter into the muffin liners, filling no more than 2/3’s to 3/4’s full. We like to use a #20 yellow portion scoop. Overfilling will result in crisp mushroom tops and sinking in the center.
- Bake in the top third of the oven for about 30 minutes, or until a toothpick inserted in the center comes out clean. Remove the pan and place on a wire rack to cool for 10 minutes. After 10 minutes, carefully remove the cupcakes from the pan and place on the wire rack to cool completely. It is normal for allergy-friendly cupcakes to be more fragile than their wheat counterparts.
- When completely cool, the cupcakes are best stored in the fridge for up to 2 days before decorating. The cupcakes can also be wrapped and stored in the freezer for up to 3 months.
- For the buttercream, place the vegan butter and vanilla in the bowl of an electric stand mixer fitted with the paddle attachment. Beat on low to blend. Increase the speed and beat until the mixture is creamy and light, 2-3 minutes, scraping down the sides of the bowl from time to time.
- Lower the speed and begin adding the confectioners’ sugar, 1/2 cup at a time, increasing to medium-high after each addition. Once the mixture gets dry, add 1 tablespoon of strawberry puree. Continue to add remaining sugar, 1/2 cup at a time and strawberry puree, beating for about 3-4 minutes. Add just enough puree to reach a buttercream of a consistency you desire.
- The buttercream is ready to use. Store, airtight, at room temperature until ready to decorate (see recipe notes). The buttercream yields 2 cups.
- For a plain buttercream, replace the strawberry puree with an alternative milk. To color plain buttercream, a variety of commercially-prepared natural, vegetable-based colors are available. Some are liquid and some are powdered. Natural colors are not as vibrant as the chemical-laden, artificial colors.
Notes
Sifting Confectioners’ Sugar
- Sifting the sugar prevents the buttercream from being grainy. Organic confectioners’ sugar is coarser than conventional confectioners’ sugar and should be sifted twice.
Strawberry Puree
- To make the strawberry puree for the buttercream, rinse and core 4-6 strawberries. Place in a blender or food processor and blend until you have a puree, about 30 seconds. If you don’t want seeds in your buttercream, put the puree through a metal sieve.
Decorating
- To decorate, trim the bottom of a piping bag and insert an open round tip. For easy filling, put the bag into a tall jar. Fold the bag down around the container and fill bag with buttercream not more than 2/3 full. Push the filling down into the tip to eliminate air pockets.
- Start on one of the edges of the cupcake and pipe the icing around, hugging the outside of the cupcake. When the buttercream meets, pull it in and pipe three rotations, bringing the buttercream to the center. When the cupcake is covered, pull up.
This cupcake batter is a modification of Catherine Ruehle’s Chocolate Cake.
Courses Sweets
The post Chocolate Cupcakes with Strawberry Frosting appeared first on Your Allergy Chefs.
]]>The post Salted Chocolate Popcorn appeared first on Your Allergy Chefs.
]]>
free from gluten and the top 8 food allergens
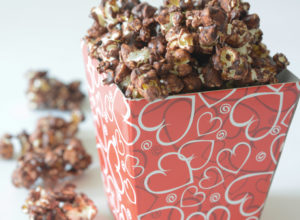
Kick up your Valentine’s Day with salted chocolate popcorn made with just 3 ingredients.
Compared to most snack foods, popcorn is low in calories. Besides, what’s not to love? Chocolate and popcorn. Bliss in a bowl.
We recently developed videos with recipes for the American Kidney Fund, the leading U.S. non-profit organization working on behalf of the 30 million Americans with kidney disease. One of the recipes for the snack video was sriracha popcorn. Read more for the recipe and links to Chef Joel’s videos.
Choose and Pop Your Popcorn Wisely
In general, microwave popcorn often contains a lot of salt with artificial flavorings. The Environmental Working Group, a nonprofit that advocates for human and environmental health, found other chemicals inside microwave popcorn bags that are potential carcinogens (AKA cancer-causing agents).
Cooking your popcorn on the stove in oil is better than using microwave bags, but still allows for some issues, because the burning oil can create chemical compounds that potentially can cause oxidative damage to cells.
The best option for popping popcorn is using an electric air popper, which requires no oil. You’ll get perfectly fluffy popcorn, minus the chemicals, preservatives, and excess salt. And the best part is you can find electric air poppers on Amazon for under $30.00.
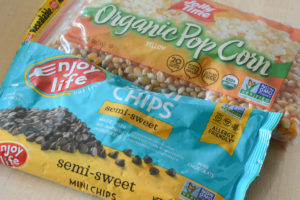
simple ingredients for salted chocolate popcorn
You’re gonna love this quick and easy gourmet salted chocolate popcorn!
Pop 1/2 cup of organic popcorn kernels. This will yield about 12 cups of popped popcorn. Place in a large bowl and set aside.
Did you know?
It’s estimated that 90 percent of corn grown in the United States is from genetically modified seed. Fortunately, there are plenty of non-GMO popcorn options available. Any certified organic popcorn will be non-GMO.
Melt 6 ounces of chocolate chips or finely chopped chocolate in a double boiler, stirring occasionally. We love Enjoy Life semi-sweet mini chips that are free from the top 8 allergens, but not free from flavor.
Remove the melted chocolate from the heat and immediately pour over the popcorn, stirring to coat as thoroughly as possible. We like to wear disposable food grade vinyl gloves, tossing with our hands.
Spread evenly onto a baking sheet lined with parchment paper. Sprinkle with a little sea salt. Let sit at room temperature until the chocolate has hardened and set, about an hour.

salted chocolate popcorn
This keeps for up to 3 days in an airtight container, if it lasts that long!
Videos
Check out Chef Joel’s videos with step-by-step recipes for healthy, kidney-friendly foods. The categories are international dishes with a flair, chicken entrees, and low phosphorus snacks.
Included in the low phosphorus snacks is sriracha popcorn.

sriracha popcorn
Salted Chocolate Popcorn
Yield 3 Quarts
Free of: gluten and top 8 allergens.
Kick up your movie night with salted chocolate popcorn!
Ingredients
1/2 cup organic popcorn kernels
6 ounces allergy-friendly chocolate chips, such as Enjoy Life Mini Chips (1 cup)
1/2 tsp sea salt
Instructions
- Pop popcorn kernels according to manufacturer’s instructions. The healthiest option is popping in an electric air popper. You should have about 12 cups of popped popcorn. Place in a large bowl and set aside.
-
Fill a saucepan with a couple inches of water and bring to a boil. Place chocolate in a bowl; the bowl of chocolate should not be in direct contact with the water. Once you place the bowl on the saucepan, lower the heat so the water is gently simmering. Melt the chocolate, stirring occasionally.
- Remove the melted chocolate from heat. Wipe the bottom of the bowl to dry any condensation. Immediately pour over the popcorn and stir to coat as thoroughly as possible. We like to wear disposable food grade vinyl gloves, tossing with our hands.
- Spread evenly onto a baking sheet lined with parchment paper. Sprinkle with a little sea salt. Let sit at room temperature until the chocolate has hardened and set, about an hour.
- This keeps for up to 3 days in an airtight container.
Courses Sweets
The post Salted Chocolate Popcorn appeared first on Your Allergy Chefs.
]]>